Have you ever received an order confirmation email from Apple? Sleek, well-designed, and professional, right? Every detail makes you feel valued as a customer.
Now, think about the generic, plain-text order emails you’ve gotten from other stores. No logo, no personal touch—just plain text. Not quite the same impact, is it?
I realized I wanted my WooCommerce emails to be just as impressive as Apple’s. I wanted them to reflect the same level of care, engage my customers, and reinforce my brand identity.
In this blog, I’ll show you how I personalized my WooCommerce email templates to achieve a polished, professional look. By the end, you’ll learn how to customize WooCommerce order emails, write compelling copy, and add personal touches that leave a lasting impression.
Why Customize WooCommerce Order Emails?
Customizing order emails enhances brand consistency, improves customer engagement, and allows you to include personalized information that default WooCommerce emails lack.
Is coding not your forte?
Don’t worry. Schedule a free consultation with our WooCommerce customisation experts to get personalized guidance on customizing your WooCommerce emails effortlessly.
Table of Contents
- No Code Needed: Simple WooCommerce Emails Customization
- Preparing for Advanced Customization
- When Do You Need Advanced Customization
- Steps to Create Custom Email Templates
- Steps to Customise Specific Parts of the Email
- Steps to Add Custom Content with Hooks and Filters
- Wrapping Up
Methods to Customize WooCommerce Emails:
- WooCommerce Emails Customization
- Advanced Customization
- Editing WooCommerce Email Template Files
- Using WooCommerce Email Customizer Plugins
No Code Needed: Simple WooCommerce Emails Customization:
When I started customizing my order emails in WooCommerce, I was daunted by the idea that a lot of coding might be involved. But I was in luck—WooCommerce offers some basic customization options that don’t require any coding. Let me walk you through those.
How to Customize Your WooComerce Emails – Navigating to Email Settings
First, navigate to WooCommerce -> Settings -> Emails. Here, you’ll see a list of all the email types WooCommerce sends. Click on the email type you want to customize, like “New Order” or “Completed Order.”
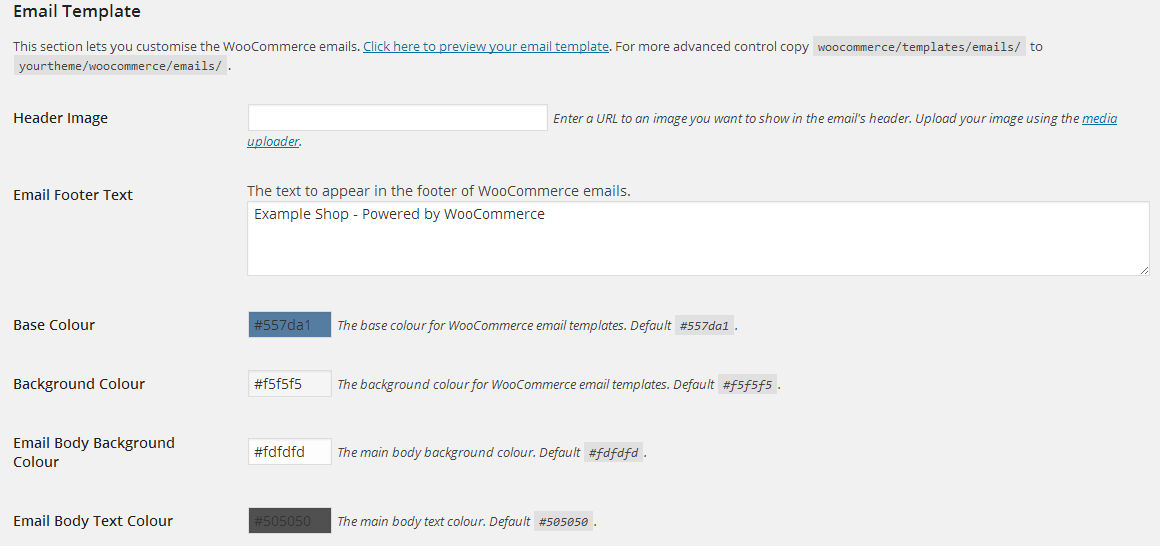
Adding Your Logo
One of the easiest changes is adding your logo to the email header. Simply upload your logo under Email Options. This small change instantly makes your emails look more professional and branded.
Adjusting Colors
Next, adjust the colors to match your brand. Under the same Email Options, you can change the header text color, body background color, and footer text color. Pick colors that align with your brand’s palette for a consistent look.
Editing the Footer Text
Lastly, you can edit the footer text. Scroll down to the Email Options section and add your custom message. This could be a thank you note, customer support contact, or social media links.
These basic changes help your emails stand out and provide a cohesive brand experience without any coding required.
Preparing for Advanced Order Conformation Emails Customization
While the basic customization options are great for adding a personal touch, sometimes you need to go a step further.
Say someone places an order for a new iPhone, and Apple sends out a highly personalized email. This email doesn’t just have the logo and colors; it includes specific layout changes, detailed order information, and promotional content related to their purchase. To achieve this level of customization, you’ll need to get handy with advanced customization.
Tools You’ll Need
To get started with advanced customization, you’ll need a few tools:
- Text Editor: A good text editor like Sublime Text or Visual Studio Code.
- FTP Client: An FTP client like FileZilla to access your site’s files.
- WooCommerce Documentation: Keep the WooCommerce documentation handy for reference.
Creating a Child Theme
To ensure your changes aren’t lost during updates, you’ll need to create a child theme. This allows you to override the parent theme’s files with your custom templates.
Steps to Create a Child Theme:
- Create a New Folder: In your WordPress themes directory, create a new folder for your child theme. Name it something like your-theme-child.
- Create a Stylesheet: Inside your new folder, create a style.css file. Add the necessary header information, linking it to your parent theme.
- Create a Functions File: Create a functions.php file in the same folder. Use this file to enqueue the parent and child theme styles.
- Activate the Child Theme: Go to your WordPress dashboard and activate your new child theme.
Note: Activating a child theme may change your site’s styling, menu, and some other segments like sidebars and widgets. These elements can be adjusted in your theme settings to match your desired layout and design. For more detailed instructions on creating a child theme, check out our blog on The Ultimate Guide to WordPress Child Themes.
When do you need advanced customization?
When you want to take your WooCommerce email customizations to the next level, there are several key use cases to consider. Each of these use cases involves different steps and techniques. We’ll cover them one by one, step by step.
Creating Custom Email Templates
Do you need to change the header or add personalized elements like your logo? Then you’ll need to create custom email templates. This involves overriding and editing the default WooCommerce email templates.
Customizing Specific Parts of the Email
Need to add custom text to the footer or modify other specific components of the email layout? You can customize specific parts of the email, such as the header, footer, and body, by editing the appropriate template files.
Adding Custom Content with Hooks and Filters
Want to insert additional content like custom order notes or promotional banners? You can use WooCommerce hooks and filters to add or modify content without changing the core files.
Steps to Create Custom WooCommerce Email Templates
I wanted to make my WooCommerce email templates look more professional by adding my logo and changing the header text. Here’s how I went about it.
Step 1: Identify the Email Template to Override
WooCommerce sends out various emails such as order creation, completion, payment invoices, and order updates. I started by going to WooCommerce -> Settings -> Emails and selecting the “Processing Order” email to customize.
Step 2: Locate the Template File
Each email type has a specific template file. For the “Processing Order” email, the template used is customer-processing-order.php. I found the template files in the WooCommerce plugin directory:
wp-content/plugins/woocommerce/templates/emails/
Step 3: Copy the Template to My Theme
To customize the template, I needed to copy it to my theme’s directory. This allows me to override the template without modifying the core WooCommerce files.
- Create Directory Structure: I created the necessary directories in my theme:
wp-content/themes/your-theme/woocommerce/emails/ - Copy the File: I then copied the template file from the WooCommerce plugin directory to my theme’s directory:
wp-content/plugins/woocommerce/templates/emails/customer-processing-order.php
to
wp-content/themes/your-theme/woocommerce/emails/customer-processing-order.php
Step 4: Edit the Template File
Now that the template file was in my theme’s directory, I could edit it to make the desired changes.
- Adding My Logo and Changing the Header Text:
- I opened email-header.php in my text editor. This header template is located at:
wp-content/themes/your-theme/woocommerce/emails/email-header.php
- I opened email-header.php in my text editor. This header template is located at:
- To add my logo, I located the HTML <img> tag in email-header.php and replaced it with my logo URL:
<img src="<?php echo esc_url( get_template_directory_uri() . '/images/your-logo.png' ); ?>" alt="Your Logo">- I then changed the header text to include a personalized greeting by editing the following line:
<h1><?php _e( 'Thank you for your order!', 'woocommerce' ); ?></h1>Step 5: Save and Test the Changes
After making these changes, I saved the modified template file back to my theme’s directory. To ensure everything looked right, I placed a test order to see the changes in action. The new order email now included my logo and a custom header, making it look much more professional and aligned with my brand.
If you’re looking to include more specific customer information in order emails, you might find this guide on adding custom data to WooCommerce orders useful.
Steps to Customize Specific Parts of the Email
I wanted to add custom text to the footer and include order notes in my WooCommerce order emails. Let me take you through the steps.
Step 1: Identify the Email Template to Customize
WooCommerce sends out emails for various actions, like order creation, completion, payment invoices, and updates. I decided to customize the “Completed Order” email.
Step 2: Locate the Template Files
Every part of the email is managed by a different template file. For example, the footer is managed by email-footer.php, and the body content for the completed order is managed by customer-completed-order.php. I found these template files in the WooCommerce plugin directory:
wp-content/plugins/woocommerce/templates/emails/
Step 3: Copy the Template Files to My Theme
To customize specific parts of the email, I needed to copy the relevant template files to my theme’s directory. This allows me to make changes without affecting the core WooCommerce files.
- Create Directory Structure: I created the necessary directories in my theme:
wp-content/themes/your-theme/woocommerce/emails/
Since these directories did not exist, I created them.
- Copy the Files: I then copied the template files from the WooCommerce plugin directory to my theme’s directory. For example:
wp-content/plugins/woocommerce/templates/emails/email-footer.php
to
wp-content/themes/your-theme/woocommerce/emails/email-footer.php
Similarly, for the body content:
wp-content/plugins/woocommerce/templates/emails/customer-completed-order.php
to
wp-content/themes/your-theme/woocommerce/emails/customer-completed-order.php
Step 4: Edit the Template Files
With the template files in my theme’s directory, I could now edit them to make the desired changes.
- Customizing the Footer
I opened email-footer.php in my text editor. This footer template is located at:
wp-content/themes/your-theme/woocommerce/emails/email-footer.php
To change the footer text color and add a personal message, I edited the following
$credit = "
    border: 0;
    color: black;
    font-family: Arial;
    font-size: 12px;
    line-height: 125%;
    text-align: center;
";
2. Adding Order Notes
I opened customer-completed-order.php in my text editor. This file is located at:
wp-content/themes/your-theme/woocommerce/emails/customer-completed-order.php
To add order notes to the completed order email, I added the following code:
<h2><?php _e( 'Order Notes', 'woocommerce' ); ?></h2>
<?php
$args = array(
    'status' => 'approve',
    'post_id' => $order->id
);
$comments = get_comments($args);
foreach($comments as $comment) :
    echo $comment->comment_content . '<br />';
endforeach;
?>
I placed this code where I wanted the order notes to appear, after the order details and before customer details.
Step 5: Save and Test the Changes
After making these changes, I saved the modified template files back to my theme’s directory. To ensure everything looked right, I placed a test order to see the changes in action.
To enhance customer communication, you can also enable a subscribe to email notifications option in WooCommerce to keep users updated.
Using WooCommerce Email Customizer Plugins:
Customize emails effortlessly with powerful plugins.
- Email Customizer for WooCommerce
- Kadence WooCommerce Email Designer
- YITH WooCommerce Email Templates
These plugins offer drag-and-drop customization, real-time previews, and dynamic content insertion.
Steps to Add Custom Content with Hooks and Filters
I wanted to have more control over the content sent in my WooCommerce order emails by adding additional details like the shipping method chosen by the customer. To do this, I used WooCommerce hooks and filters. Here’s how I went about it.
Step 1: Understand the Need for Hooks and Filters
For more control over the content in the email, you need to delve into actions and filters provided by WooCommerce. These hooks allow you to add custom content at specific points in the email.
Step 2: Choose the Appropriate Hook
In my case, I wanted to add the shipping method chosen by the customer. WooCommerce provides hooks like woocommerce_email_after_order_table and woocommerce_email_before_order_table to add content around the order table in the email.
Step 3: Add Custom Function Using the Hook
I decided to use the woocommerce_email_after_order_table hook to add the shipping method details. Here’s the custom function I added:
- Open Your Theme’s Functions File: I opened the functions.php file in my theme’s directory:
wp-content/themes/your-theme/functions.php
- Add the Custom Function: I added the following code to the functions.php file:
add_action( 'woocommerce_email_after_order_table',
'wdm_add_shipping_method_to_order_email', 10, 2 );
function wdm_add_shipping_method_to_order_email( $order, $is_admin_email ) {
    echo '<p><h4>Shipping:</h4> ' . $order->get_shipping_method() . '</p>';
}
Step 4: Save and Test the Changes
After adding the custom function, I saved the functions.php file. To ensure the new content appeared correctly, I placed a test order and checked the order email.
Wrapping Up
Customizing WooCommerce order emails can make a huge difference in how your customers perceive your brand. From creating custom templates and tweaking specific parts to adding personalized content with hooks and filters, these steps make your emails look professional and engaging.
If you’re new to WooCommerce, check out our complete guide to setting up and using WooCommerce on WordPress to get started.
Need some help?
Schedule a free consultation with our WooCommerce customization experts to get personalized guidance on making your WooCommerce emails stand out.