React is one of the most popular JavaScript libraries in the wild today and for good reason. With the backing of a giant like Facebook, the effort was bound to go far, even with the initial skepticism with which it was met.
The use of React has skyrocketed over time, and React Native is its next iteration. React Native aims to allow developers to build React applications that run natively on iOS and Android devices.
With this post, I am going to cover some basics about React and how to start structuring and styling in React Native.
There are no prerequisites other than basic Javascript, HTML and React skills. Knowing what “closures” are and how “this” works in JavaScript will help but you’ll learn React Native regardless. :)
So warm up your fingers and get your keyboard ready for this fun ride!
Getting Started
For anyone who is unfamiliar with React Native, the documentation has an excellent Getting Started page to help you get started with React.
Now, let’s create a basic React project with a create-react-native-app (the official getting started page to setup React Native on your site).
After you have successfully finished the installation steps, have a look at the project directory:
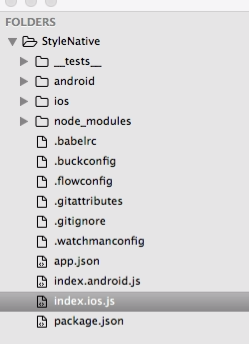
One great thing about React Native is that you can write both Android and iOS applications together with a majority of JavaScript code shared between them. Inside the newly created folder, you will find two files: “index.android.js” and “index.ios.js”. If you are building an iOS app you’ll work with index.ios.js and for an Android app, you would work with index.android.js.
Since we’re building an iOS app, let’s get rid of the “index.android.js” file and the android folder altogether, just for the sake of this tutorial and to keep things clean.
The first file that executes when the app starts is “index.ios.js”. Head on over to the ios folder and open the xcode project inside. Then hit the run button to run your project in the xcode emulator.
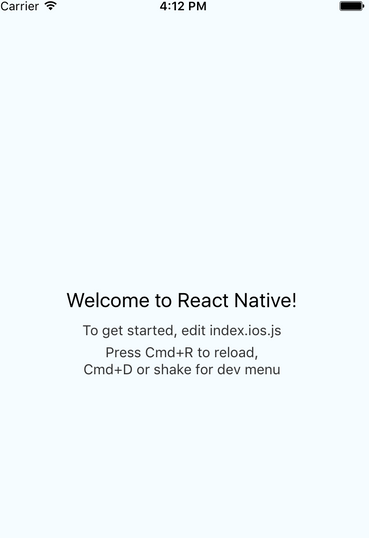
Presto! Your iPhone emulator is now up and running, with your very own React Native app locked and loaded!
Once done, you should see the following output in the emulator:

For this tutorial, I am using the iPhone 6 emulator and the following is the screenshot of the initial app landing screen.
 Now you can open up “index.ios.js” in your IDE and play around with editing the text and watch it change instantly.
With this, we have completed our very first section.
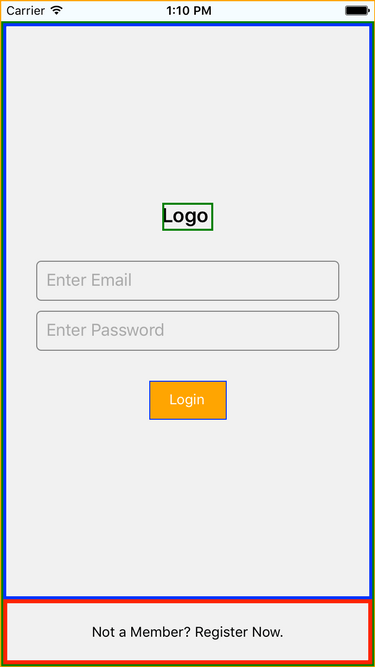
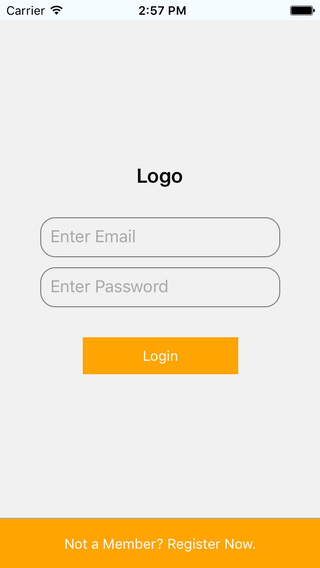
The final tutorial mockup:
This is the desired result of the view that we want to create with this tutorial.

This mockup can be achieved through the following steps:
Step 1: Splitting the page into containers
It is a recommended practice to have a rough visual representation of what you are about to build. React is built around containers; everything you see on the page is a part of a container. Before we start coding, it’s a good idea to analyze the mockup.
From the above diagram, we can fish out our presentation containers:
- Screen container
- Login container
- Logo
- password
- Register container
- Register button
- Login container
Here, we will also need a method for _userLogin, which will POST the request to /sessions/create with the username and password.
Components are the heart and soul of React native and they have one requirement: they must implement render, a function that tells the component what to render. ( I honestly couldn’t think of another word. :D)
Edit the render method in the index.ios.js file (for iOS users) and add the sections analyzed accordingly.
Add the style class to each section in the following manner:
<View style={styles.YourSectionClassName}>
Before we start structuring in the render method, the first thing we need to do is to add a constructor. Inside the constructor, we will initialize our state variables.
Step 2: Initialize the state in the constructor inside the component class
constructor(props) {
    super(props);

    this.state = {
    };
  }
Add _onpressButton method below the constructor
_onPressButton(){
    console.log('login pressed');
  }
We are going to build our login form using TextInputs (inputs) and TouchableHighlights (button-like components, which convert a single child into a clickable element).
The structure inside the render function should look as follows:
Make sure all the components used in the render are imported from the React Native library on top of the file. In this case, I am using the following components from the library
- View
- Text
- Textinput
- TouchableHightlight
Import these modules as follows:
Add the following on top of the index page
import React, { Component } from 'react';
import {
  AppRegistry, //register the app
  StyleSheet, // stylesheet component for the app
  Text,
  TextInput,
  TouchableHighlight,

} from 'react-native';
Viewstyle={styles.YourSectionClassName} will add all the custom styles to your component.
You will find the constant styles by default in the index file.
const styles = StyleSheet.create({
	...
});
When you style the section make sure that you add the border to each section so that we can check the height, width, and placement of each section and how it is being displayed in the emulator.
YourSectionClassName:{
	borderWidth:1,
    	borderColor:"YourSectionBorderColor",

// your other styles
...
}
The following is the screenshot of highlighting all sections of the screen with borders:
Once the styling for the sections is done, we can remove the borders wherever it is not needed.
The following is the final style of the login screen component:
After completing all the structuring and styling, The image shown below is the final output:
The following is the final code for the login component:
Congratulations, you’ve just built your first React Native project!
This is just a simple demonstration of how to structure and style a screen in a React Native app development engine. With a little dabble, we can see how React Native can enable developers to create applications that perform nearly identically on Android and iOS devices. If you couple this with React development for the Web, then you will have a fiercely competitive, cross-platform suite, raring to change the world. :)
How did you like our tutorial on React Native? Do let us know in the comment section below!