I work with the WooCommerce plugin and I work on customizing it. I have repeatedly observed on various discussion forums and Q&A forums that ways to add custom data to the WooCommerce order is always a point of contention.
However, these discussions are so specific to a certain step in the process that the entire picture is never made clear to the readers.
So, I am writing this post to help you accomplish your goal in 6 simple steps, and believe me the task is not as daunting as it seems. By the end of the post, I am confident that adding custom data to WooCommerce sessions should not be a hassle for you ever again.
(Heads up: Here I shall be talking about adding custom data to WooCommerce orders before WooCommerce v3.0. For version 3.0 and above, find the solution here!)
To make it easy for you to understand, I will be using a use-case scenario. If you have custom requirements and are not sure about the solution in this post, reach out to here to discuss your requirements for Free. Our Official WooCommerce experts will develop a custom solution for you!
If you’re also interested in managing data across multiple WordPress sites, check out this guide on listing posts from all blogs on WordPress Multisite.
Nevertheless, you can apply the solution for whatever your requirements may be.
So here’s what I had to do.
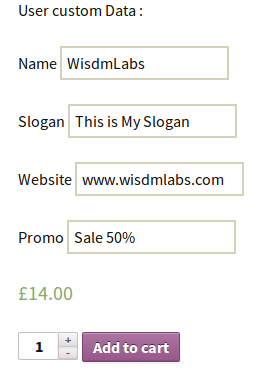
Note: User input was required in a custom video template design site. The user adds this data and then clicks ‘Add to Cart’. This user input should then be displayed on the cart and checkout page. To achieve this objective I had to add the user’s custom data to a WooCommerce session
Table of Contents :
- Benefits of Adding Custom Data to WooCommerce Orders
- Methods to Add Custom Data to WooCommerce Orders
- Adding Custom Data to a WooCommerce Order
- Step 1: Add Data in a Custom Session, on the ‘Add to Cart’ Button Click
- Step 2: Add Custom Data in WooCommerce Session
- Step 3: Extract Custom Data from WooCommerce Session and Insert it into Cart Object
- Step 4: Display User Custom Data on the Cart and Checkout Page
- Step 5: Add Custom Data as Metadata to the Order Items
- Step 6: Remove User Custom Data, if Product is Removed from Cart
- Best Practices for Adding Custom Data to WooCommerce Orders
- Conclusion
Benefits of Adding Custom Data to WooCommerce Orders
Adding custom data to WooCommerce orders isn’t just a technical tweak—it can genuinely make a big difference for both your store and your customers. Here’s how:
- Better Customer Experience: Imagine getting a personalized note or special instructions with your order. It’s those small touches that can make customers feel special and appreciated.
- Smoother Order Management: Adding extra fields like delivery instructions or product customization requests makes it easier for your team to manage orders accurately and quickly.
- Clearer Communication: If a customer leaves special delivery instructions, they’ll go straight to the shipping team, ensuring nothing gets lost in translation.
Useful Insights: Collecting more detailed info about your customers helps you understand their preferences better, leading to smarter business decisions. - Automated Processes: Custom data fields can kickstart automated workflows or emails, like sending gift-wrapping instructions to the packing team, making everything run more smoothly.
Methods to Add Custom Data to WooCommerce Orders
There are several ways to add custom data to WooCommerce orders. Here’s a quick overview:
- Using Plugins: Plugins are the easiest way to add custom data. They often have user-friendly interfaces that let you add extra fields to WooCommerce orders without needing to code.
- Custom Fields in Product Pages: You can add custom fields directly to your WooCommerce product pages. This allows customers to enter their data, which then gets carried over to the order details during checkout.
- Custom Checkout Fields: Adding custom fields to the checkout page is another method. This can be done using WooCommerce hooks and filters to capture additional information from customers when they place an order.
These methods make it simple to incorporate custom data into WooCommerce orders, enhancing the functionality of your store and improving customer experience.
WooCommerce provides built-in options as well as custom code solutions for adding extra fields. The WooCommerce Admin Custom Order Fields documentation provides official guidance on this
Adding Custom Data to a WooCommerce Order Programmatically (Step-by-Step Guide)
Now that we’ve covered why adding custom data is important and the benefits it brings, let’s look at how you can actually implement this in your WooCommerce store. Here are the steps to add custom data to a WooCommerce order:
Step 1: Add Data in a Custom Session, on the ‘Add to Cart’ Button Click
For those of you who have worked with WooCommerce might know that on the click of the ‘Add to Cart’ button, the product page gets refreshed and the user data is lost. Hence, we should add the custom data from our product page to a custom session created using Ajax. This code is invoked before the WooCommerce session is created.
<?php
add_action('wp_ajax_wdm_add_user_custom_data_options', 'wdm_add_user_custom_data_options_callback');
add_action('wp_ajax_nopriv_wdm_add_user_custom_data_options', 'wdm_add_user_custom_data_options_callback');
function wdm_add_user_custom_data_options_callback()
{
      //Custom data - Sent Via AJAX post method
      $product_id = $_POST['id']; //This is product ID
      $user_custom_data_values =  $_POST['user_data']; //This is User custom value sent via AJAX
      session_start();
      $_SESSION['wdm_user_custom_data'] = $user_custom_data_values;
      die();
}
?>
Step 2: Add Custom Data in WooCommerce Session
At this step, the WooCommerce session has been created and is now available for us to add our custom data. We use the following code to add the custom data from the session we have created into the WooCommerce session. At this step, our session is also unsetsince the data in it has been captured and it is not needed anymore.
add_filter('woocommerce_add_cart_item_data','wdm_add_item_data',1,4);
if(!function_exists('wdm_add_item_data'))
{
    function wdm_add_item_data($cart_item_data,$product_id, $variation_id, $quantity )
    {
        /*Here, We are adding item in WooCommerce session with, wdm_user_custom_data_value name*/
        global $woocommerce;
        session_start();
        if (isset($_SESSION['wdm_user_custom_data'])) {
            $option = $_SESSION['wdm_user_custom_data'];
            $new_value = array('wdm_user_custom_data_value' => $option);
        }
        if(empty($option))
            return $cart_item_data;
        else
        {
            if(empty($cart_item_data))
                return $new_value;
            else
                return array_merge($cart_item_data,$new_value);
        }
        unset($_SESSION['wdm_user_custom_data']);
        //Unset our custom session variable, as it is no longer needed.
    }
}
Step 3: Extract Custom Data from WooCommerce Session and Insert it into Cart Object
At this stage, we have default product details along with the custom data in the WooCommerce session. The default data gets added to the cart object owing to the functionality provided by the plugin. However, we need to explicitly extract the custom data from the WooCommerce session and insert it into the cart object. This can be implemented with the following code.
add_filter('woocommerce_get_cart_item_from_session', 'wdm_get_cart_items_from_session', 1, 3 );
if(!function_exists('wdm_get_cart_items_from_session'))
{
    function wdm_get_cart_items_from_session($item,$values,$key)
    {
        if (array_key_exists( 'wdm_user_custom_data_value', $values ) )
        {
        $item['wdm_user_custom_data_value'] = $values['wdm_user_custom_data_value'];
        }
        return $item;
    }
}
Does this feel overwhelming? Let WooCommerce experts help you with a solution quickly. Get In Touch
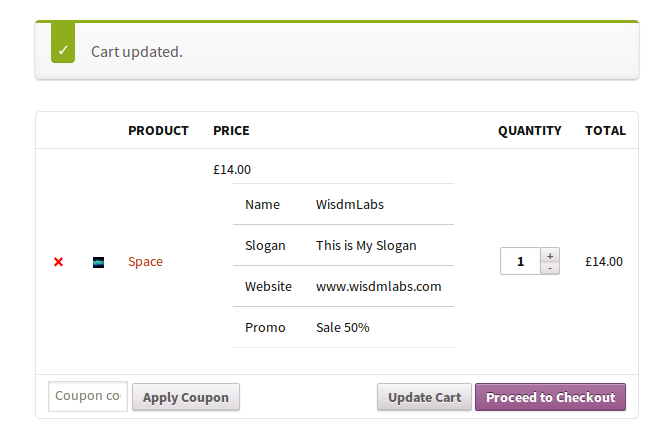
Step 4: Display User Custom Data on the Cart and Checkout page
Now that we have our custom data in the cart object all we need to do now is to display this data in the Cart and the Checkout page. This is how your cart page should look after the custom data has been added from the WooCommerce session to your Cart.
add_filter('woocommerce_checkout_cart_item_quantity','wdm_add_user_custom_option_from_session_into_cart',1,3);
add_filter('woocommerce_cart_item_price','wdm_add_user_custom_option_from_session_into_cart',1,3);
if(!function_exists('wdm_add_user_custom_option_from_session_into_cart'))
{
 function wdm_add_user_custom_option_from_session_into_cart($product_name, $values, $cart_item_key )
    {
        /*code to add custom data on Cart & checkout Page*/
        if(count($values['wdm_user_custom_data_value']) > 0)
        {
            $return_string = $product_name . "</a><dl class='variation'>";
            $return_string .= "<table class='wdm_options_table' id='" . $values['product_id'] . "'>";
            $return_string .= "<tr><td>" . $values['wdm_user_custom_data_value'] . "</td></tr>";
            $return_string .= "</table></dl>";
            return $return_string;
        }
        else
        {
            return $product_name;
        }
    }
}
Step 5: Add Custom Data as Metadata to the Order Items
One more additional step that needs to be done is to add the custom data as metadata to the order items. This metadata will then be displayed in the orders section of WooCommerce for your reference. It will also be used in the confirmation email that is sent to the user after a payment is made. This metadata can be incorporated into the order using the following code.
add_action('woocommerce_add_order_item_meta','wdm_add_values_to_order_item_meta',1,2);
if(!function_exists('wdm_add_values_to_order_item_meta'))
{
  function wdm_add_values_to_order_item_meta($item_id, $values)
  {
        global $woocommerce,$wpdb;
        $user_custom_values = $values['wdm_user_custom_data_value'];
        if(!empty($user_custom_values))
        {
            wc_add_order_item_meta($item_id,'wdm_user_custom_data',$user_custom_values);
        }
  }
}
Step 6: Remove User Custom Data, if Product is Removed from Cart
Beware though! Your work does not end here. Let us assume now that instead of proceeding to the payment section the user deletes an item from the cart…then what? You don’t want the custom data lingering around in your WooCommerce session. So to avoid such a scenario we’ll write some code below to remove the custom data from the WooCommerce session.
add_action('woocommerce_remove_cart_item','wdm_remove_user_custom_data_options_from_cart',1,2);
if(!function_exists('wdm_remove_user_custom_data_options_from_cart'))
{
    function wdm_remove_user_custom_data_options_from_cart($cart_item_key, $WC_Cart)
    {
        global $woocommerce;
        // Get cart
        $cart = $woocommerce->cart->get_cart();
        // For each item in cart, if item is upsell of deleted product, delete it
        foreach( $cart as $key => $values)
        {
        if ( $values['wdm_user_custom_data_value'] == $cart_item_key )
            unset( $woocommerce->cart->cart_contents[ $key ] );
        }
    }
}
?>
Best Practices for Adding Custom Data to WooCommerce Orders

To keep things running smoothly when adding custom data to WooCommerce orders, here are a few key tips:
-
- Keep It Relevant:Only ask for information that you really need. Too much unnecessary data can confuse customers and clutter up your system.
- Use Clear Labels: Make sure WooCommerce custom fields have clear and simple labels. This helps customers know exactly what info you’re asking for and why.
- Validate User Input: Implement checks to ensure the data collected is accurate and in the correct format. This helps avoid errors and reduces the need for manual fixes.
- Secure Data Handling: Always handle custom data securely. Use proper sanitization and validation techniques to protect against security issues.
- Test Thoroughly: Before going live, test your custom data fields to make sure they work correctly across different devices and scenarios.
By following these practices, you’ll make the process smoother for both your customers and your team.
Final Thoughts
Integrating custom data into your WooCommerce store can significantly boost its functionality and the overall customer experience. By following the steps in this guide and keeping best practices in mind, you’ll make order management smoother and more personalized.
If you ever run into any issues or have unique requirements that this guide doesn’t cover, we’re here to help. Our team of WooCommerce experts is ready to provide you with customized woocommerce solutions and support. Don’t hesitate to get in touch with us for any assistance you need.
Note: This code is compatible only with the versions of WooCommerce prior to 3.0. You can find the code for WooCommerce v3.0 and ahead right here!
By implementing these techniques, you can efficiently customize WooCommerce orders. If you also need to fetch and display posts dynamically on your WordPress site, refer to this guide on fetching posts in WordPress.
FAQs
1. Why would I need to add custom data to my WooCommerce store?
Adding custom data personalizes the shopping experience, collects valuable customer info, and improves order management.
2. How can I add custom fields to WooCommerce products?
Use plugins, custom fields on product pages, or add fields to the checkout page to capture additional customer information.
3. Are there any risks associated with adding custom data to WooCommerce?
Yes, there can be conflicts with other plugins, theme compatibility issues, and performance impacts. Follow best practices to minimize these risks.
4. Is there support available for adding custom data to WooCommerce?
Absolutely. Our team of WooCommerce experts can provide customized solutions and support to ensure your store runs smoothly.