The e-Learning industry has been growing rapidly ever since the pandemic hit us. One of the reasons is that creating and selling courses online is an awesome way to start an online business and generate revenue.
Additionally, it’s easy.
You don’t really need a degree to create your first online course and you definitely don’t need to know how to code!
There are so many tools that you can use to create courses quickly and start getting enrollments!
Due to this, the online course market has become quite competitive, especially the WordPress e-learning space, and that’s why people who have a course idea that they believe in want to get started ASAP!
If you operate in the WordPress world then LearnDash is one of the BEST tools out there. So. if you want to know how to launch LearnDash courses right off the bat, then this step-by-step training guide is for you!
So, grab your cup of coffee coz we have some ground to cover and courses to launch! But first, let’s talk about LearnDash a little.
What is LearnDash?

LearnDash is one of the most popular tools that can create a Learning Management System (LMS) out of your WordPress site. It’s a premium WordPress plugin that equips you with the right tool for building courses and providing an engaging learning experience for the user.
From fortune 500 companies, and institutions like John Hopkins University and the University of Michigan, to best-selling authors, entrepreneurs, and numerous other organizations, LearnDash is the most trusted LMS plugin.
It works impressively with most WordPress themes and comes power-packed with features that allow users to build courses on the go. Some key features include:
- Drag and drop builder
- Drip feed lessons
- Group and assignment management
- Integration with third-party plugins
- Advance quizzing, certificates, and badges
- Dynamic course content creation, delivery, and protection
- Discussion forums and support
Why is LearnDash a superior platform to launch courses on the go?

While there are several options like Teachable (which unlike LearnDash is a self-hosted platform), here are some reasons why LearnDash has the edge:
Supports Premade Templates
When short on time, course creators cannot spend crucial hours trying to outline their course content to fit with their website design. LearnDash is compatible with themes like Astra, BuddyBoss, and eLumine which come with ready-made templates so all that’s left to do is replace the demo content with your own!
eLumine even comes with Neo layouts for LearnDash 3.0 where you just need to import the course content to the page and you’re ready to go.
Content Ownership
With other platforms like Teachable, all the data is stored on the main server and you rely on the hosted server for the functioning. Even though it doesn’t own your data, it has access to all the records. And if you want to download extra security extensions, it might not be possible.
Whereas in LearnDash, you can do your own research and install the best security layers as per your choice. Not only do you have full ownership and control of your data at all times but there is also no risk of 3rd parties getting involved.
Customizability and Flexibility
If you plan to scale your online course business and provide engaging course content, then LearnDash gives you more freedom to customize. Since it’s an open-source platform (unlike Teachable), you can configure it as per your requirements by tweaking its code.
Recommended: LearnDash vs Teachable: Which one is better?
Now that we’ve some understanding about LearnDash and why it’s a superior platform, let’s look at what you need to get started.
To use LearnDash you need an up and running WordPress site. For the sake of this guide, we’re not going to go in-depth about setting up WordPress. For a head start, you can refer to this guide here.
Is LearnDash easy to use?
Yes. Part of what makes LearnDash so popular in the e-Learning space is that it has the lowest barrier to entry.
Firstly, setting up LearnDash is easy. You don’t need to be tech-savvy or have any coding experience.
Since it’s a feature-rich LMS, there’s usually a learning curve in understanding what you need and don’t need for your course program. But as easy and helpful as the support guides are, you won’t face a challenge in building your course even if it’s your first time.
So, let’s dive in!
Steps to Create, Sell, and Validate your LearnDash Course in 2 hours
1. Install and Configure LearnDash
If you have already installed and configured the LearnDash plugin, then by all means skip this step. But for those of you who are new to this, let us quickly show you :
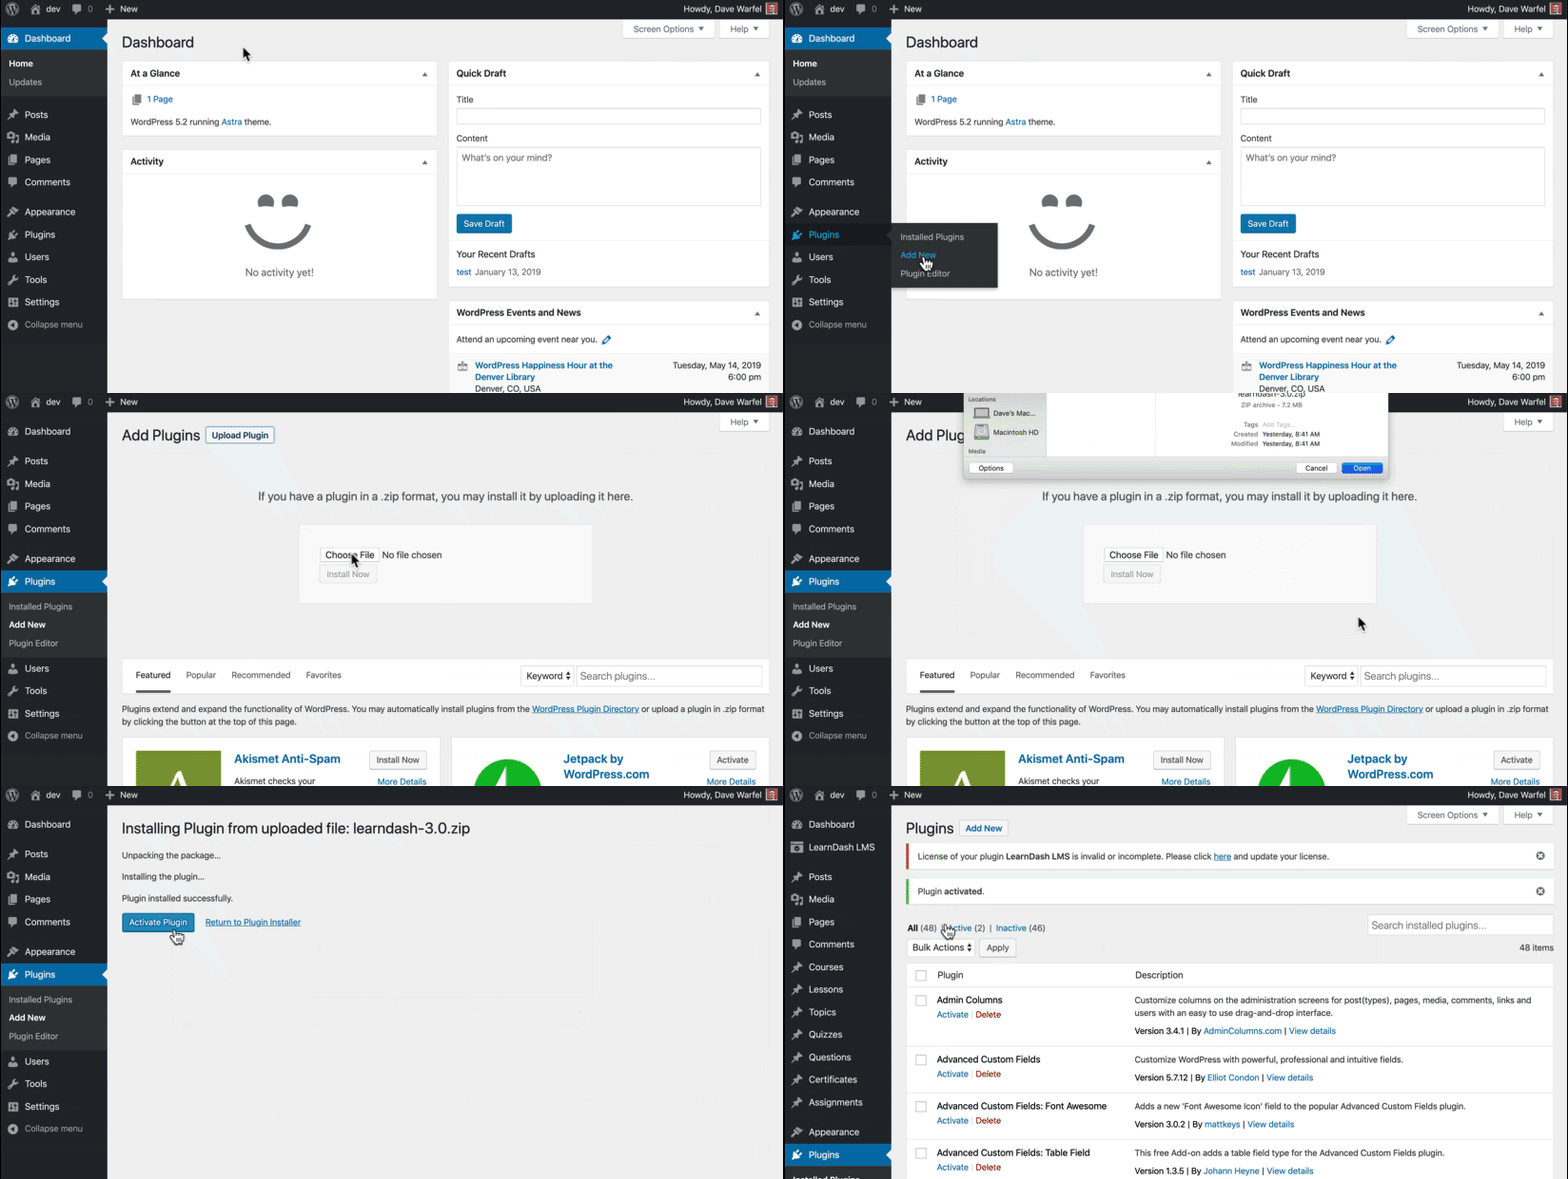
1. From your WordPress admin panel, Navigate to Plugins > Add New
2. Click Upload Plugin.
3. Select the .zip file that you downloaded.
4. Click Install Now and then Activate Plugin.
5. After activating the plugin, you need to activate the license.
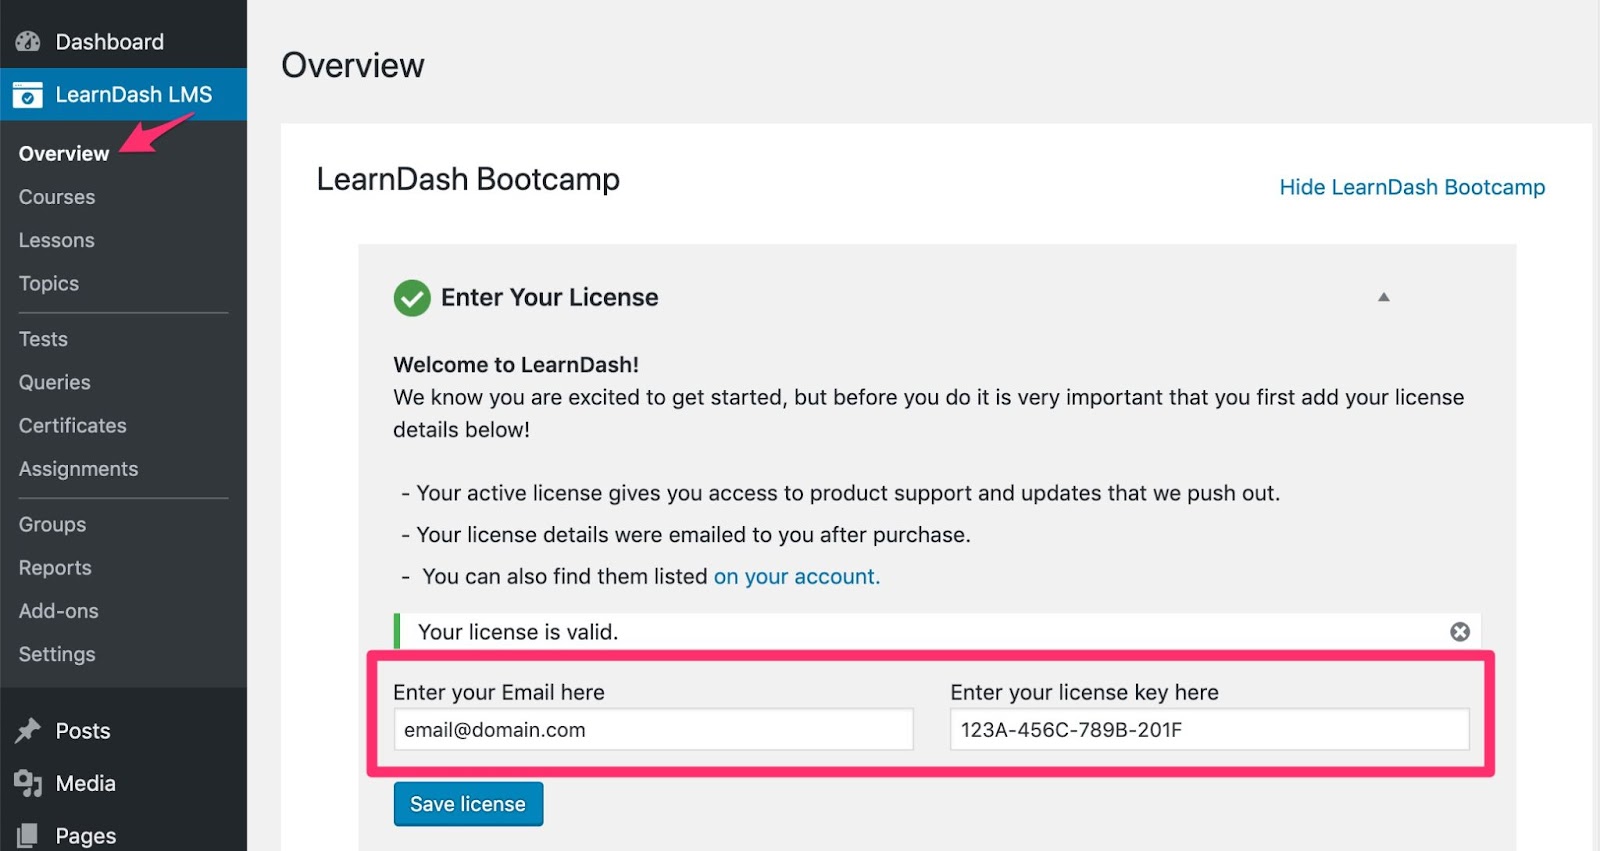
6. Navigate to Learndash LMS > Overview
7. In the LearnDash Bootcamp, enter your email and license key that you received via mail.
8. Click on save license and you’re done!
9. After successful installation, LearnDash applies a set of default settings to your LMS. You can make necessary changes to global settings, custom labels, login/registration settings, etc. depending on your requirements.
10. Access your LearnDash general settings by navigating to LearnDash LMS > Settings in the WordPress admin area.
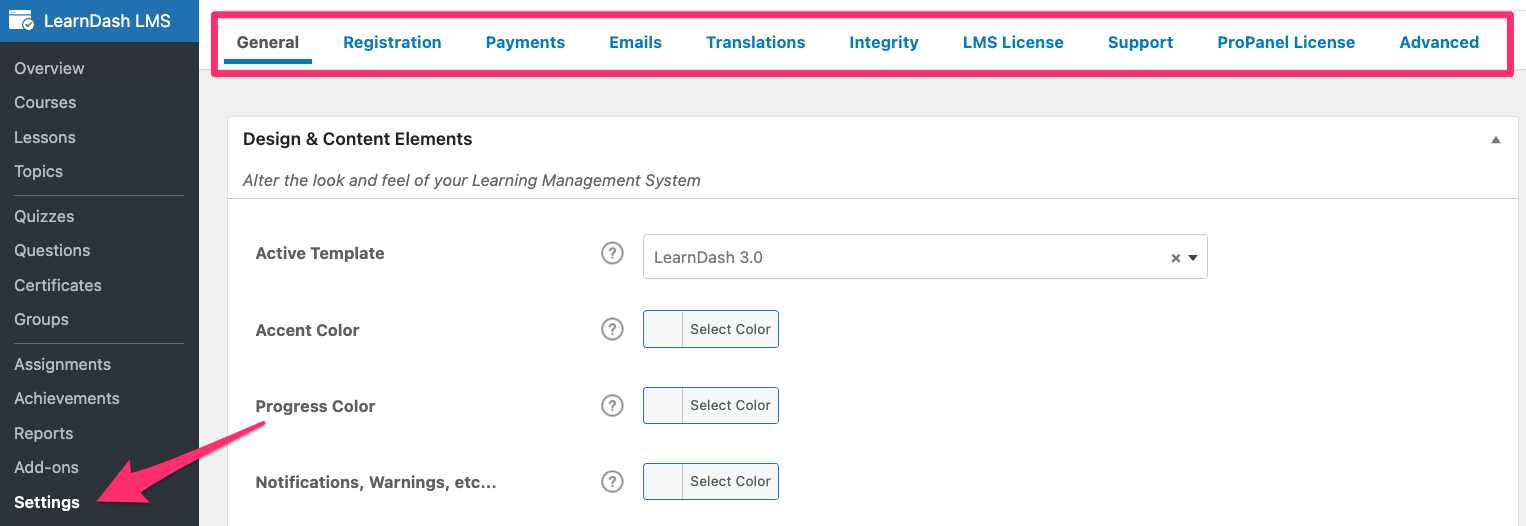
11. You’ll see a navigation menu across the top of the screen. Each tab will take you to different LearnDash settings. The General tab contains the majority of LearnDash’s global settings.
12. Under design and content, you can enable the registration and login setting for your courses.
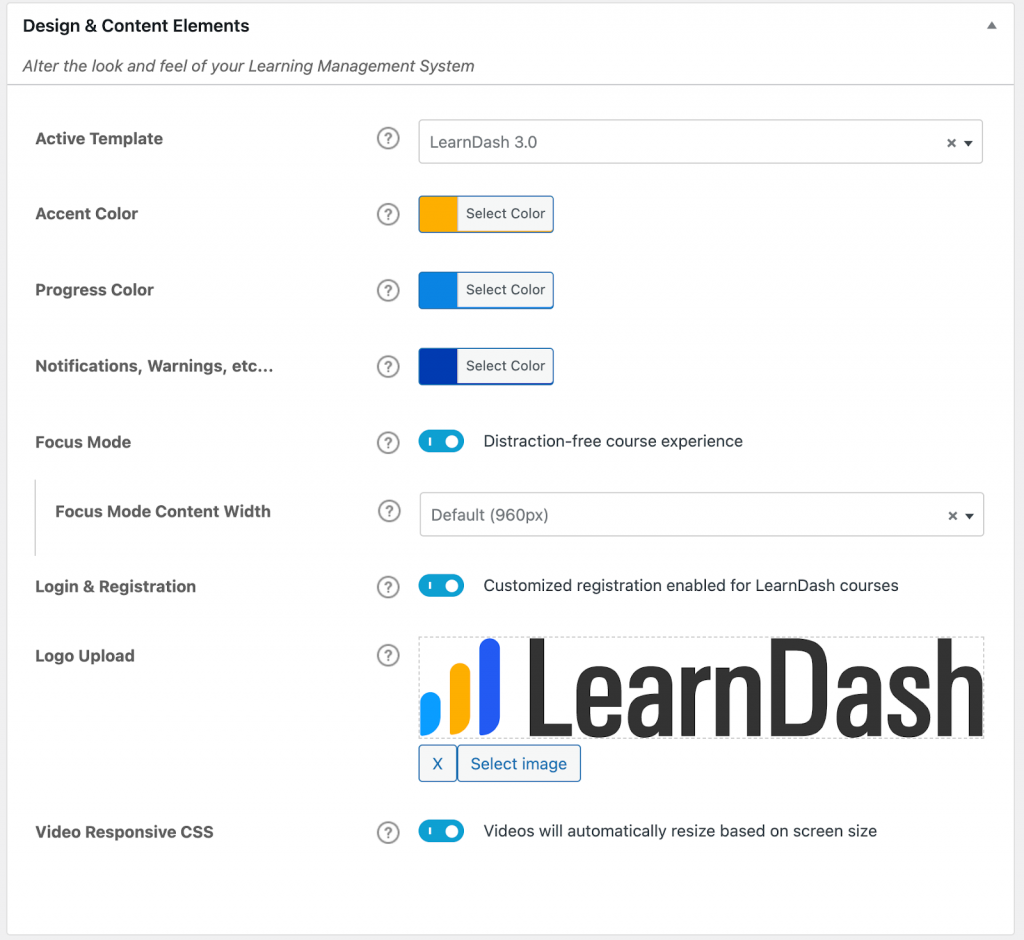
- When the Login & Registration setting is enabled, LearnDash will use a customized registration process.
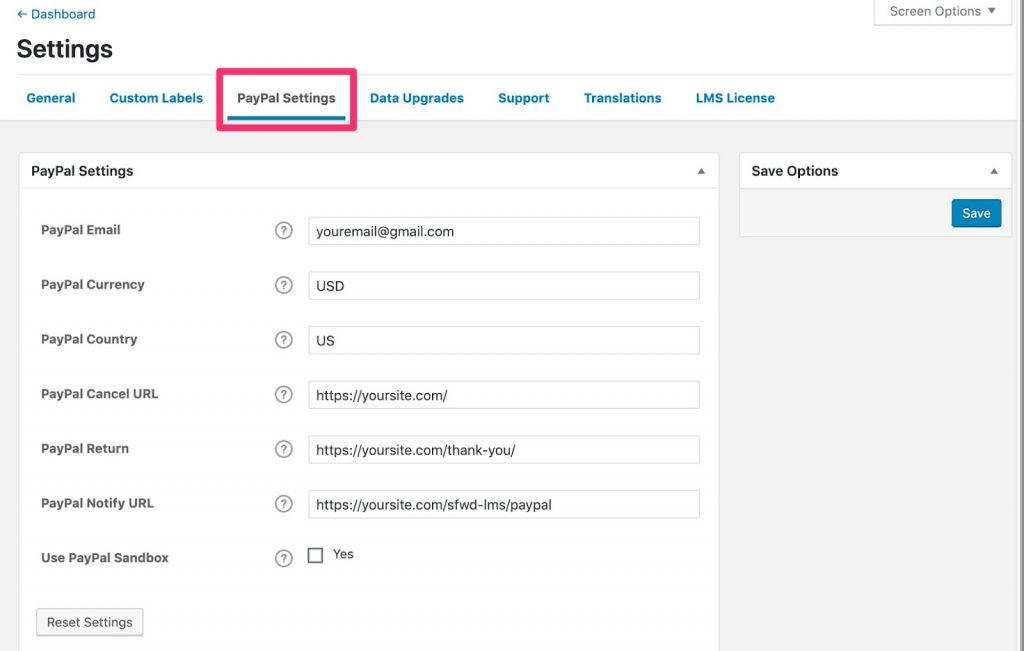
Note: To enable payments, Learndash has a built in integration for Paypal. So, all you need to do is enter your Paypal Id and configure the rest of the Paypal settings in the WordPress admin area.
But if you want to use the LearnDash Stripe Integration which is equally simple to use, then read on.
Now that we’ve set up LearnDash and configured it for the user, it’s time to create the courses!
2. Create a new course in LearnDash
Now, in this training guide, we’re using the drag and drop course builder to create the courses. But before we can do that, we’ll need to add a new course.
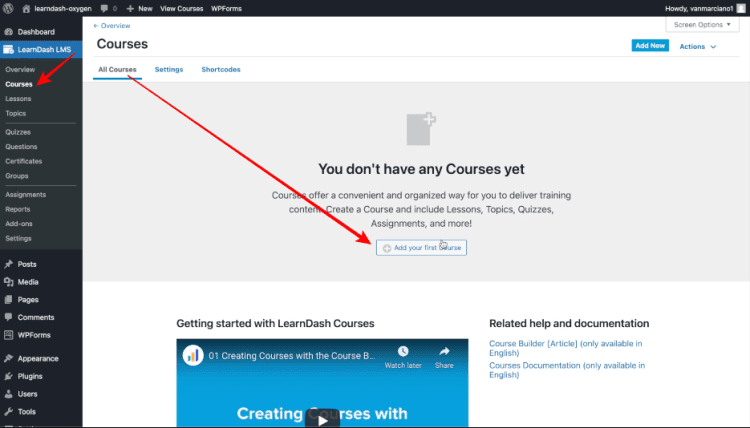
1. Go to LearnDash > Courses > Add Your First Course.
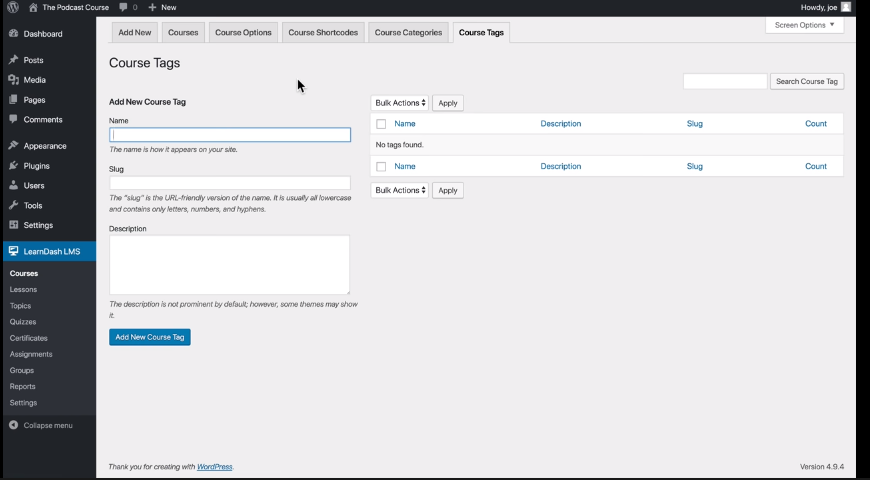
2. Click the Add New tab, add the name, a simple description, and feature image, etc.
3. After filling these details, scroll down and add other details like course price type, access list (for new and existing users), and course points, etc.
Note: Leave the disable lesson progression option unchecked if you want the users to follow the course in the order that you’ve laid out.
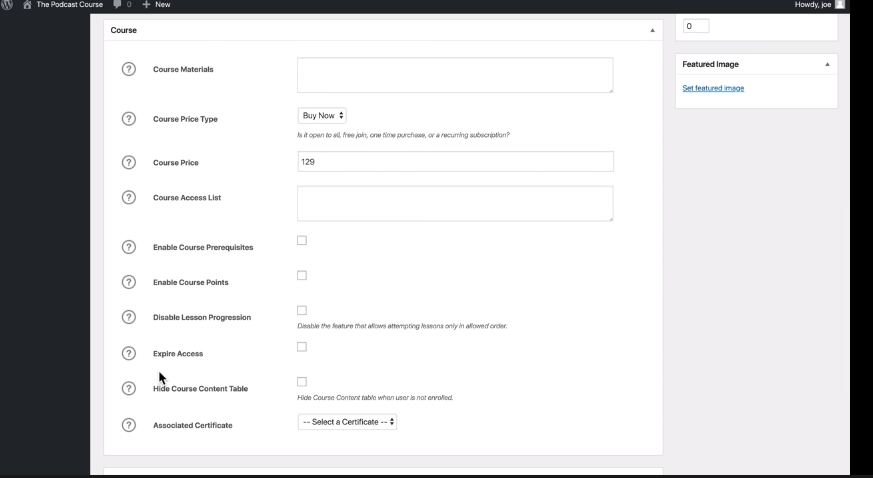
4. Once you’ve finished entering the course details it’s time to actually create the course by adding lessons, topics, and quizzes.
3. Add Lessons, Topics, and Quizzes
1. Head over to the Builder tab on the top of the navigation bar to get started.

2. Once you click on the builder tab, you’ll see the outline of your course content. Use the course builder and start by adding section headings.
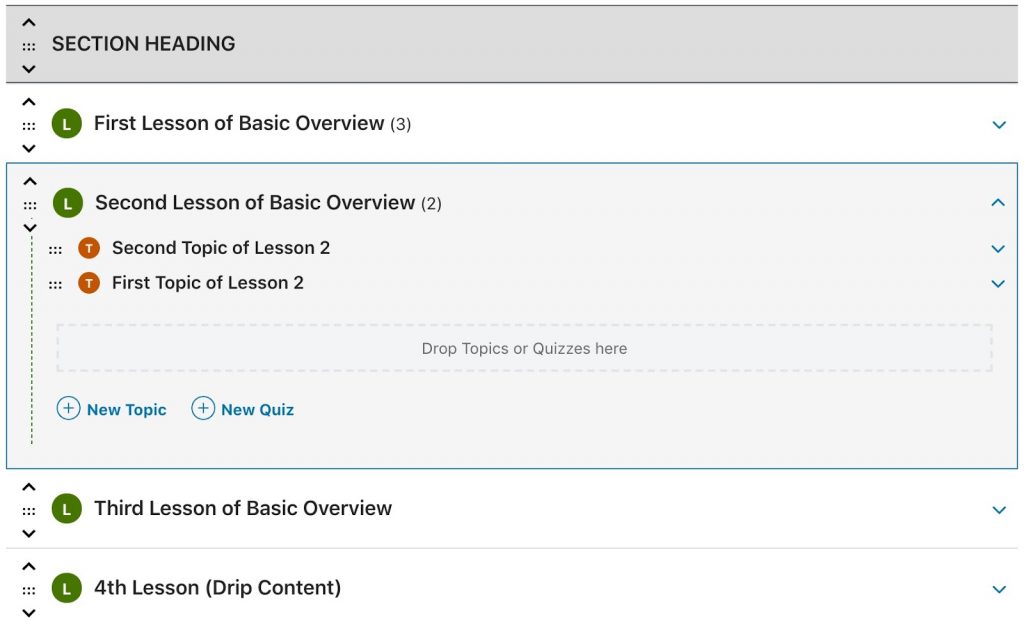
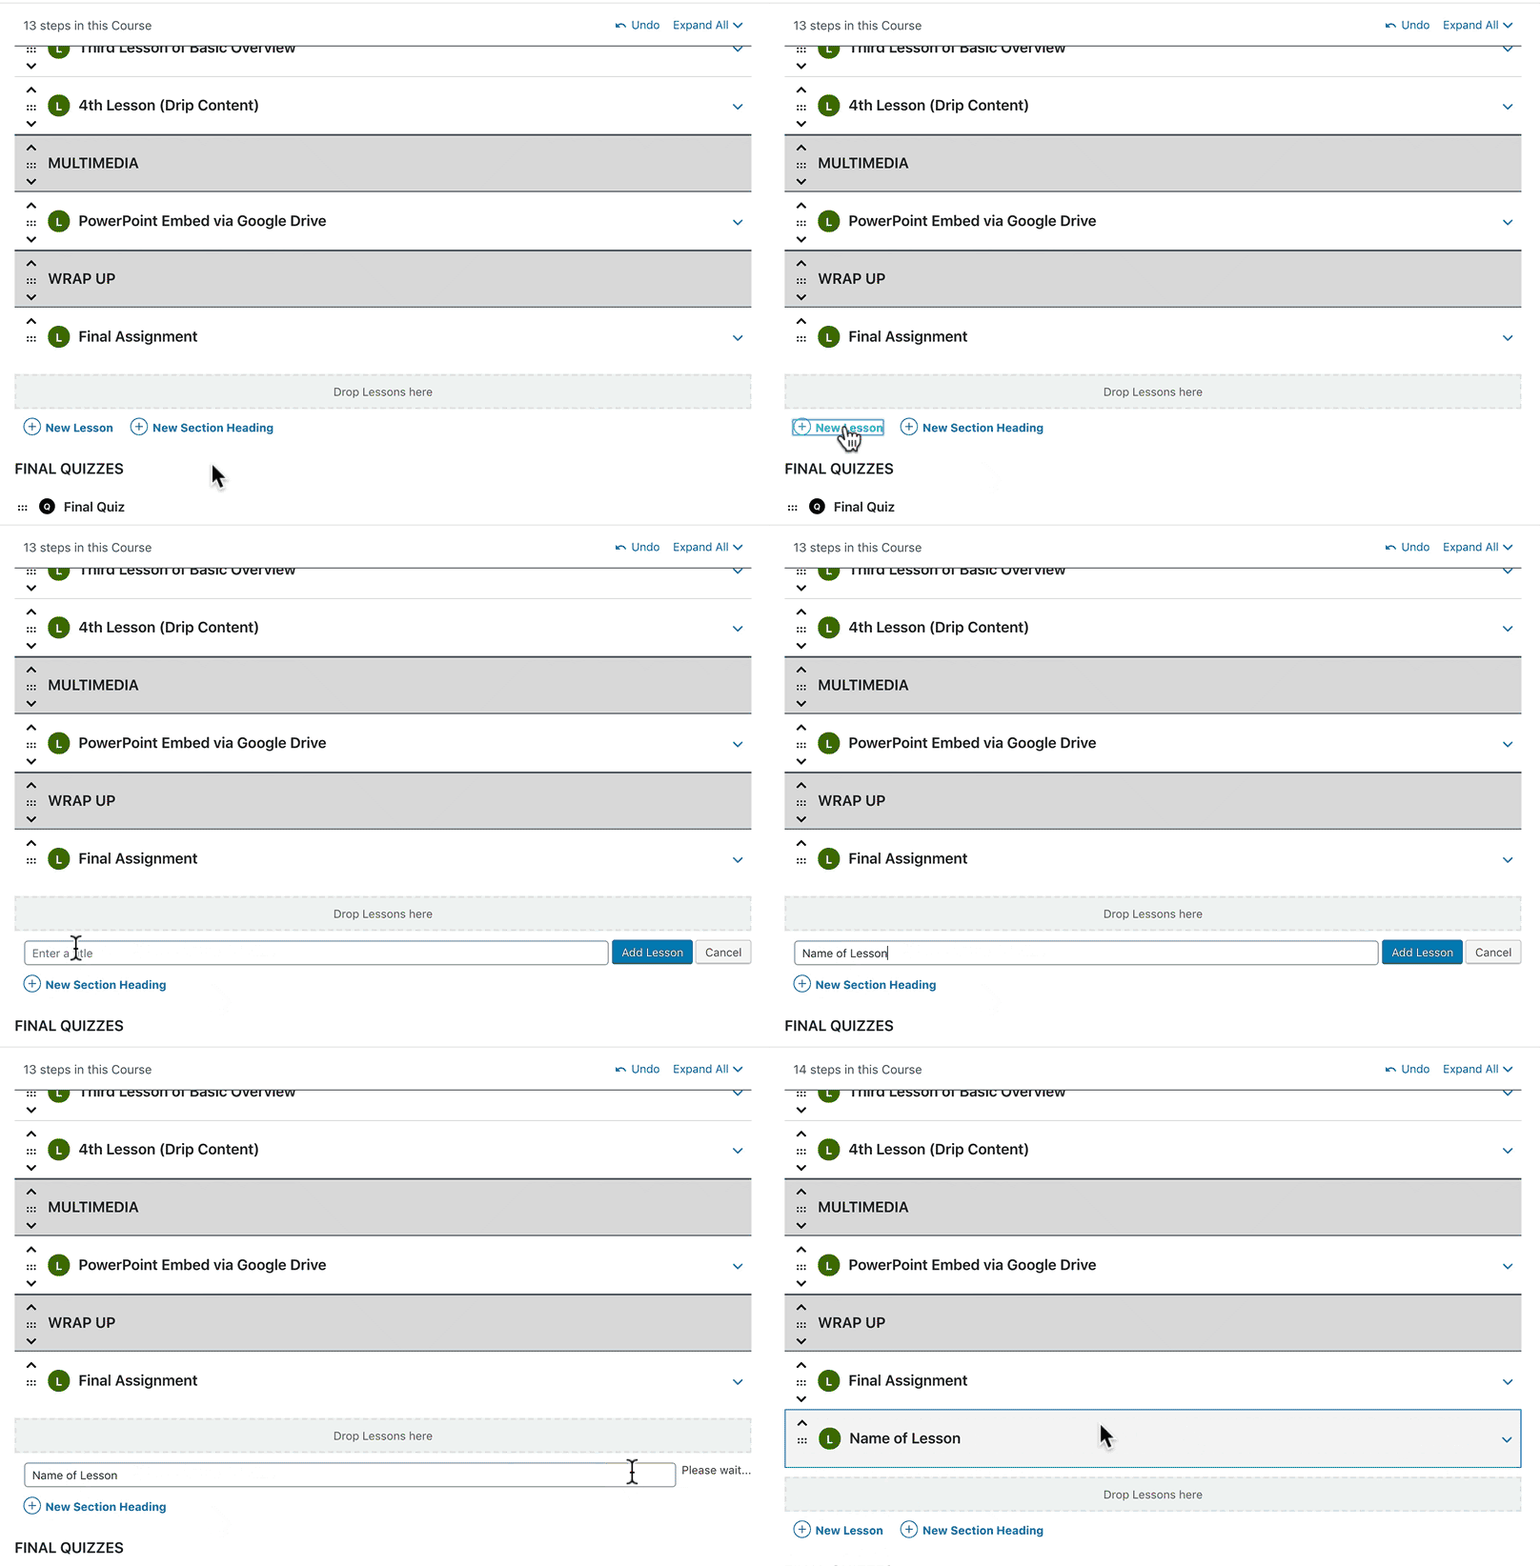
3. Once you’ve added the headings, it’s time to add lessons, topics, and quizzes.
4. To create a new lesson, click the “New Lesson” link, type the name of your lesson, press ENTER, or click the “Add Lesson” button.
5. To add content to your lessons, hover over the lesson title and click on edit!

6. After that you can easily add content to your lesson like the introduction, topics to cover, and multimedia, etc.
Note: You can repeat the steps for topics, assignments as well as quizzes.
4. Rearrange your course content
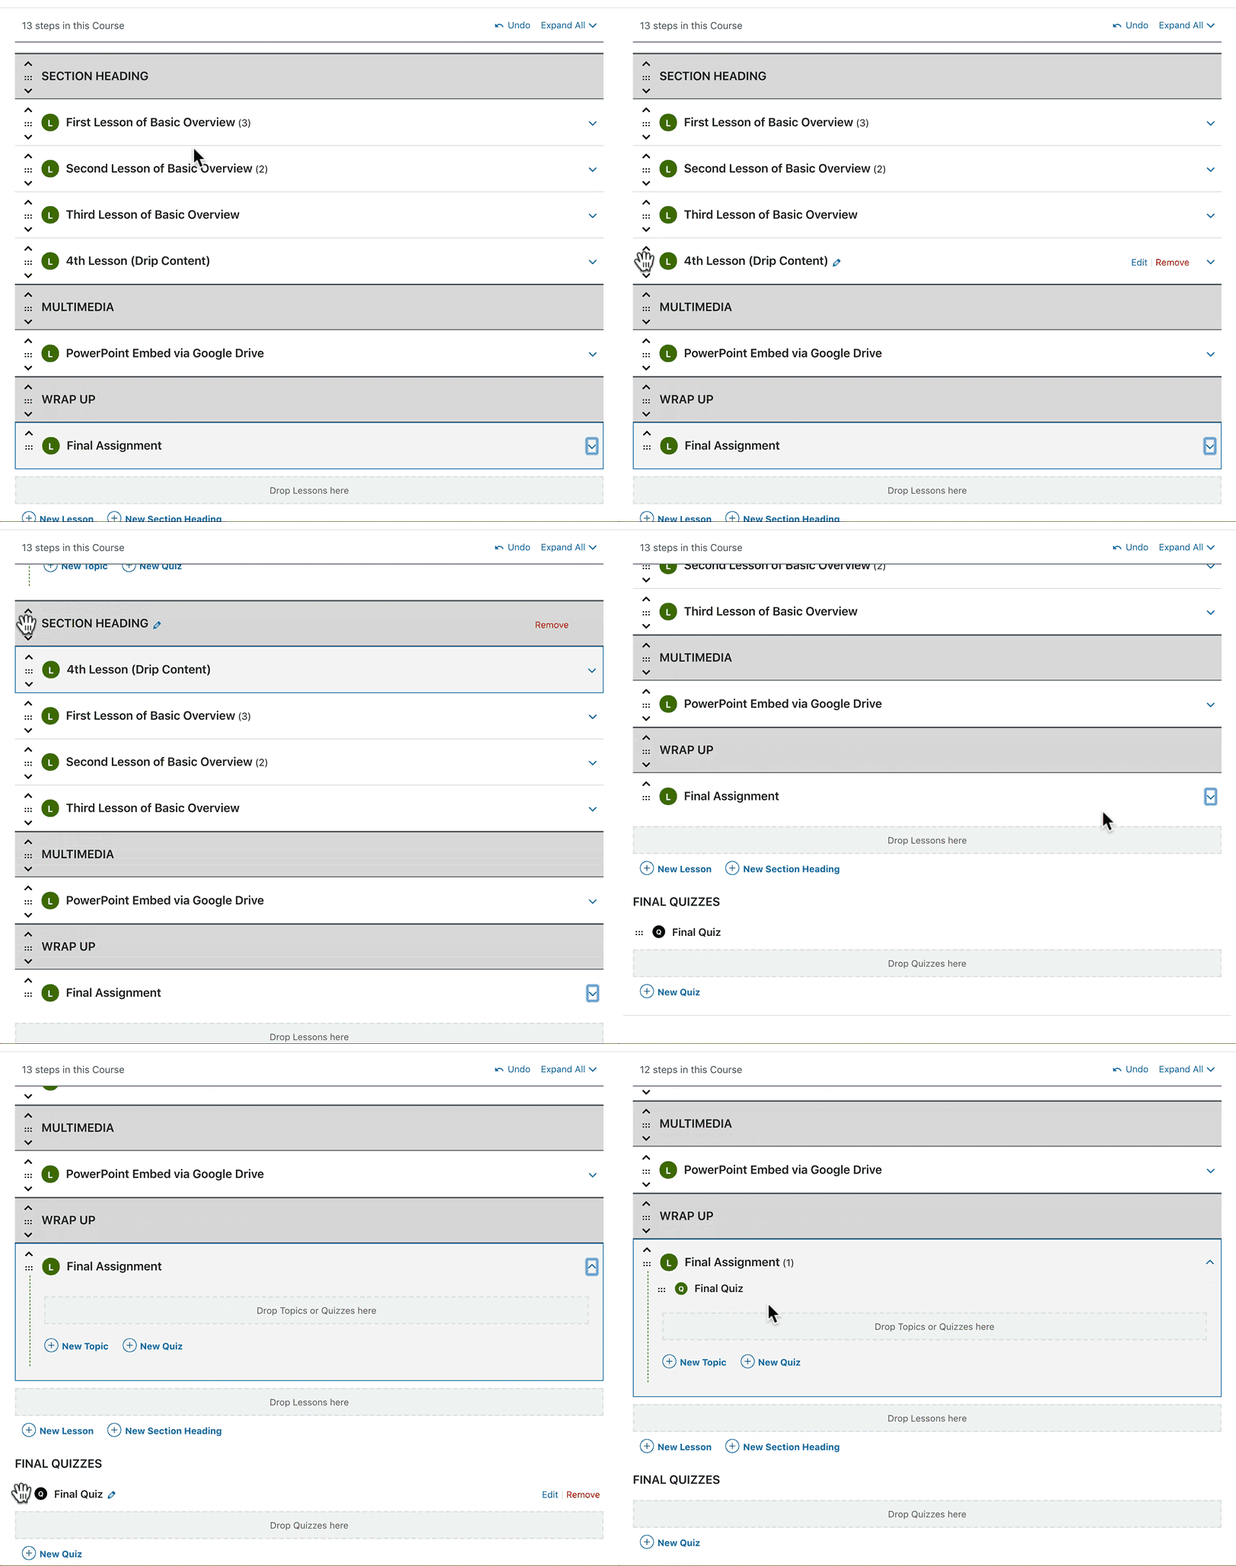
1. After you’ve added your lessons, topics, quizzes, and assignments, you can use the course builder to rearrange all your content and make sure that everything is in progression.
Recommended: Does this seem overwhelming, Let us do it for you!
5. Add a course certificate
Once you’ve added the content to your courses, you can now create a certificate as well.
1. Navigate to Learndash LMS > Certificates
2. Click the Add New button.

3. After you’ve added a new certificate, you can go on to include all the information that is required like, title, background, image, and certificate options, etc.
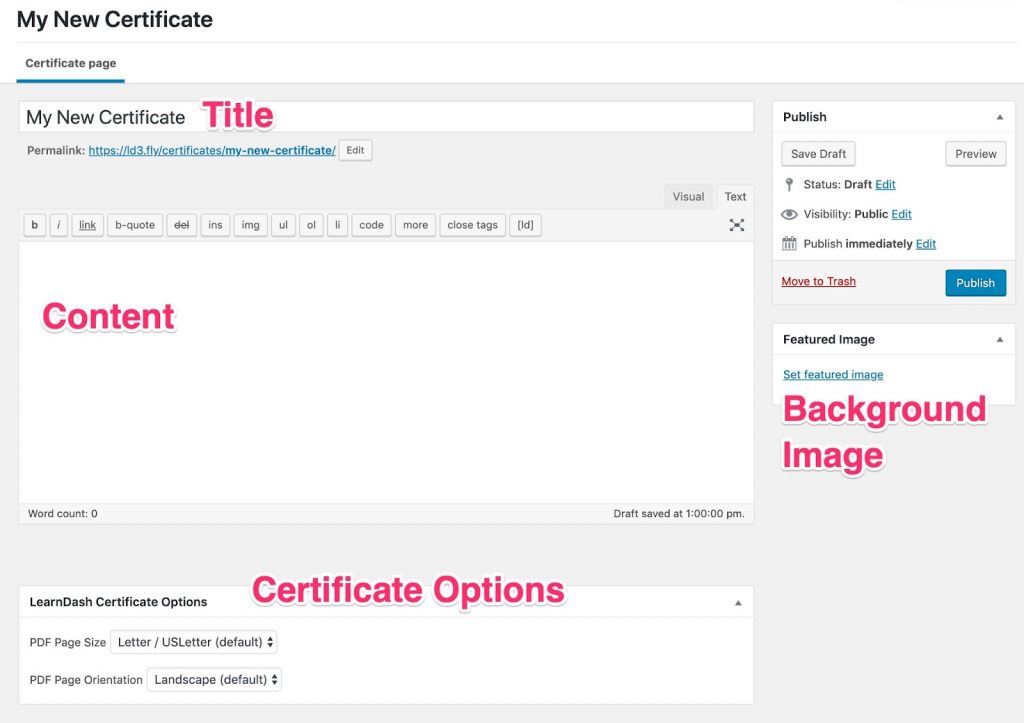
4. The certificate content will mostly consist of dynamic fields that are generated for each individual user like User’s Name, Course Title, Date of Completion, etc.
5. For these dynamic fields you’ll need to insert short codes. Read on to find the certificate shortcodes here ?
Want to learn about designing certificates?
Read more on how to create LearnDash course certificates.
6. Associate your course with the certificate
After you’ve created your course certificate make sure you publish it to associate it with a course.
You can do that by navigating to Settings and simply selecting the certificate you want to link with the course.
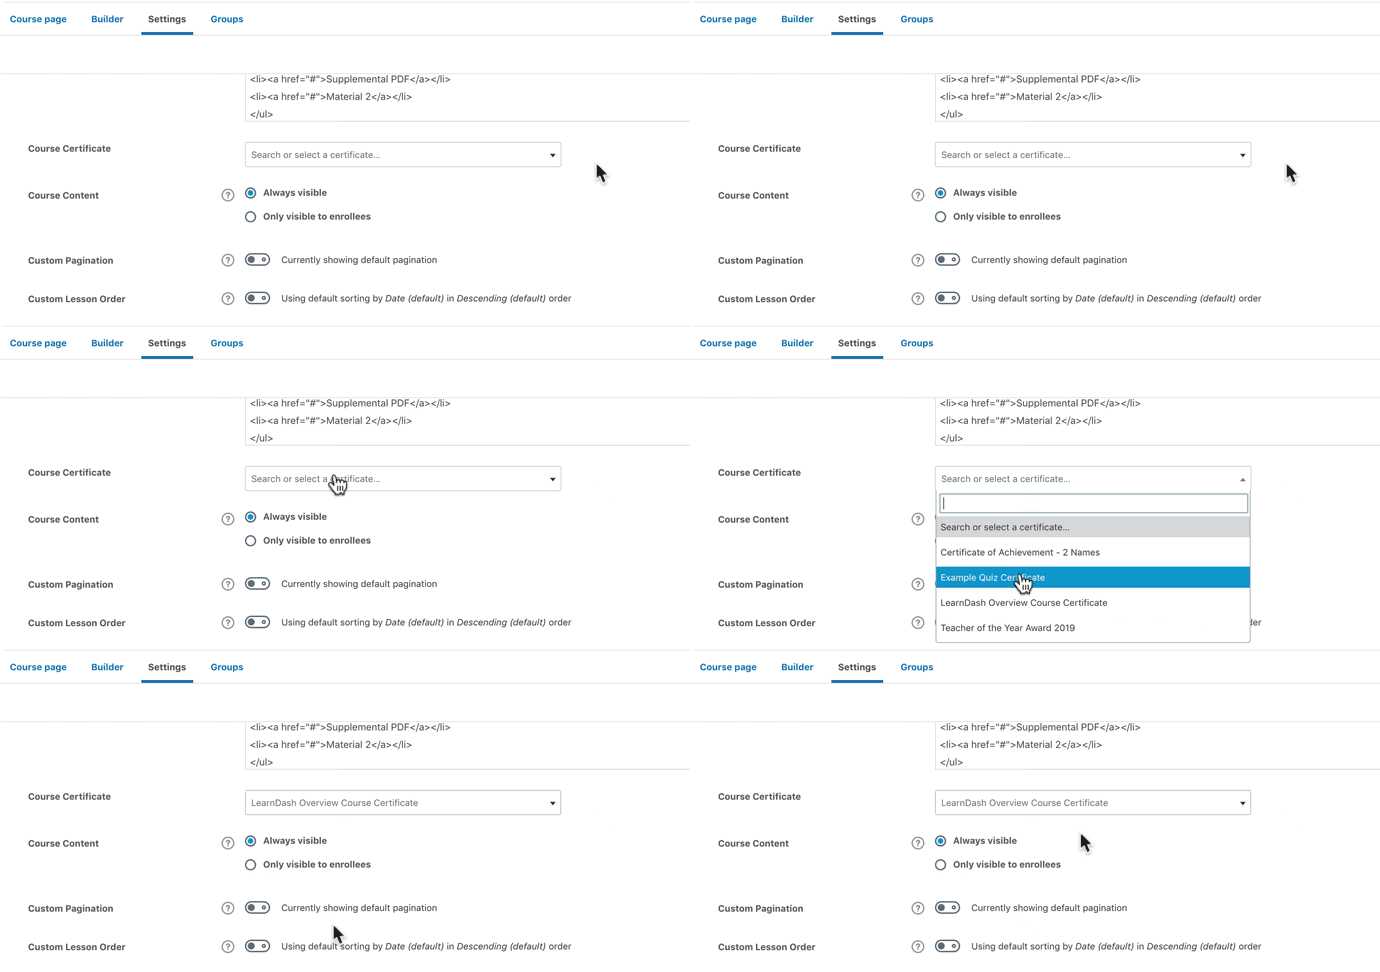
And now your course has a certificate as well!
7. Integrate with Stripe to sell your course
The LearnDash Stripe integration is one of the easiest and quickest ways to sell your LearnDash courses. All you need to do is sign up for a Stripe account, install the Stripe integration for LearnDash, and configure the settings.
1. Navigate to stripe.com and register for a new account. After that, you can navigate to dashboard.stripe.com to access all the information you’ll need to set up the LearnDash Integration.
2. Install the Stripe integration by going to the WordPress admin area,
- Navigate to Learndash LMS > Add-Ons
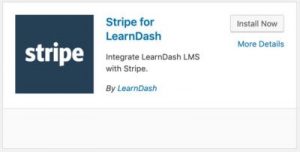
- Locate the Stripe for LearnDash add-on.
- Click Install Now and then click the Activate Plugin button
3. Configure Stripe – There are a few unique keys that Stripe creates for you when you set up a new account. You’ll need to provide these keys to LearnDash so that LearnDash can deposit your money in the proper Stripe account
4. There are two ways you can set up the LearnDash Stripe Integration: test mode or live mode. For now, we’re going with the live mode.
5. After selecting the mode, you need to select the integration type. There are two options: Legacy Checkout and Checkout (Support SCA). You can choose the Legacy Checkout if you want to capture payments in a popup form.
Note: No matter which integration type you choose. There are two additional fields. For more information on the modes, integration types and fields, you can read here.
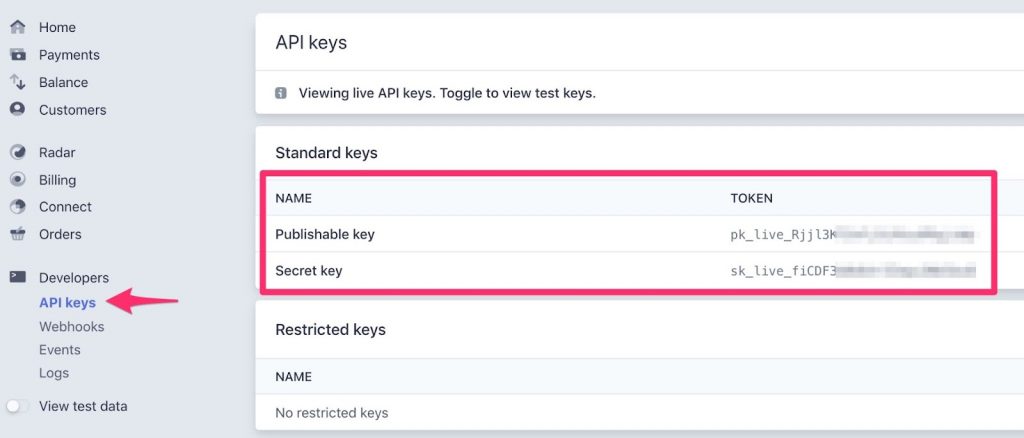
6. Now, you need to locate your Stripe keys. Follow these steps to do so.
- Navigate to your Stripe Dashboard
- Under Developers, click on API keys
- In the Standard keys section, you’ll see both a “Publishable key” and a “Secret key.”
Note: You’ll need both of these keys to set up the LearnDash integration. Your LIVE keys will be prefixed with pk_live_ and sk_live_
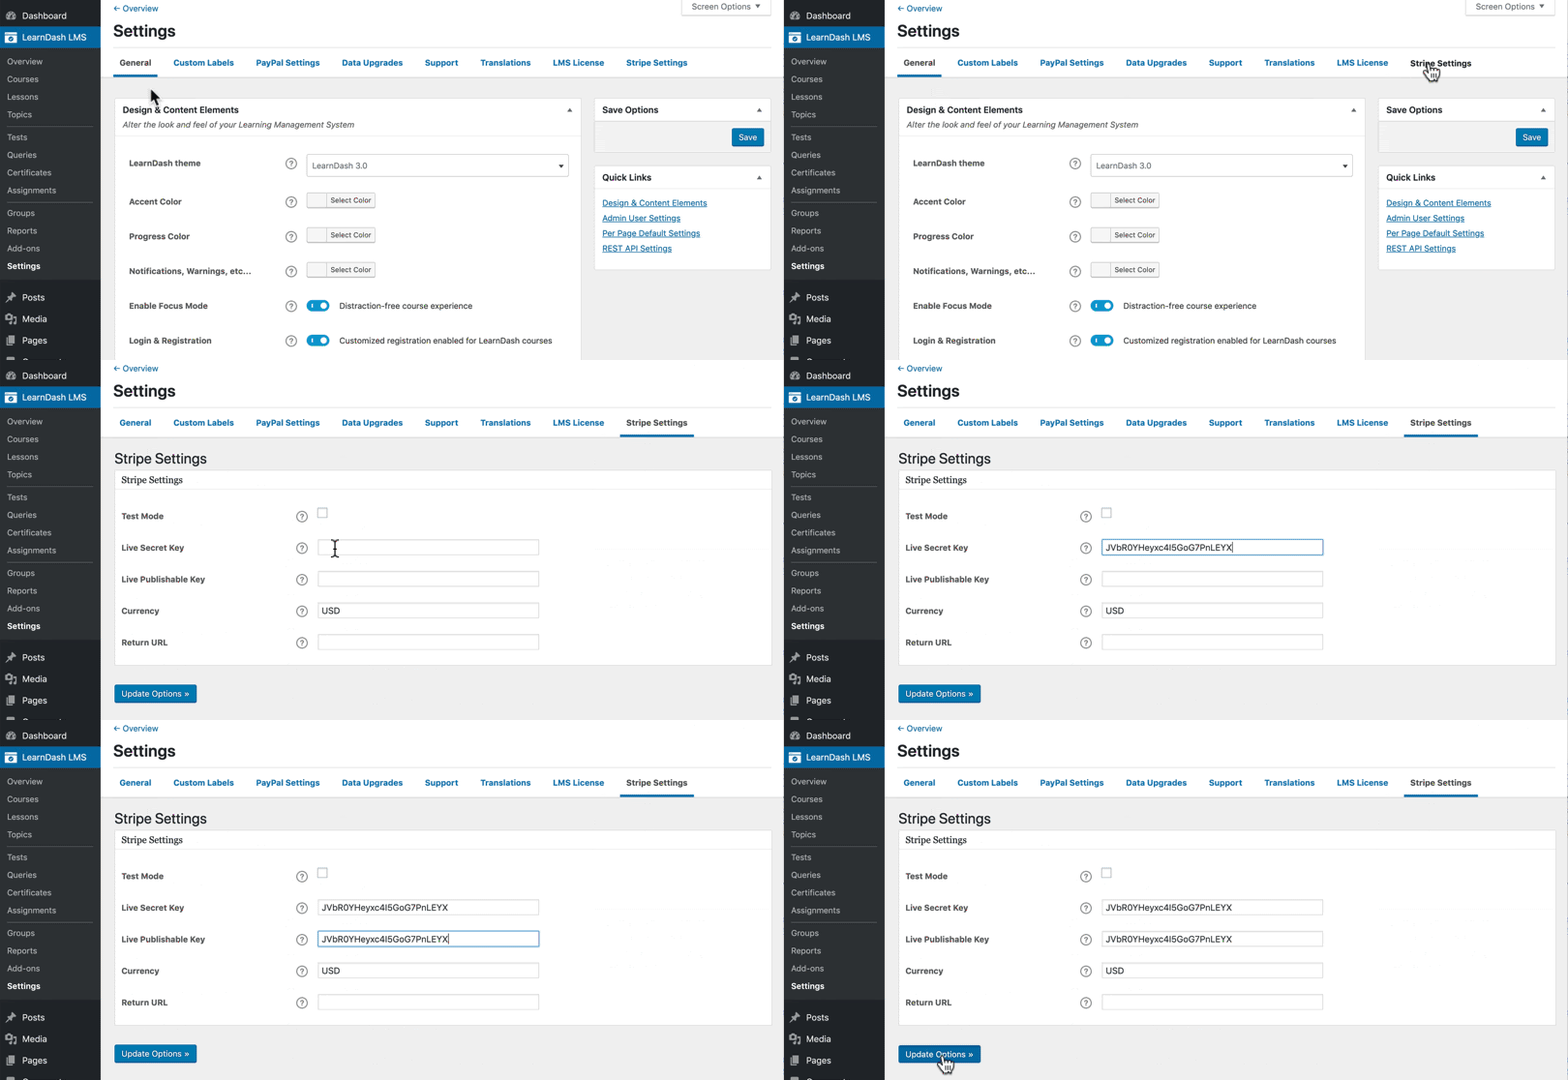
7. Now you need to provide the Stripe keys to LearnDash. Navigate to LearnDash LMS > Settings in your WordPress admin area and click on the Stripe settings tab on top.
8. For LIVE mode, make sure “Test Mode” is unchecked, and input your Stripe live keys.
9. After that you’ll need to set the 3-letter ISO code for the currency you want to use. For example: USD, CAD, AUD.
10. The default payment option offered by Stripe is credit card, as that’s what most people use. But you can choose other payment options as well.
11. In the URL field, you can provide a link to redirect your users to a different confirmation page on your website after they checkout. Leave it empty if you want users to remain on the same page.
8. Set up course to accept payments
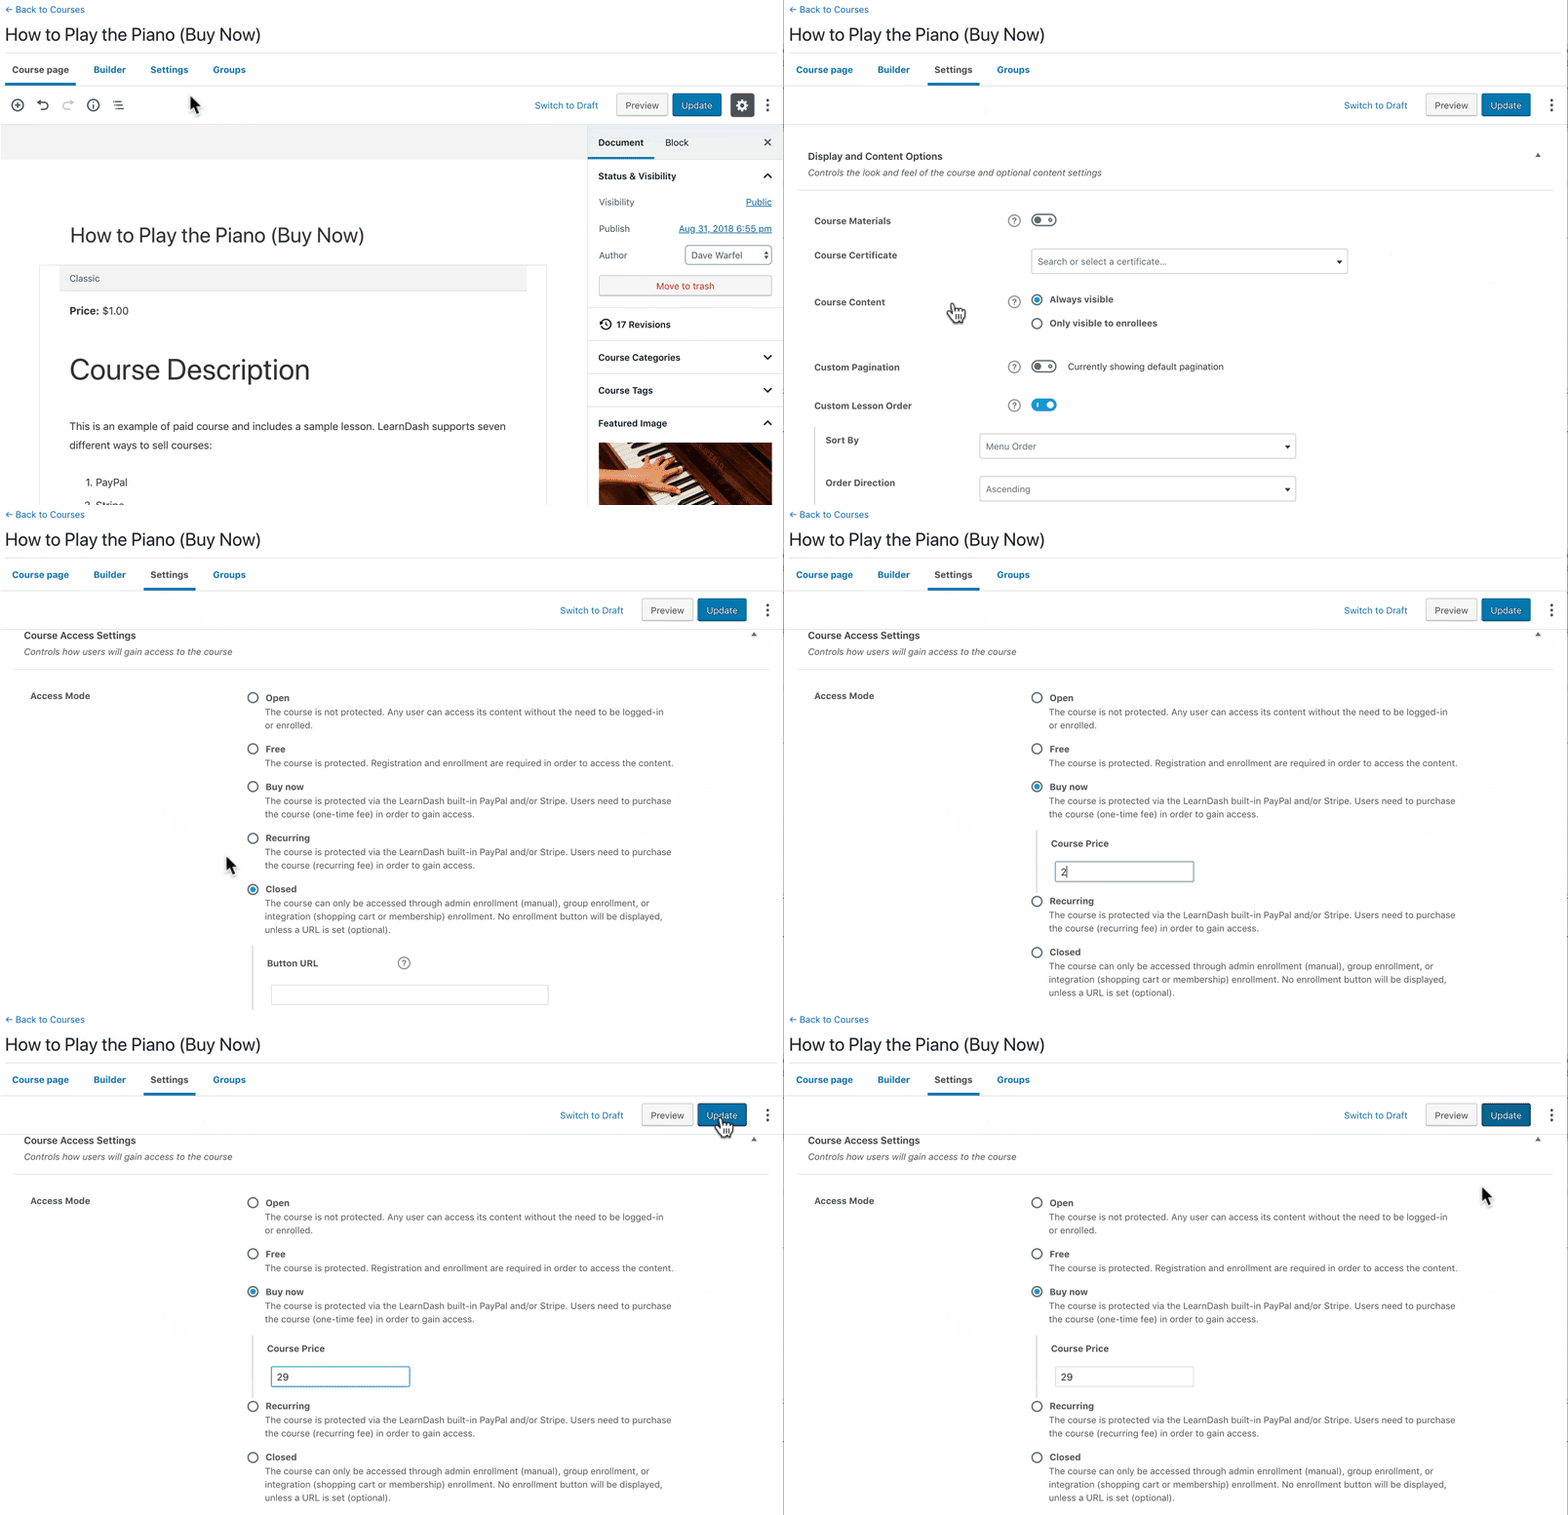
1. After you’ve configured your Stripe for LearnDash settings, the final thing you need to do is configure your course settings. In the WordPress admin area, navigate to LearnDash LMS > Courses
2. Select the course you want to sell with Stripe and then click on Settings at the top.
3. Scroll down to Course Access Settings and Set the “Access Mode” to one of two values.
- Buy Now: Use “Buy Now” for one-time payments
- Recurring: Use “Recurring” if you’d like to set up a subscription
4. And finally, set the Course Price.
Note: For recurring payments, you need to include the “Billing Cycle” in days, weeks, months or years.
We would love to make this easy for you.
All you need to do is get in touch with us!
9. Set up courses for Admin Validation
After you’ve created your course and set it up for payments, the last thing left to do is configure the courses for the admin to validate!
1.You can do that easily by again going to your WordPress Admin Area > LearnDash LMS> Settings > General.
2.Under General settings you can access the User Admin Settings and enable the options for the admin.
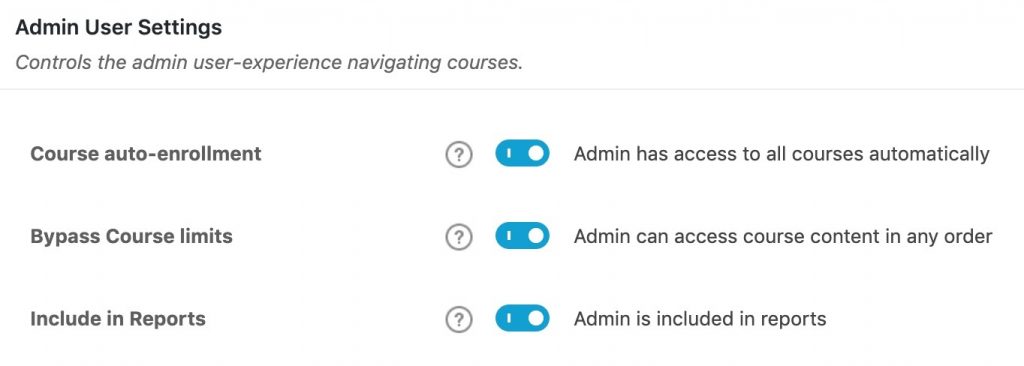
3. These settings will apply to all users who have been assigned the Administrator role.
4. Enable the Course Auto-Enrollment setting to give administrators access to all courses automatically.
5. Enable the Bypass Course Limits setting to allow administrators to access course content in any order.
6. Enable Include in Reports setting to include course activity by administrators in all LearnDash reporting, including ProPanel. Turn it off in case you don’t want to include the admin activities.
Once the Admin has access to your courses, they can share their feedback and validate your course content.
And phew, your course is finally ready to take enrollments!
Conclusion
We understand how setting up courses can sometimes be tricky, especially when you’re a beginner. That’s why we’ve created this step by step guide to break down the entire process.
In this free training guide you’ve gained knowledge about LearnDash, why it’s a superior platform, and how to create, sell and validate your LearnDash courses when you have limited time.
So, we hope this article was helpful and if you feel stuck in between you can always reach out to us for assistance. We can even handle the entire LMS set up for you and guide you through the settings to add and edit the course material.
Let us know when you create your first LearnDash course!
Read more
1. New in Instructor Role for LearnDash: LearnDash Frontend Course Builder to build Courses Easily
2. How to create LearnDash course? (with no expertise)
3. How a frontend course grow your LearnDash eLearning business?


