 What is the first thing that comes to your mind when you think of an online Learning Management System?
Well, the answer might be different for different people based on your exposure to the idea. For some it might be about learning online, for others it might be teaching online and then again for some it might be a system full of courses, quizzes, assignments, blah blah blah.
Until a few months ago I was one of those people I just mentioned above. If you ask me now my answer has altered a little. No, wait a minute, I think it has altered drastically. For me, an eLearning website now entails one of the many things below.
- An eCommerce Website
- An Event Management System
- A Social Networking Website
- A Membership Website
- And hey how can we overlook the obvious, the “learning” of the online learning management system ;)
I understand this list can be a bit overwhelming. But don’t worry your pretty little head about it. Let’s just take one step at a time starting with the “learning” of the online learning management system and working our way upwards from there.
I’ll be taking you through the whole thought process of developing an online LMS using the LearnDash plugin in WordPress, and so the title.
(As for other eLearning systems in the WordPress domain there is WPLMS too. It is a sound product with an exhaustive list of features. We’ll talk about it some other time. If you’re confused between WPLMS and LearnDash you must read this article first before you go on)
You’ve Installed LearnDash – What Next?
Now that you have installed LearnDash you’ll have to go the whole mile. You’ll have to create courses, lessons, topics, quizzes and certificates. It will take some time for sure. But who said it would be a speedy process!
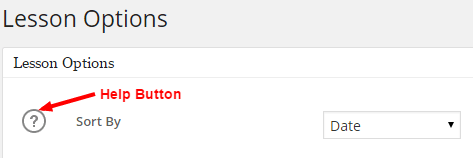
Most of the back-end settings of the plugin are self-explanatory. All you need is a little bit of time and the curiosity of Sherlock Holmes. And when you’re stuck there is always the little question mark to help you out. You prod it (Read: Click it) and it answers your queries right away.
In spite of that though there are some things that you might want to know about using LearnDash for your eLearning website. Let’s take a look at these things together.
Things to Know While Setting Up Your LearnDash Website
1. Sell Courses Without an eCommerce Plugin
LearnDash provides integrations with four different eCommerce plugins in WordPress – WooCommerce, JigoShop, Easy Digital Downloads, and iThemes Exchange. So if you need an eCommerce plugin your greatest dilemma would be to choose from between one of them. This dilemma is not just as bad as having to integrate an eCommerce plugin with your site though and we’ll deal with it a bit later.
The bigger question here though would be if you should actually use any of the integrations available.
Well, it depends!!
If your only requirement is to be able to sell courses then I’d say you do not need to use any of the integrations available. All you will need to sell courses from your website is the core plugin and a PayPal account.
Once equipped with the two prerequisites you will have to complete the PayPal settings and course pricing settings.
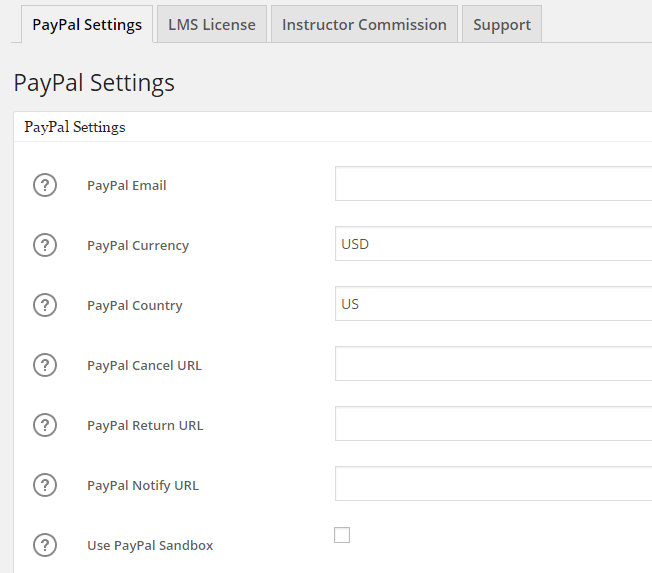

Note: Without providing a PayPal Email in the PayPal settings section you will not be able to sell courses from the website.
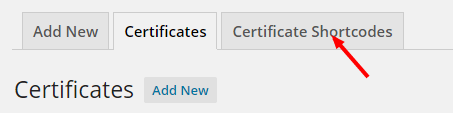
2. Course and Certificate Shortcodes
LearnDash provides course shortcodes to add information to any page, course, lesson and quiz on the website. The complete list of these shortcodes can be found along the following path, LearnDash –> Courses –> Course Shortcodes

Apart from the course shortcodes the plugin also provides shortcodes which can be used to add information to the certificates that are created. These certificates are awarded to students on successful course completion.
3. Categories and Tags
Ideally you might not find the need of categorizing courses when you just start out and the number of courses is few. However, as the number of courses increase, categorization of courses becomes imperative from the perspective of the end user. It is one of the factors that aids them to search for courses of interest with absolute ease.
The Categories tab provided in the course section of the plugin allows you to define various categories based on your requirement.

These categories can then be attributed to a course at the time of course creation.
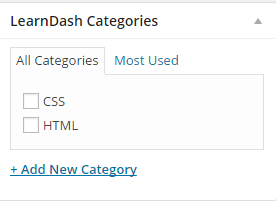
Apart from categories courses, lessons and topics can also be assigned tags which can also be helpful while searching all courses related to the same tag.
4. Course Expiration
It is possible to restrict access to courses on the website to a fixed period of time after a student has been given access to a particular course. This period of time is be measured in days. ‘Expire Access’ field is provided on the course page in the back end to decide if you want to apply the time-based restriction and the duration after which you want to apply this restriction.
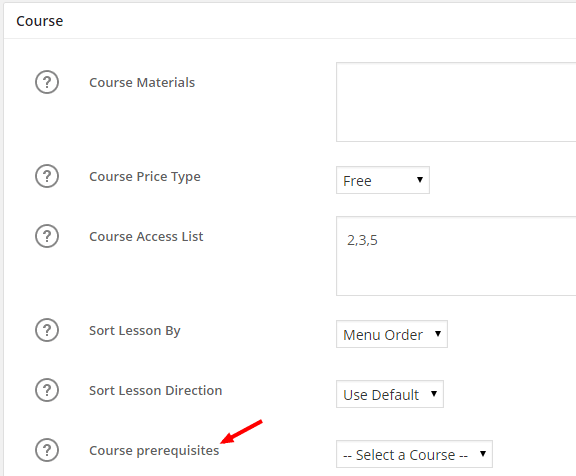
5. Interlinking Courses, Lessons, Topics, Quizzes and Certificates
The various aspects such as courses, lessons quizzes etc can be interlinked together. This process is just as simple as it is confusing and here are a few things that you might need to know when you start.
- A course can have prerequisites that need to be completed before it can be taken. This prerequisite will also be another course from an existing list of courses.
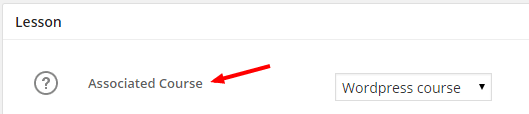
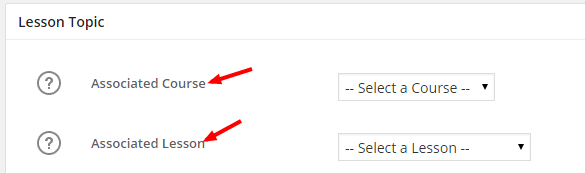
- A lesson ideally must be associated with a course but not necessarily so. This option to associate the course is available on the lesson page at the back end.
- Just like lessons a topic can be associated with a course. Additionally it can be associated with lessons in that course.
- Quizzes can be associated with courses and lessons. If a quiz is associated with only a course it will be displayed on the course page in the front-end. If it is associated with a course as well as a lesson then it will be displayed on the lesson page as opposed to the course page.
- Quizzes can also be associated with created certificates. The certificates will be awarded to the students on completion of the quiz.

6. Timer for Lessons and Topics
Defining the amount of time that a student should take to complete a quiz is obvious and that is an option provided by LearnDash on the Quiz page at the back end along with many other options.
Additionally, LearnDash also provides an option with which you can predefine the maximum amount of time a user can spend on a lesson or a topic. The time defined will be in seconds.
7. Lesson Options
This is one thing that you must definitely know about LearnDash. On the lessons page in the back end you will find the ‘Posts Per Page’ in the Lessons Tab. Now if you set the value of this field to 10 you will be able to see only 10 lessons associated with any course. If there are more than ten lessons associated to a course they will not be visible to the end use in spite of being associated with the course.
So the next time you are not able to see a few lessons on your course page at the front end you know which setting you have to look for.

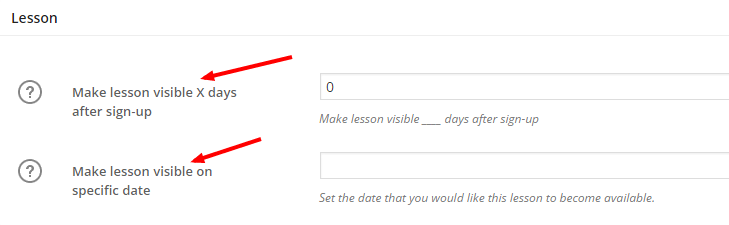
8. Drip Feed Content
LearnDash allows eLearning website owners to provide students with lessons gradually. Which means that students do not get to view the lessons all at once. They will only be able to see the lessons based on the date or days that have been set by the website admin.
Here’s a great article on the drip-feed feature at how it would be useful.
9. Option to Upload Assignment
LearnDash provides students with an option to upload assignments. This option has been provided in the lessons page as well as the topics page. In order to activate this option, you will have to select the checkbox against the ‘Upload Assignment‘ field provided on the lesson page and topic page at the back end.
A catch here though is that the upload option will not be available on the display till the lesson or topic and the quizzes associated with it have not been completed. So if you activate the upload assignment option for a lesson and do not see the upload option on the front-end do not fret. Just complete the lesson and quizzes associated with the lesson and Voila! the upload button will magically appear on your screen.
[space]
That was about LearnDash, it’s features and how the plugin can be used best to build an exceptional eLearning website on WordPress. In the next post, I will take up another aspect of building an eLearning system with LearnDash and that is eCommerce.
If there is something you think that I have left out and is worth a mention do let me know through the comments section.
Until the next post, Adios!
[space]
[freepik]