Every customer is different!
And, no matter how hard one tries, this fact can’t be changed. In the hindsight, the attempt to recognize it will actually help to push your conversions and sales.
Now, a retail customer in your store will look at the product, its price, add it to the cart, buy, and leave. But, a wholesaler or customer wanting to buy in bulk would expect something more. Maybe – special pricing, discounts, or simply the chance to negotiate for a good deal!
It’s time to move beyond the good old ‘Pricing-Add to cart’ buy formula. You’ve got to make some room for Inquiry and Pricing negotiations. Let customers Inquire and Request a Quote for your products through your WooStore.
And, to help you fulfill this purpose, I’m here to show how you can enable the ‘Request a Quote’ option in your WooCommerce Store.
Let’s dig in!
[lwptoc numeration=”none” title=”5 Steps to enable Request a Quote option” skipHeadingLevel=”h3,h4″ skipHeadingText=”*Final Thoughts,*”]
Step 1 – Get your hands on a ‘Request a Quote’ plugin
So, here’s the thing – WooCommerce, by default, doesn’t offer this functionality. However, WordPress doesn’t stop you from adding one through its plethora of plugins.
Having said that, the very first step you’ve got to follow is – Pick, Install, and Activate a ‘Request a Quote’ plugin.
Doing this will allow you to add Inquiry forms, enable customers to Request for Quotations, and empower you to create and send Quotations.
Now, you’ve plenty of options to choose from but, I’d recommend going with the WISDM Product Enquiry Pro (PEP) plugin.
[su_note]Recommended Read: 8 Best WooCommerce Request a Quote plugins. [/su_note]
And, this is because:
- The WISDM Product Enquiry Pro plugin comes with tons of powerful features that’ll make it smoother for your customers to Request a Quote. Plus, it’ll make it easier for you to create, manage, and respond to those Quotes.
- With over 3000+ downloads, the plugin has been rated at a near-perfect score of 4.8/5 by its users.
- More importantly, the support team is extremely dedicated, responsive, and helpful.
While you’re free to choose a plugin that fits your needs the best, however, for the purpose of this article, I’ll be going ahead with the WISDM Product Enquiry Pro plugin.
And, if you’ve decided to move forward with the WISDM PEP as well, then let’s quickly look at the Installation process.
Install the WISDM Product Enquiry Pro plugin
This process is quite simple!
Once you’ve purchased the plugin from the website, you can download the .zip file.
You can then go ahead to upload this file to the backend of your WordPress Dashboard.
And, to do so, follow the below steps:
- WordPress Dashboard > Plugins > Add New
- Upload the .zip file

Also, don’t forget to enter the License key and Activate the plugin. This will ensure the smooth working of the extension.
Now that you’re done with the installation, let’s quickly hop on to the exciting part!
Step 2 – Create a Custom Inquiry Form for customers to send in Inquiries
This part is exciting and important in equal measures.
Here, I’ll show you how to create and add an Inquiry & Quotations form to your products page.
Having this form will help your customers ask any questions/concerns they have regarding your products. It’ll also make it easier for them to connect with you in the fastest possible way.
More importantly, you’ll get to connect with genuine leads and improve the conversion rates significantly.
Now, let’s get to it – this plugin gives you two options for adding an Inquiry form:
- Default Inquiry Form
- Custom Inquiry Form
a. Default Inquiry Form
First, let’s look at the Default Inquiry Form.
If you’re looking for a simple, quick, and basic Inquiry form for your products then opting for a Default Inquiry Form is a good option.
It can be useful if your product isn’t too complex or difficult to understand. And, if your products don’t have variations or types, then going ahead with this option can save you loads of time.
So, to enable this Default Inquiry Form, go to:
- WordPress Dashboard > WISDM Product Enquiry Pro
- Click on Settings and hop on to the Forms icon from the navigation menu
- Enquiry Form > Tick the ‘Default Form’ box

As soon as you click on the option, few functionalities will appear in the Default Form Settings as shown in the image above.
You can choose to display various options like Send me a copy, Date field, Telephone Number, etc. to be included in the Inquiry Form.
Once you’re done, hit the Save button.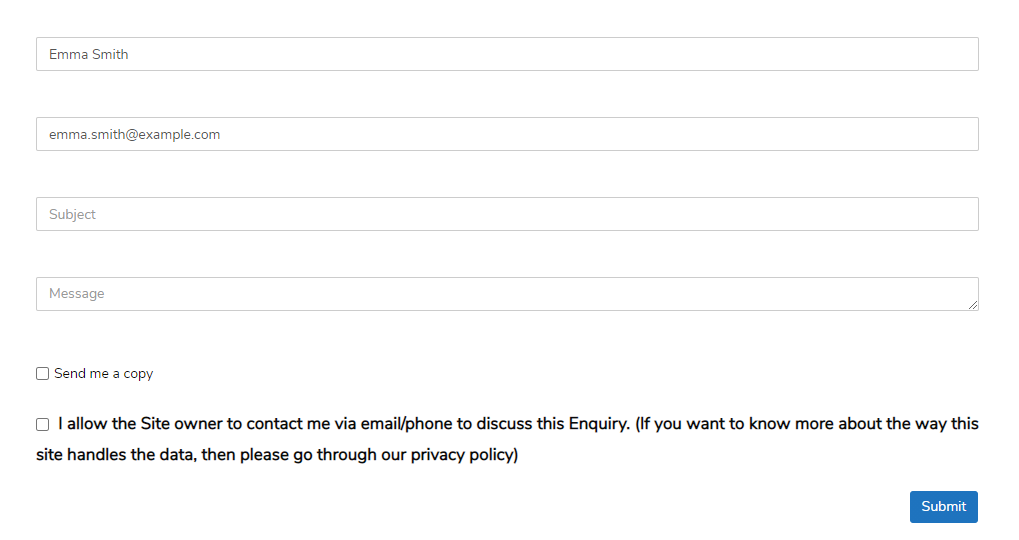
And, the image above is an example of what a ‘Default Inquiry Form’ looks like. Simple and elegant.
However, if you wish to add your own custom fields and make the Inquiry form a little more personalized, you should create your own Custom Inquiry Form.
b. Custom Inquiry Form
With this option, you’ll be able to build your own custom Inquiry Forms as per your needs.
Any customer will have plenty of questions/doubts if a product has several features, benefits, variations, popularity, etc. And, to answer these obvious questions, you can add more fields to these Inquiry Forms and attach them to the products that are usually complicated in nature.
Plus, it can be useful especially when you want to learn more about your customer before sending out a Quotation. Through the form, it’ll even become easier to identify the shopper as a wholesaler, retailer, big, medium, or a small customer.
Having said that, to create a Custom Inquiry form, you can head to:
- WordPress Dashboard > WISDM Product Enquiry Pro > Forms
- Click on the ‘Add New’ icon
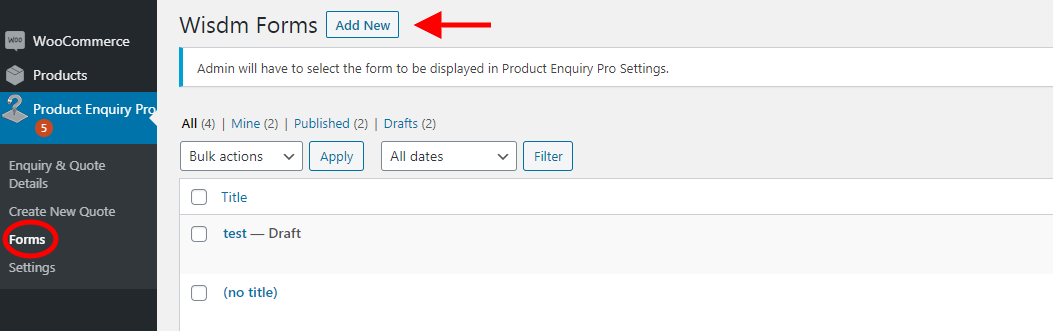
Upon clicking the ‘Add New’ icon, you’ll land on a page that’ll allow you to add a Title to your Form and different Custom Fields.
Form Builder
This is the section that’ll allow you to add custom fields to your Inquiry & Quotations form. You can create multiple forms and save for future use.
You can choose the custom fields from 3 different categories:
- Commonly Used Fields
- Generic Fields
- Advanced Fields
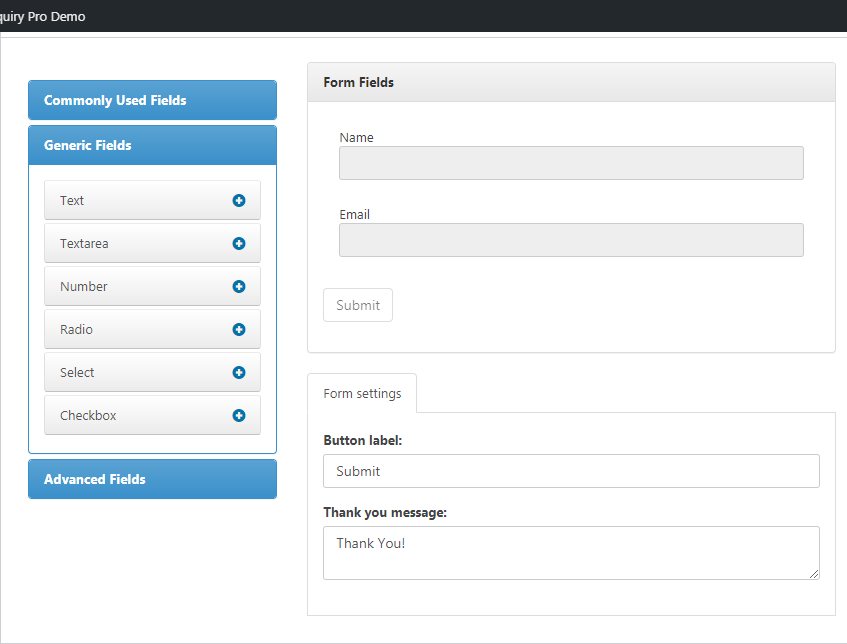
Commonly Used Fields
This category, as the name suggests, has the basic and common fields that you’d find in any Inquiry & Quotations form.
For e.g: Name, Email, Subject, Message. To add these, you can simply drag and drop the fields on to your form.
These details are useful to capture basic customer information. You can then add this to your database and accordingly target email id’s for product promotions in the future.
Generic Fields
If you want to add more elements to your Inquiry & Quotations form, you can even do so from the Generic Fields Category.
Different elements like Text, Number, Select, Checkbox, etc. can be added to the form. And, what’s interesting is – you can even add conditional logic to any of these fields.
For e.g: You can choose to Show/Hide the ‘Number’ field if Any/All conditions are met. In this case, the condition could be – if a customer’s name starts or ends with a certain letter, only then ask for his/her number.
Using conditional logic can be useful if you’re looking for some information specifically from some users only. Also, when you don’t want to force details or information from your customers, the conditional logic can be pretty useful.
Advanced Fields
This is the category that’ll enable you to make your form detailed and comprehensive.
You can add fields like ‘Upload File’ if you want them to upload an image, ‘Captcha’ for extra security layer and to ensure the person Inquiring is an actual human, ‘URL’ to allow customers to leave their website link, etc.
With these advanced fields, you get a chance to understand your customers better and acquire more details to understand their persona. Choosing and applying these fields carefully will make your Inquiry & quotation form seem engaging and interesting.
And, once you’re done adding the needed fields from the categories, you can hit the ‘Update’ button and the form will be saved.
Enable the Inquiry & Quotations form
Now that the Custom Inquiry & Quotations form has been created, you’ve got to enable it so that your customers can actually send in their inquiries.
To do so, you can go to:
- Product Enquiry Pro > Settings
- Hover to the ‘Forms’ icon in the navigation menu
- Under the Enquiry Form options, tick Custom Forms
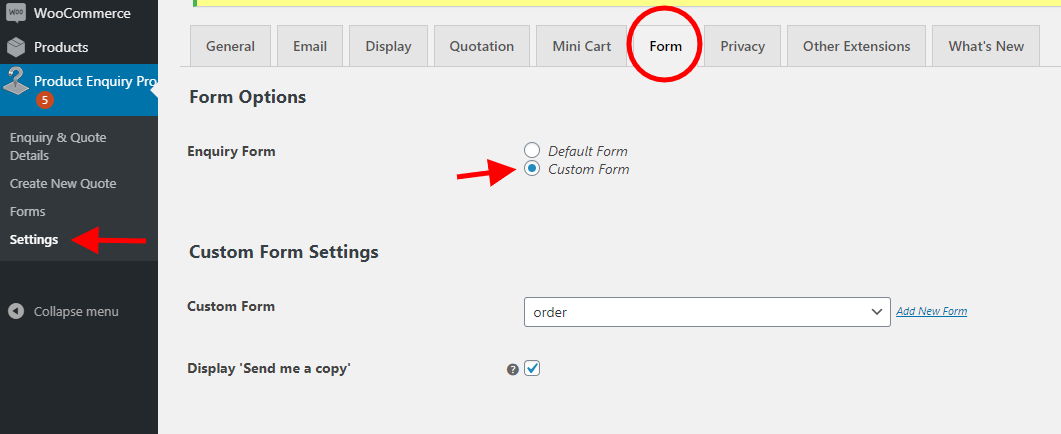
Once you scroll down to the Custom Form Settings, you can select the form you’ve created to be displayed through the Custom Forms option. And, even enable the ‘Send me a copy’ option.
Your customers will be able to choose this option and receive a copy of their sent Inquiry & Quotations form.
With that being said, this Inquiry form once enabled will be displayed and applied to all products by default. However, if you wish to enable the inquiry option on selected products only then, you can do so by heading to:
- WordPress Dashboard > Products > All Products
- Choose a specific product or all products in bulk
- Select Edit and Enable/disable Inquiry option for the selected products
- Hit Save and Publish.
After enabling the Custom Inquiry & Quotation forms, smash the Save button. Make sure you’ve tested the form in the front end and if it doesn’t satisfy your requirements, you can always make further changes accordingly.
On that note, you can now move on to the next step to address the Inquiries and Create Quotations.
Step 3 – Address Inquiries and Create Price Quotations
Too much information to digest? :(
Well, don’t worry. Take a 2 min break. Grab a cup of hot coffee maybe?
Awesome. Now that you’re back and fresh, let’s proceed.
So, the customers visiting your shop, scrolling through the products now have an option to send in Inquiries and Quotations.
However, addressing those Inquiries and sending Price Quotations in time is what will lead to customer conversions and sales.
In this step, I’ll show you how to quickly find the Inquiries and create quotations for the same with ease.
And, to handle Inquiries & Create Quotations, go to:
- WordPress Dashboard > Product Enquiry Pro
- Select the Inquiry & Quote Details

On this page, you’ll find details of all the Inquiries & Quotation requests sent by different customers.
As shown in the image above, you can get a glimpse of the basics of the Customer Inquiry through – ID, Status, Customer Name, Email Id, Inquiry date, and the total amount.
This list will give you an idea of how many Inquiries are coming in on a daily basis. Plus, the status bar will make it further possible to track the Inquiries that are Pending, Quotes created, Quotes Sent, and the ones that have been Approved.
And, what stands out is – you can easily search for customer quotations through Customer Name, Customer Email, Enquiry id, and Product Name. This option works wonders when you have to quickly reply or find a particular customer’s quote. You’ll save tons of time.
Create Quotations
From the Inquiries & Quotations detail list, you can choose to address the Inquiries and Quotations by simply clicking on the Edit option under Customer ID.
Doing this will open up a page resembling the below image.
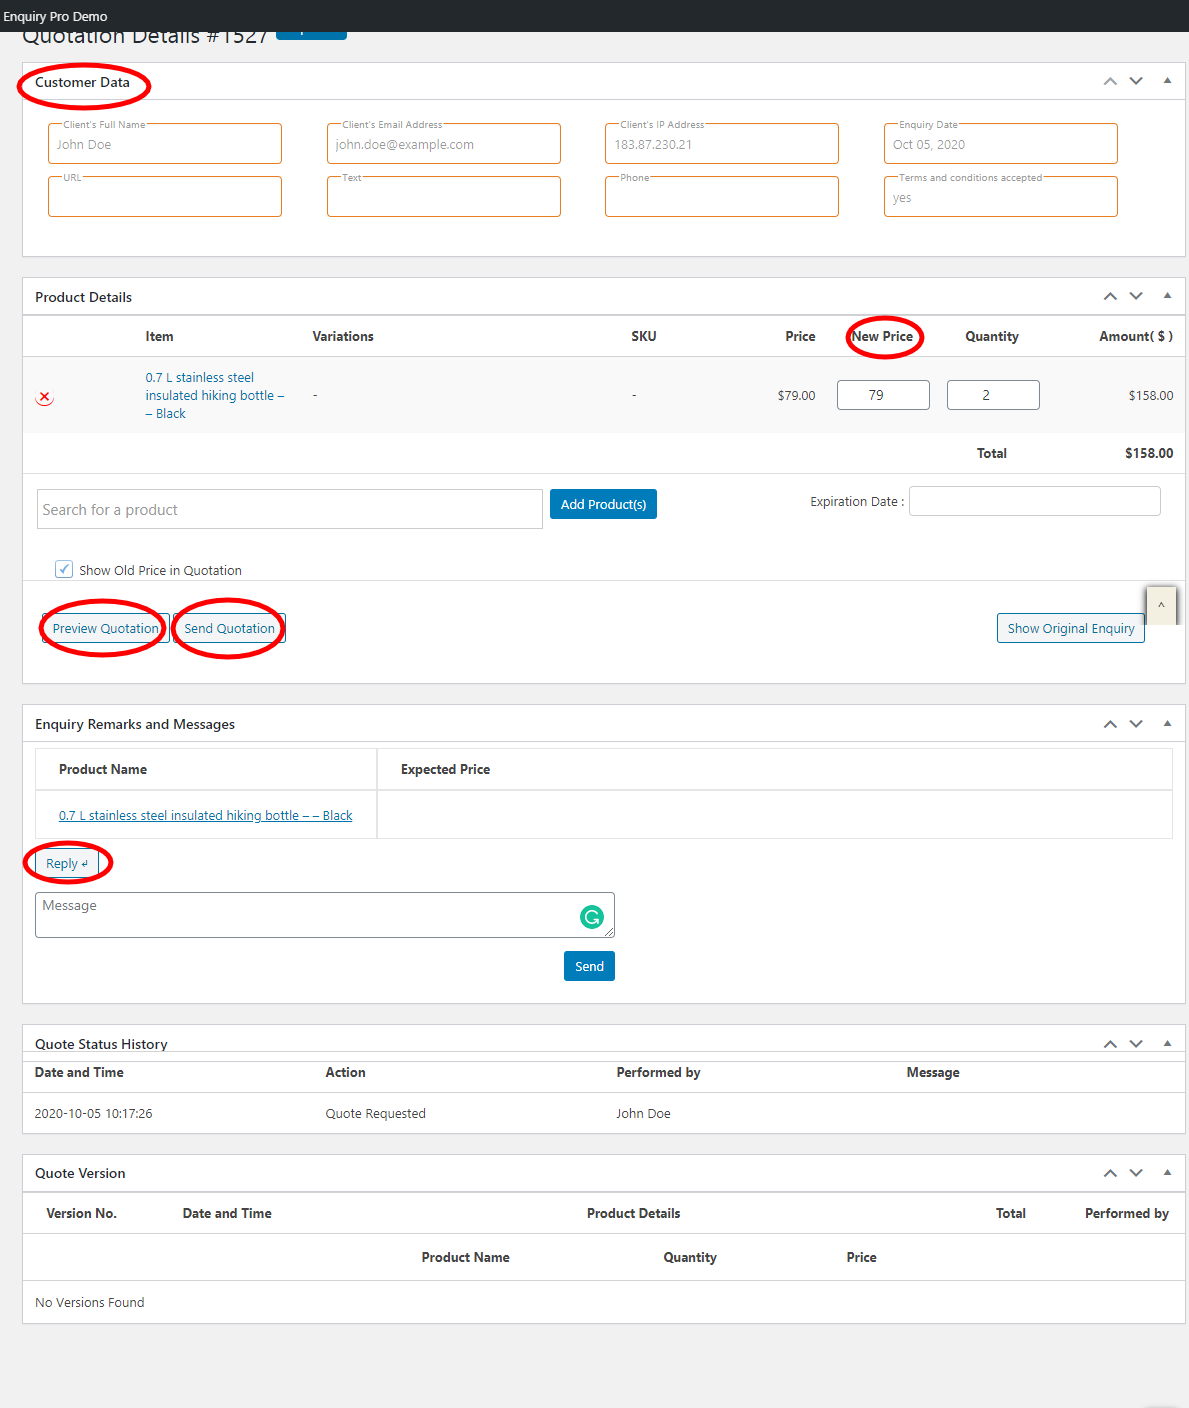
This is the page containing the customer Inquiry and details.
Right on top, you’ll see the Customer Data tab which will give you all the basic details about the client. This will help you assess the client’s background and business details.
Product Details
Under this tab, you’ll find all the details regarding the product your customer has Inquired about.
As seen in the above image, this is where you’ll be able to Quote a New Price (Reduced) to your customer and even change the quantity accordingly. Furthermore, you can also attempt to Add and Quote another product that might compliment the customer’s Inquired product.
In doing so, you can improve your chances of upselling or cross-selling as well.
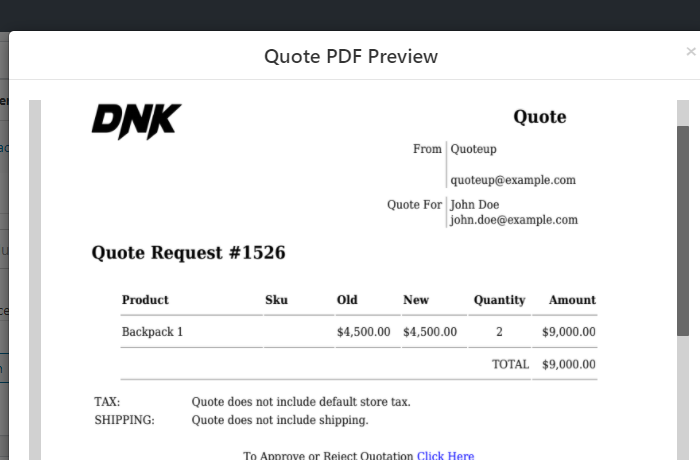
After adding New Price and Quantity, make sure to Preview your Quotation before sending it. Plus, it’s advisable to set an expiry date for the Price quotation to induce FOMO. This will push your customer to make a decision quickly.
Furthermore, while sending the Quotation, you can even personalize the subject line and the message. This will add a human touch to the transactional form making it more engaging.
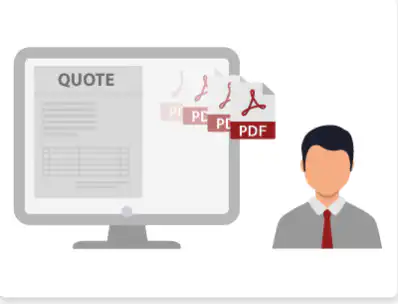
This Quotation will be sent in the form of a pdf to the email Id given by the customer. And, your customer can approve/reject the Quotation from the pdf itself.
Inquiry Remarks and Messages
In this section, you’ll be able to view any messages or special requests your customer has made for the Inquired Product.
You have the option to draft your response and reply to the message as per your needs. Just hit the Send button once you’ve formed your reply.
And, this is how you can easily address Inquiries and Quotation Requests in time with the WISDM Product Enquiry Pro plugin thereby, ensuring customer conversions.
Now, all you have to do is wait for your customer to approve the Quotation.
[su_note]Get rid of all your doubts – Try the Live Demo. Experience and explore all the functions now.[/su_note]
Step 4 – Send Price Quotations without receiving Inquiries
Over time, your WooStore will have customers who visit regularly or special customers who always have unique requirements.
Sometimes, you’ll even have customers who place orders on calls instead of emails or Inquiry forms.
And, once you’ve identified these customers and captured their email Ids, you can then use this feature to directly generate and send Price Quotations.
To generate price Quotations, you can go to:
- WordPress Dashboard > Product Enquiry Pro > Create New Quote
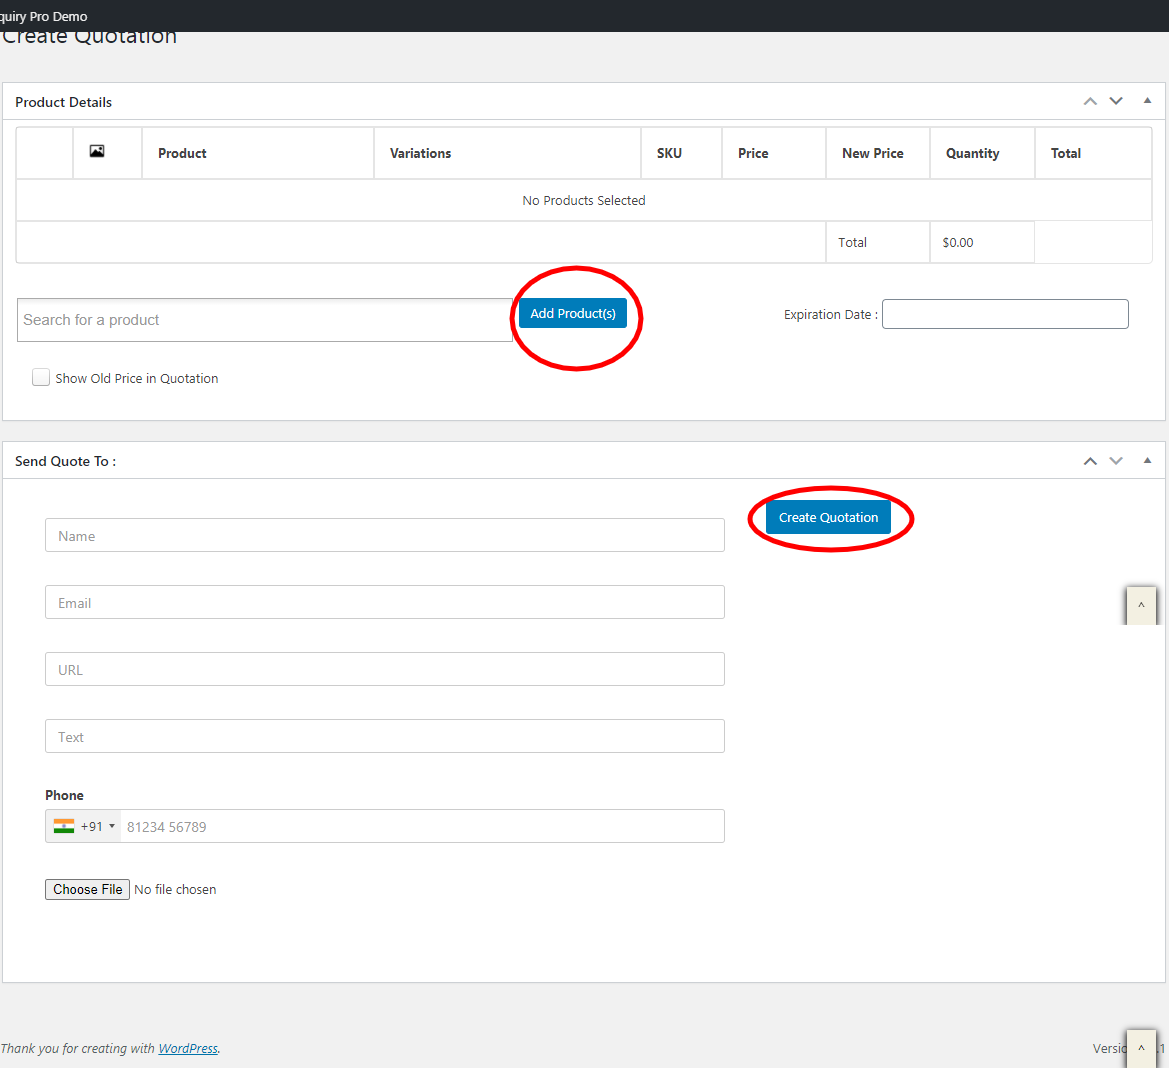
This pop-up will allow you to create Quotations.
As shown in the image above, you can click on the ‘Add Products’ button to select the particular product(s) you want to create the quotations for.
Similar to the above point, you can then add your Quoted Price in the ‘New Price’ column against the ‘Quantity’ as per your plans. And, you can even set the Expiry date for the Quotation.
After adding the products, you can scroll down and fill in the Customer details like – Name, Email id, Number, etc.
Once you’ve filled in Customer details, hit the ‘Create Quotation’ button to generate the pdf and send it across.
And, that’s how you can generate Quotations without receiving Inquiries. You can then move on to the last step in the process.
Step 5 – Change Settings to suit your requirements
And, this is the final step in the process of enabling Request a Quote (Yaaaaay!)
Here, you’ll get to control most of the settings and other features related to Inquiries and Quotations.
So, to look at your options and settings, you can quickly hop on to:
- WordPress Dashboard > Product Enquiry Pro
- Click the Settings option
This will bring you a page similar to the above image. Here, you’ll find different tabs like General, Email, Display, Quotations, Mini Cart, etc., and its settings that can be tweaked to fit your WooCommerce store.
a. General Settings
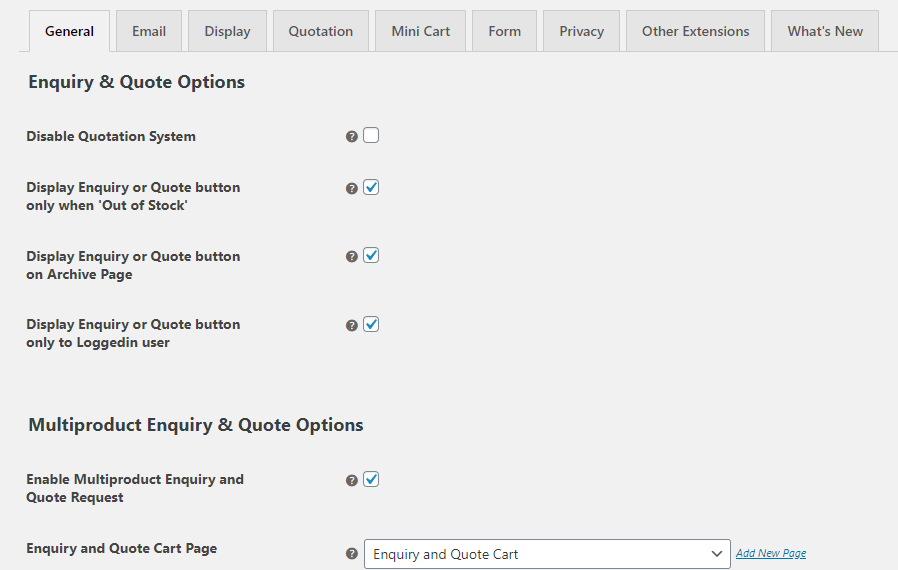
This tab will provide you with key options regarding Inquiry & Quotations.
You can choose to enable/disable Quotation System, display Inquiry or Quote button only when a product runs out of stock, display the Quote button on the archive page, and enable only logged in users to place an Inquiry or Quotation.
This allows you to be flexible with the ‘Request a Quote’ option. And, it also gives you the freedom to choose when and whom to make the Quotations options available.
Multi-Product Inquiries and Quotations
Moreover, you can even enable your customers to Inquire or Request a Quote for multiple products at once.
Enabling this option will provide convenience and save tons of time for your customers.
Plus, when you scroll further down, you also have the option to disable the ‘Price’ and ‘Expected Price’ column in the Inquiry mail and Inquiry Cart.
Form Options
Under this setting, you can even change the text for the ‘Request a Quote’ and ‘Inquiry’ buttons. You’re free to enter your own alternate texts that highlight the same.
Also, you can pick the Button Location to be displayed either after the ‘Product Summary or at the end of the ‘Single Products page’.
Once you’ve made the changes, you can hit the ‘Save’ button to make the settings Live.
b. Email Options
You can now move ahead to the Email Options.
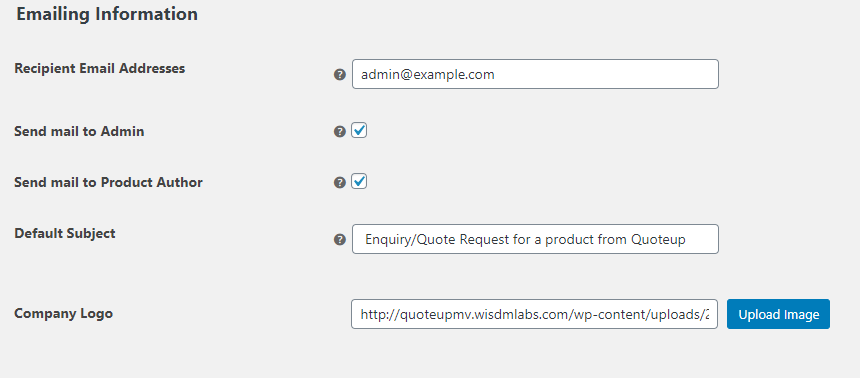
Under this tab, you can add the basic Emailing Information that will be used when customers send in Inquiries or Quotations.
You can add multiple email addresses from different departments in your WooStore. Doing this will ensure all the concerned people, by default, receive the Inquiries or Quotations sent by the customers.
This enables delegation of work and smoother coordination leading to the quicker address of the Inquiries and Quotations.
Plus, you can even add your Company Logo in the emails. It will highlight your brand and make your email look more professional.
c. Display Options
Through this setting, you’ll find lots of Styling options that can be applied to Inquiry and ‘Request a Quote’ buttons.
You can change the Button Background color, Button text color, Button Border color, Product Name color, etc. as per your will to suit the aesthetics of your website.
d. Quotations Option
This is an important setting where you can choose to enable/disable the pdf for sending quotations.
Once you enable it, you can add details like ‘Company Name’, ‘Company Email’, and ‘Company Address’ to highlight in the pdf.
You can add settings, choose where to redirect the customers, and highlight the message to be displayed when they approve/reject your Quotation.
With these settings, you can make it easier for your customers to understand and reply to your Quotations in a smooth manner.
e. Mini Cart
Now, a Mini Cart widget is an Inquiry Cart that you can place on your products page.
The moment your customer clicks on the Add Inquiry button for a specific product, it’ll get added to the Inquiry Cart. Your customer can view all their Inquiries in the Mini Cart at all times.
It might seem like a minor option but, believe me, it’s an important one.
This Mini Cart widget can enhance and smoothen your customers’ shopping experience significantly. And, through this setting, you can choose to enable/disable the Mini Cart widget as per your convenience.
Once you’re done with the settings, remember to Save it. You can then head to the front-end to test if the made settings are reflecting as per your command. And, if you’re unsatisfied then you can always come back and tweak the settings if needed.
On that note, you’re now set to enable the Request a Quote and Inquiry button on your WooCommerce Store :)
[su_button url=”https://quoteup.wisdmlabs.com/” target=”blank” style=”flat” background=”#960000″ size=”8″ center=”yes” text_shadow=”0px 0px 0px #000000″ title=”View Demo – WISDM Product Enquiry Pro”]View Demo – WISDM Product Enquiry Pro[/su_button]
Final Thoughts,
I hope this article has provided you with valuable insights into enabling ‘Request a Quote’ in your WooStore.
With the WISDM Product Enquiry Pro plugin, you can now move beyond the ‘Price-Add to cart-Buy’ formula. It’s time to scale your WooStore to greater heights with the Inquiries and Request a Quote option leading to higher conversion rates and sales.
And, in case you have any concerns/questions, feel free to comment below :)