


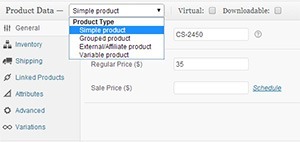
 WooCommerce has four product types, ‘Simple Product’, ‘Grouped Product’, ‘External/Affiliate Product’ and ‘Variable Product’.
Now, if you were happy with these product types, this article wouldn’t help you much. ;-)
We had a recent client, who wanted to create a certain kind of product, which did not ‘fit’ any of the current product types. Instead of customizing existing products, we concluded, the best way to move forward with this was to create a new product type.
Creating a Custom Product Type in WooCommerce
Having your own product type, allows you to have control on product settings. For example, you could set default values like price, visibility, etc.
If you wanted to create a new product type, this is what you would have to do. Add the below code in functions.php of your active theme, or a custom plugin.
// add a product type
add_filter( 'product_type_selector', 'wdm_add_custom_product_type' );
function wdm_add_custom_product_type( $types ){
    $types[ 'wdm_custom_product' ] = __( 'Wdm Product' );
    return $types;
}
add_action( 'plugins_loaded', 'wdm_create_custom_product_type' );
function wdm_create_custom_product_type(){
     // declare the product class
     class WC_Product_Wdm extends WC_Product{
        public function __construct( $product ) {
           $this->product_type = 'wdm_custom_product';
           parent::__construct( $product );
           // add additional functions here
        }
    }
}
Adding Custom Fields to Product Settings
Now that you have your custom product type, it is understandable, you would probably need to add some extra settings fields, for your custom product type. WooCommerce provides functions to add:
- A Text or Numeric Field: woocommerce_wp_text_input()
- A DropDown List: woocommerce_wp_select()
- A Text Area: woocommerce_wp_textarea_input()
- A Checkbox Option: woocommerce_wp_checkbox()
- An Hidden Input Field: woocommerce_wp_hidden_input()
You can use these functions to add settings options, using specified hooks. Below is an example, which adds a numeric field and a checkbox to the product settings:
// add the settings under ‘General’ sub-menu
add_action( 'woocommerce_product_options_general_product_data', 'wdm_add_custom_settings' );
function wdm_add_custom_settings() {
    global $woocommerce, $post;
    echo '<div class="options_group">';

    // Create a number field, for example for UPC
    woocommerce_wp_text_input(
      array(
       'id'                => 'wdm_upc_field',
       'label'             => __( 'UPC', 'woocommerce' ),
       'placeholder'       => '',
       'desc_tip'    => 'true',
       'description'       => __( 'Enter Unique Product Code.', 'woocommerce' ),
       'type'              => 'number'
       ));

    // Create a checkbox for product purchase status
      woocommerce_wp_checkbox(
       array(
       'id'            => 'wdm_is_purchasable',
       'label'         => __('Is Purchasable', 'woocommerce' )
       ));

    echo '</div>';
}
So, this was fairly simple to do. But just showing these options is not enough. We need to save and use these options. You would have to do the following:
add_action( 'woocommerce_process_product_meta', 'wdm_save_custom_settings' );
function wdm_save_custom_settings( $post_id ){
// save UPC field
$wdm_product_upc = $_POST['wdm_upc_field'];
if( !empty( $wdm_product_upc ) )
update_post_meta( $post_id, 'wdm_upc_field', esc_attr( $wdm_product_upc) );

// save purchasable option
$wdm_purchasable = isset( $_POST['wdm_is_purchasable'] ) ? 'yes' : 'no';
update_post_meta( $post_id, 'wdm_is_purchasable', $wdm_purchasable );
}

// to use the field values just use get_post_meta, and you are good to go!
This code has been written by trained professionals. For your own safety, Do try this at home ;-)


