

Trying to build your own WooCommerce plugin? Then this step-by-step WooCommerce plugin development guide is for you!
In the world of e-commerce, WooCommerce stands as a prominent WordPress plugin that empowers millions of online stores. However, sometimes you may find that the available extensions don’t quite meet your specific requirements.
That’s where building your own WooCommerce plugin comes into play.
In this WooCommerce plugin development tutorial, we will explore the process of building a WooCommerce plugin from scratch, providing you with the knowledge and tools to customize and extend the functionality of your online store.
But before we go there, let’s look at some key reasons why it becomes necessary to build a WooCommerce plugin from scratch.
Benefits of creating a WooCommerce plugin
The benefits of creating a WooCommerce Plugin are immense. Here are some of them:
- Tailored Functionality: Building your plugin allows you to add custom features and functionalities to your WooCommerce store, catering specifically to your business needs. Such features may not be available readily.
- Seamless Integration: By creating a plugin, you can seamlessly integrate additional functionalities with WooCommerce, ensuring smooth operation and compatibility – thereby extending its power.
- Scalability and Flexibility: Developing your plugin offers the advantage of scalability and flexibility, enabling you to adapt and expand your online store as your business grows.
Pre-requisites for WooCommerce plugin development
Although creating a WooCommerce plugin is a pretty simple procedure, there are several pre-processes that must be undertaken before we start coding. To put it simply, you require the following hardware and software to construct a WooCommerce plugin:
PHP:
WooCommerce was created using PHP, so a thorough knowledge of PHP programming principles is required. Variables, data types, functions, loops, arrays, and classes are all included in this.
WordPress Development:
Since WooCommerce is a WordPress plugin, you should be familiar with WordPress development. The WordPress architecture, hooks, filters, actions, and template files are all included in this.
WooCommerce:
You ought to be well-versed in the software’s operation and foundational features. This involves familiarity with order administration, taxonomies, product categories, and payment gateway integration.
HTML, CSS, and JavaScript:
You should be well-versed in HTML, CSS, and JavaScript because WooCommerce plugins frequently call for changes to the front-end user experience. Basic web development topics including DOM manipulation, style, and event handling are included in this.
Documentation:
Writing simple and comprehensive documentation is essential for any plugin. You must be proficient in writing user manuals, API documentation, and technical documentation.
Code editor:
The creation of WooCommerce plugins requires a reliable code editor. To assist you in writing and testing your code, it ought to contain debugging tools, code completion, and syntax highlighting.
Git:
For managing code changes, many engineers utilize the Git version control system. It is practical for monitoring changes and working with other developers.
Debugging Tools:
You should be familiar with debugging tools like Xdebug, Kint, and Query Monitor because it’s a crucial aspect of creating plugins.
You may create reliable and effective plugins for WooCommerce if you have a solid understanding of these requirements. To ensure compatibility with your plugin, it is also advised to stay up to speed with WooCommerce’s most recent upgrades and modifications.
Key Steps for WooCommerce Plugin Development
To successfully build a WooCommerce plugin from scratch, you need to follow these key steps:
- Set up the Plugin Folder: Create a dedicated folder for your plugin to organize its files.
- Create Plugin Files: Develop the necessary files for your plugin, such as the main plugin file and any additional files required for custom functionalities.
- Create the Plugin Header: Provide essential information about your plugin, including its name, version, author, and description.
- Write the Plugin Code: Implement the desired functionalities using PHP, HTML, CSS, and JavaScript, while utilizing the WooCommerce API and hooks.
- Test the Plugin: Thoroughly test your plugin to ensure it functions as intended and remains compatible with WooCommerce and other plugins.
Note: To access WisdmLabs’ detailed guidebook on building a WordPress plugin, click here.
Developing the WooCommerce plugin: Step-by-step guide
Step 1: Set up a development environment:
- To create a plugin, you’ll need to install WordPress and WooCommerce on your local computer. You can create a local server environment by using programs like XAMPP or MAMP.
- For your development environment, you should set up a different WordPress installation so that you may test out new code without affecting the live version of your website. To accomplish this, you can set up WordPress and WooCommerce as a subdomain or subfolders on your web server.
- You must use a code editor that supports WordPress and PHP to write your code. There are numerous choices, such as PHPStorm, Sublime Text, and Visual Studio Code. Install the one you decide meets your needs on your computer.
- Enable debugging: You must enable debugging in your development environment because it is crucial to the creation of plugins. Add the following lines of code to your wp-config.php file to accomplish this:
define(‘WP_DEBUG’, true);
define(‘WP_DEBUG_LOG’, true);
define(‘WP_DEBUG_DISPLAY’, false);
Is this overwhelming? Let our WooCommerce Experts create a plugin for you!
Get help from WooCommerce Experts
Debugging will then be enabled, and any problems will be logged to a file in the wp-content directory.
- Set up version control: Working with other developers and tracking changes to your code both require version control. You can create a Git repository for your plugin and host your code on a platform like GitHub or Bitbucket.
You can create a development environment for WooCommerce plugin development and begin creating changes and new features for your e-commerce website by following these instructions.
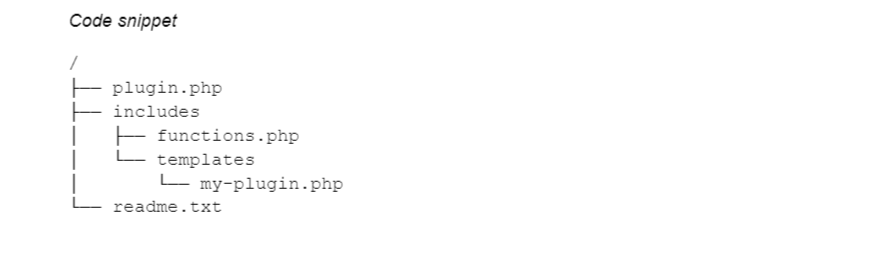
Step 2: Setting up the Plugin Folder
To begin, create a dedicated folder within the WordPress plugins directory to house your custom plugin files. This folder should be named after your plugin, and it should be located in the wp-content/plugins directory.
The directory structure for a typical WooCommerce plugin should look like this:
Step 3: Add Plugin Files: Once you’ve created your plugin folder, you’ll need to create a few files. Typically, you’ll have a main plugin file (e.g., plugin.php/your-plugin-name.php) and additional files for custom functionalities. These files are:
- plugin.php/your-plugin-name.php: This is the main plugin file. It contains the plugin’s header, functions, and hooks.
- functions.php: This file contains the plugin’s main functionality.
- style.css: This file contains the plugin’s CSS stylesheet.
- script.js: This file contains the plugin’s JavaScript code.
The plugin.php/your-plugin-name.php file is the plugin’s main file. It contains the plugin’s header and the plugin’s functions.
The includes folder contains the plugin’s PHP files. These files contain the plugin’s code.
The templates folder contains the plugin’s templates. These files are used to render the plugin’s output.
The readme.txt file is the plugin’s readme file. It contains information about the plugin, such as the plugin’s name, version, description, and author.
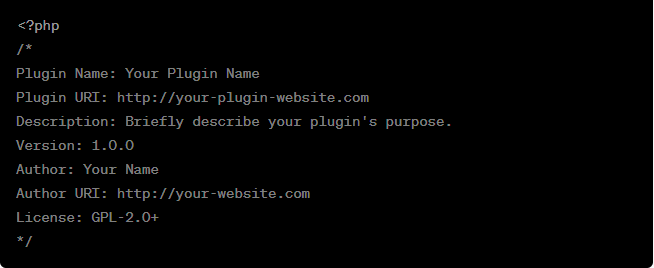
Step 4: Adding a Plugin Header
The next step is to add a plugin header. In the main plugin file, add a plugin header containing essential information about your plugin. This header provides details that WordPress uses to identify and display your plugin correctly:
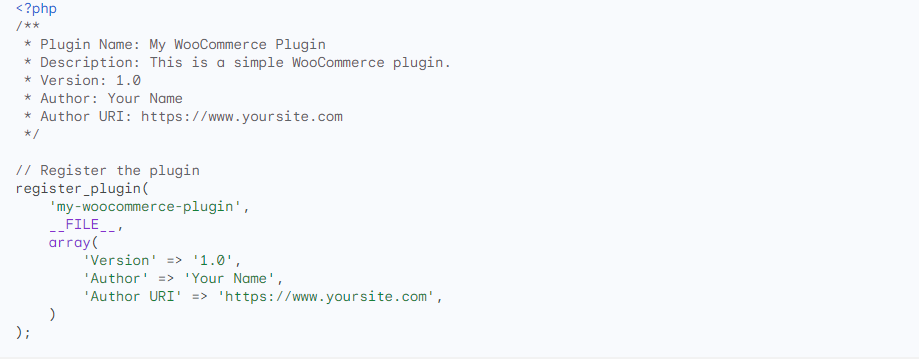
Step 5: Registering the Plugin
Now it’s time to register your plugin. This tells WordPress about your plugin and allows it to be activated and deactivated.
To register your plugin, you’ll need to add the following code to the plugin.php/your-plugin-name.php file:
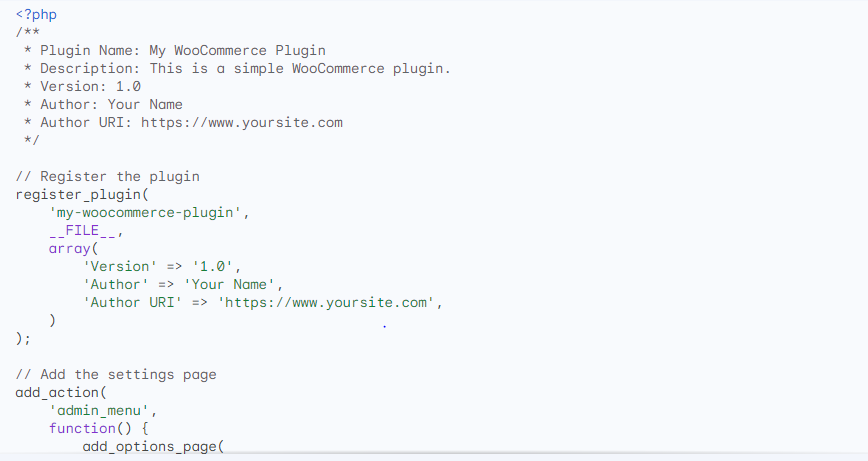
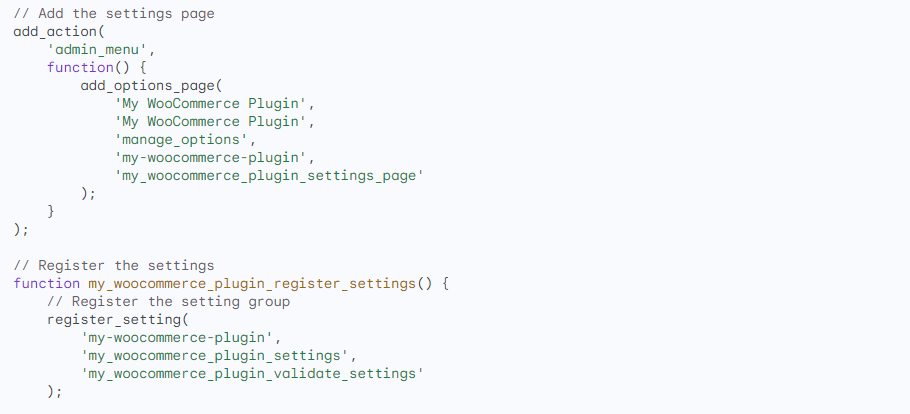
Step 6: Create a Settings Page
Now that we’ve registered our plugin, we can create a settings page. This will allow users to configure the plugin’s settings.
To create a settings page, we’ll need to add the following code to the plugin.php/your-plugin-name.php file:
Step 7: Writing the Plugin Code and adding a functionality
Start writing your plugin code, utilizing the WooCommerce API, and add hooks to interact with WooCommerce functionalities. Here’s an example of how you can add a custom tab to the product page after adding the settings.

This example demonstrates how to register a custom tab on the product page and display custom content within that tab. You can further extend this functionality to add more features and customize your WooCommerce store to meet your specific needs.
Note: This above step is often referred to as adding hooks and filters.
Hooks and filters must be added as a necessary component of WordPress plugin development. Other developers can alter your plugin’s behavior using hooks and filters without changing its core code. When creating a WooCommerce plugin, hooks and filters can be used to change the system’s many components, including orders, products, and payments.
Your WooCommerce plugin can be made more adaptable and adjustable for users and other developers by adding hooks and filters. Follow WordPress best practices when adding hooks and filters, which include giving your hooks and filters distinctive names, adequately describing them, and extensively testing them to make sure they function as intended.
Step 8: Testing the Plugin
To test your plugin, you’ll need to activate it and then visit the WooCommerce settings page. You should see your plugin’s settings page in the list of WooCommerce settings pages.
Once you’ve found your plugin’s settings page, you can configure the plugin’s settings. Once you’ve configured the plugin’s settings, you can test the plugin’s functionality.
Feeling Stuck? Let our expert WooCommerce team make things easy for you!
Discuss my plugin with experts
Publishing the WooCommerce plugin
Now that you have your plugin, it’s time to publish it and make it available for others as well. Let’s look at the steps we need to follow to accomplish this.
- Pick a platform to publish your plugin: The official WordPress plugin repository, GitHub, and CodeCanyon are a few places where you can publish your WooCommerce plugin. Pick a platform based on your needs and objectives.
- Prepare your plugin for publication: Before publishing, ensure your plugin is ready for use by the general public. This entails making certain that your code is well-documented, that your plugin has undergone rigorous testing, and that it is secure.
- Submit your plugin to the platform: Submit your plugin to the platform of your choosing once it is ready for publication. To ensure that your plugin is accepted, carefully follow the submission rules.
- Promote: Promote your plugin on forums, social media, and other platforms after it has been released. This might raise the visibility of your plugin and draw users to it.
Steps to Publish on WordPress.org
- Prepare readme.txt with plugin details.
- Submit your plugin via the WordPress Plugin Repository.
- Follow WordPress review team’s feedback and make necessary changes.
Optimizing for Marketplaces
- Use clear plugin descriptions and SEO-friendly metadata.
- Provide engaging screenshots and a demo video.
- Collect early reviews to build credibility.
Best Practices for creating a WooCommerce plugin
Determine your plugin’s purpose
Decide what your plugin will perform and what issue it will tackle before you begin writing. Do you want to add a new feature or do you want to improve a pre-existing one? Does it integrate with payment gateways or other third-party services?
Use third-party libraries
When possible, use third-party libraries to cut down on errors and save time. Composer and Packagist are two popular libraries for developing PHP applications. Read the instructions carefully in the documentation before using a third-party library or service to become familiar with any restrictions or prerequisites.
When incorporating third-party libraries and services into your plugin, use best practices. Use namespaces, for instance, to prevent naming conflicts, and stay away from utilizing outdated or unsafe functions. Give credit to the provider and provide any necessary attribution in your plugin description or code if you use a third-party library or service.
Note: For more information about the exact best practices, follow the official WooCommerce documentation on plugin creation. Check here.
Recommended Tools for WooCommerce Plugin Creation:
Developing a WooCommerce plugin requires the right set of tools to streamline the process, improve efficiency, and ensure high-quality code. Below are some essential tools every developer should consider:
1. Local Development Environments
Setting up a local development environment is crucial for testing your plugin safely before deploying it live. Some recommended options include:
- Local by Flywheel – A user-friendly tool for setting up WordPress and WooCommerce locally.
- DevKinsta – Provides a one-click WordPress setup with SSL and email testing.
- VVV (Varying Vagrant Vagrants) – A flexible development environment tailored for WordPress.
- wp-env – A modern, Docker-based WordPress environment for quick setups.
2. Code Editors & IDEs
A powerful editor helps with efficient coding and debugging. Some popular choices are:
- VS Code – Lightweight and extensible with WooCommerce development extensions.
- PhpStorm – A robust PHP IDE with built-in WordPress support.
- Sublime Text – Minimalistic and fast, with great plugin support.
3. Debugging & Testing Tools
Testing your plugin ensures performance, security, and compatibility. Use:
- Query Monitor – Helps debug database queries, hooks, and PHP errors.
- Debug Bar – Adds debugging menus to WordPress for quick issue identification.
- WP-CLI – A command-line tool for managing WooCommerce sites efficiently.
- PHPUnit – The standard framework for running automated PHP tests.
4. Version Control & Collaboration
Version control is critical for tracking changes and collaborating with teams. Recommended tools include:
- Git & GitHub/GitLab – Version control for managing code repositories.
- Bitbucket – An alternative to GitHub with private repo support.
5. Security & Code Quality Checkers
Security and clean code are essential for a high-quality WooCommerce plugin. Consider:
- PHPCS (PHP CodeSniffer) – Ensures code follows WordPress coding standards.
- SonarQube – Analyzes code for vulnerabilities and optimization issues.
- Wordfence Scanner – Helps detect security threats in plugin code.
Wrapping up…
In conclusion, building a WooCommerce plugin from scratch empowers you to customize and extend the functionality of your online store, catering to your unique business needs. By following the step-by-step guide provided in this blog post, you can create a powerful plugin that seamlessly integrates with WooCommerce. Enjoy the benefits of tailored functionality, scalability, and flexibility as you enhance your e-commerce venture.
However, building a plugin with the help of experts like WisdmLabs offers numerous advantages over doing it yourself.
Being in the WooCommerce space for 10+ years, Wisdmlab’s deep expertise ensures that the plugin is built with clean, efficient code, optimizing the performance of your Woo store and enhancing its speed and responsiveness. WisdmLabs’ thorough testing and quality assurance processes guarantee a bug-free and reliable plugin, minimizing any potential issues or downtime for your website.
Ultimately partnering with WisdmLabs to build a WooCommerce plugin from scratch empowers you with a wealth of knowledge and insights in the WooCommerce ecosystem, ensuring that your plugin is future-proofed and can seamlessly adapt to any changes or updates in the platform.
So explore our WooCommerce Plugin Development services and get in touch with experts to build your WooCommerce plugin.
Resources for Further Learning:
- For WooCommerce Developer Documentation, go here.
- For the WordPress Plugin Handbook, click here.
- Join the WooCommerce Community here.
- Enrol in the Codecademy PHP Course, here.
- Read this article to learn how AI can help you write a WordPress plugin.
- For more information about perfecting the art of WordPress Plugin development, read this article
Post Authors

Kalpit is a Content-Marketer with an eye for Product Design in the B2B SaaS industry. Helps brands achieve a human voice with targeted and high ROI marketing campaigns.


