WordPress can be installed on localhost. Now what is localhost and why to install WordPress on localhost? Well localhost is basically your computer as a host. This means that you host the WordPress files on your computer instead of directly hosting it on a paid host.
The question is, why would you install WordPress on localhost? Well installing WordPress on localhost can help you to experiment and test your code offline without actually publishing it on the web. So you can test your plugins, themes, modifications, etc on the localhost.
[space]
What do you need?
You need to download WordPress package and WAMP server. WAMP is basically a package which runs on Windows with Apache server based on MySQL and PHP. So you can run a MySQL database connected to PHP script on your localhost using WAMP.
Choose the WAMP download which suits your architecture (32 bit or 64 bit). Once you download WAMP, install it with default settings. After installation, you can find WAMP at C:\wamp.
[space]
Extracting WordPress
Extract WordPress using Winrar or any compressor tool. Copy the extracted WordPress folder inside C:\wamp\www\ folder.
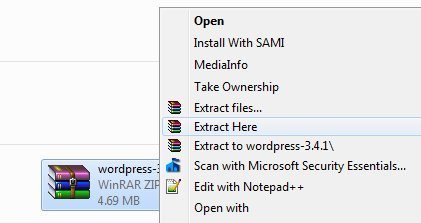
Now you should have C:\wamp\www\wordpress\

[space]
Create a Database
Run WAMP on your computer. Left Click on WAMP tray icon and select phpMyAdmin. If it asks you to enter username and password then simply enter the username as root and hit login.
In phpMyAdmin, you can find something which says “Create new database”. In there just enter the database name, for instance “abc” and hit create button.

[space]
Installing WordPress
-
Now you’re all set to install WordPress. To do so, open the web browser and type in localhost/wordpress and hit enter.
-
This will ask you to create a configuration file. Hit on the “Create a configuration file button” to create one.
-
WordPress install screen shows up with some instructions, just hit on let’s go button.
-
Now WordPress asks you to enter the database details. Here enter the database name as abc which we created previously. Enter the username as root. Keep the password field empty. Database host should be localhost by default and preferably don’t touch the table prefix. Now hit the submit button!
-
Hit run the install button!
-
Now WordPress asks you to enter your site’s information. Enter the site title, username, password, email address, etc. The username and password will help you to log into wp-admin panel. Hit the install wordpress button.
-
A success message appears and now you can hit login button to log into the wp-admin panel. And your site can be accessed at localhost/wordpress.
[space]
As a web developer, I often forget the username and password to my localhost sites since I’m usually handling too many sites at a time. So in case if you don’t remember the username and password, no need to reinstall WordPress. All you need to do is just reset the password via phpMyAdmin. I’ll show you how to do that in the next post.