Social media is a great way to drive business and attract consumers to your site. Not just that, for small businesses sharing content with the outer world via social media, makes them gain the brand they desire. But manually Sharing the blog content of the WordPress site on so many different social channels is a tedious process and consumes a lot of time.
An alternative to this is using the Microblog Poster plugin which promises the ability to cross-post your newest content to multiple social sites such as Twitter, Facebook, Linkedin, Plurk, Diigo and Delicious from your WordPress website itself!
The Microblog Poster Plugin is simple to use and much simpler to install. Let’s start with installing the plugin first. Click here to download the plugin, following which you need to install it to your WordPress sites. Once you’ve installed the plugin, Log in to your WordPress sites and go to the Dashboard. You’ll see the Microblog Poster plugin as a menu is the side menu bar.
Before we move on to using the plugin, I want you to know that you’ll need to configure all your social media accounts to start sharing. This is done because, you can’t access your social media accounts just like that, you will need to authenticate them to your WordPress site. Okay let me not confuse you here, we shall discuss this in the later part of the article.
You Need a Shortlink first!
The usual URL of your WordPress site is going to be huge! And trust me, it becomes almost impossible to use such long URLs specially on a social platform like Twitter, where the word limit itself is 140 characters! This calls for the need of a short link. Not just that, providing a short link for the website makes it easier for others to share the content of your website. Where will you get the Short link? Ever heard of Bitly? It’s a URL shortening service, which we have used for creating a short link for the WordPress site.
For getting a short link for your Website, you need to do the following:
- Sign up with Bitly
- Create an Bitly account.
- Follow the basic settings.
- Generate a token. (wait! this is not the short link, it will be used to get the short link)
Once the token is generated copy it somewhere. Come back to the plugin, Go to Dashboard> Setting> Microblog Poster.
1. General Section of the Plugin
You need to paste the newly generated token(provided by Bitly) here:
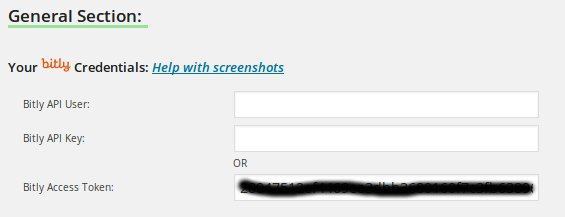
Update the options. This creates a short link for your WordPress site.
2. Social Networks Account
The Microblog Poster plugin currently supports the following social media sites: Twitter, Facebook, Plurk, Delicious, Friendfeed, Diigo, LinkedIn and Tumblr. You’ll have to configure each of your social media account with your WordPress website.
For Configuring Social Media: Please understand this- none of your social media account will allow external sites(in this case, the WordPress site) to access their data. Each of these social networking sites require you to create an ‘Application’ or an ‘App’ which would be created from the social media sites only and then configure this App with in your WordPress sites. The App is used for authentication purposes. App creation and all sounds very tedious but no worries, this is a one time procedure and it’s very simple. Please click here for detailed instructions on how to create apps for your social media accounts. The instructions given there are very clear and will surely help you configure your social media accounts.
3. The Logs Section
Logs are generated on new blog post for each configured social network account. You can configure your accounts and check it for yourself! I had configured my Facebook account, you can see the log entry for Facebook in the screenshot. Similarly, different social media accounts will have different entries. Basically the Logs section will help you in following your plugin’s activities and even debug it’s configuration.

After you’re done configuring all your accounts, you can automatically start publishing your blog posts to various social networks.
Note: If you don’t want the plugin to auto publish on your respective social platforms, simply select ‘Don’t cross post automatically’ in Dashboard> Settings> Microblog Poster> General Settings (Screenshot)

[space]
There are very few plugins out there which integrate seamlessly with different social media platforms. Microblog Poster being one such plugins handles all the posts with relative ease. What I love about this plugin is that it automatically publishes your blog content to Social Networks. This will definitely help you in further promoting your blog and reaching out to more people through social networks.
That said, this plugin will indeed make favorable addition to many WordPress sites that are frequently updated for content. Do you agree with my views? I would certainly like to hear your feedback in the comment section below.