
Adding images can bring clear focus on items, and can make them attractive. I’ve always liked seeing images on navigation menu items, they add more appeal. Images can be used instead of menu text, like a house image for ‘Home’, or a mail for ‘Contact Us’. You can also use images besides text too, which is preferred incase images don’t load. (But these images, are generally small in size so I don’t think that loading would be a problem).
I’ll tell you two simple ways to add images to your navigation menu items. One is using actual images, and the other is using font awesome icons. Both these methods basically use CSS to display a graphic next to your menu name text.
[space]
Add Custom CSS to Menu Item
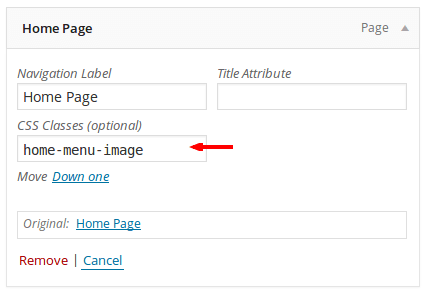
If we are going to use custom CSS to display a graphic with the menu item, there should be a way to specify this. WordPress provides us with an option to add custom css classes to menu items. This makes our job fairly simple. But by default, this option is not visible. To display this option, go to Appearance-> Menus in your dashboard. Find the ‘Screen Options’ tab and enable ‘CSS Classes’ in ‘Show advanced menu properties’.

[space]
Adding Images to Your Menu Item
The images that you want to display for your menus items, should be added in ‘images’ folder of your theme. Then, you can go to your theme stylesheet, and add the following classes.
/*
Custom Menu Images
---------------------------------------------------------------------------- */

.home-menu-image a{

padding-left: 30px !important;
background-image: url(images/Home.png);
background-position: left;
background-repeat: no-repeat;

}

.sample-menu-image a{

padding-left: 30px !important;
background-image: url(images/leaf.png);
background-position: left;
background-repeat: no-repeat;

}
This basically sets a background image for your menu item. The background image position is specified as ‘left’, to indicate that the image will appear before the menu item. If you specify ‘center’, the image will be placed at the center of your menu. As an example, I have specified menu images for ‘Home’ and a ‘Sample’ menu page. You can use this idea for all menu items.
Now, specify the corresponding classes, for your menu items.
Your menu should look something like this.

[space]
Use Font Awesome Icons for your Menus
Font Awesome is a font originally created for Twitter Bootstrap, but can now be used in WordPress, with the use of a plugin, Font Awesome 4 Menus. Although the name of the plugin says Font Awesome for Menus, icons can be added to any WordPress post or page, apart from just menu items. The plugin loads it’s own stylesheet, to load the fonts.
Install the plugin, and start using the CSS classes. You can find a list of CSS classes for your desired icons from the Font Awesome Cheatsheet.
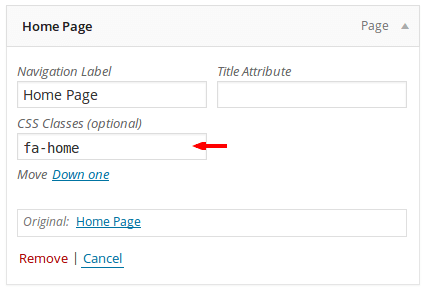
For menu items, specify the classes in the CSS Classes field.

My go to option is adding Font Awesome Icons to the menu. There are numerous icons available, and they are made up of vectors and thus are responsive. What option would you prefer? Let me know your thoughts in the comment section below.