“Maximizing revenue.” – that elusive dream we all have! Because more the better, right?!
Well, when it comes to getting more from every customer aka increasing the order value, a popular and effective strategy is to bundle or group products.
Grouping is when related products are combined and clearly displayed as packages, so save customers the trouble of finding and purchasing them separately.
And on WooCommerce, you can do so easily in two ways – a) by creating Grouped products and b) using Product Bundles. We’ll explore both in this article. So, let’s get started.
[lwptoc numerationSuffix=”dot” title=”WooCommerce Grouped Products: A Guide” toggle=”0″ skipHeadingLevel=”h3″ skipHeadingText=”Conclusion”]
What are Grouped Products? Are they the same as Product Bundles?
WooCommerce has an inbuilt functionality to create Product Groups. These are similar products you want to sell separately, but also display a clear connection between these products to the buyer.
For example, you want to sell songs, and also ‘group’ these songs as an album. Or show individual pieces of furniture, and group them under a ‘Living Room Essentials’ product.
Buyers can add any of the grouped products too in their shopping cart, thus not having to browse for them separately.
Product Bundles, on the other hand, allow you to create a combo of related products that are frequently bought together by your customers. You can sell the assortment as a single product and offer bulk discounts on such combos. Customers are drawn to the savings and might choose to purchase a bundle rather than an individual product.
The primary difference is that Groups cannot be purchased as a single product, whereas Bundles or product boxes can be.
What are the Advantages of Grouped Products?
The key benefit is that it allows you to sell ‘similar’ products from each of your product pages without necessarily ‘bundling’ them in combo packages if they’re not as deeply related to each other and do not belong to the same product category, or if you want to allow customers to choose.
For your customers, it allows them to find the products they may like very easily without having to browse across your site.
In addition to that, it also creates strong inter-linking between your product pages, which is essential for Search Engine Optimization (SEO) of any site.
Okay, moving on to how grouped and bundled products can be created on your WooCommerce store.
Steps to Create Grouped Products
Grouped Products can be created using the core functionality included in WooCommerce. The process is pretty similar to the process of creating single products. Here it is:
Step 1: Add the new simple product
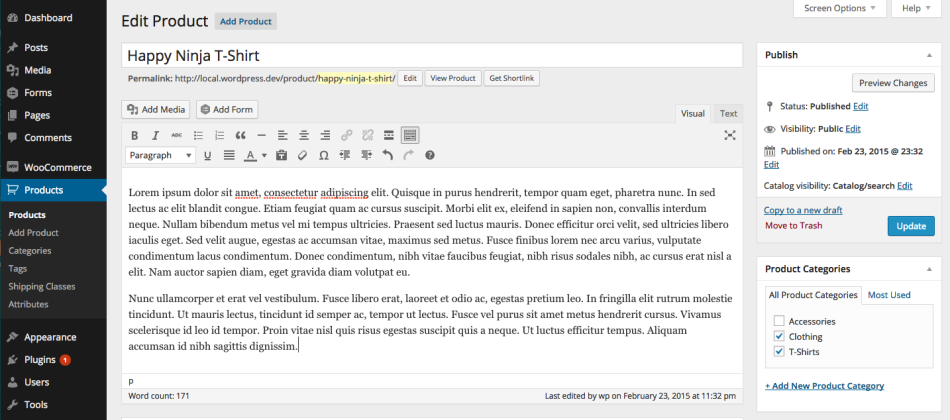
First of all you need to create a Simple product. Navigate to your WordPress dashboard, and in the dashboard menu navigate to Products > Add product.
You can enter a title, description and image for your product as well.
Once you’ve added the basic information like title, description and images, scroll down and find the ‘Product Data’ panel, and in that panel select product type as ‘Simple Product’. You can also enter inventory, taxation and price details from this panel.
Once you’ve entered every necessary detail, save your product. Repeat the process for all products that you want to sell on your site.
Let’s go back to the example of musician that we used above. That musician will first of all have to create a simple product for all of his songs so people can download them individually if they want to.
Step 2: Create the grouped product
Now, the next step is to create the Parent product that will be used to group all your products.
For instance, if that musician we’re using in our example wants to create two separate groups combining all his Party Songs and all his Instrumentals from various albums, he needs to create two Grouped Products for each of them: a Party songs product, and an Instrumentals product.
Only then he can link child products (i.e. individual songs) to these two parent products.
Fortunately, creating Grouped Products is not much different from Simple Products. You enter the title, description and Image the same way as you do for Simple Products. The only difference remains in the Product data panel, where instead of choosing the Simple product as product type you choose Grouped product.
When you choose this product type, a number of details like price, inventory etc. vanish from the Product data panel. This is perfectly normal, because those details will be derived from individual products.
Step 3: Link products
The final step is to link your individual products to the recently created Grouped Product.
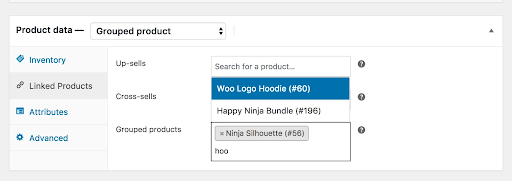
In the same Product data panel where you selected the ‘Grouped product’ option in the last step, you’ll find a new option called ‘Linked Products’. Click it and start typing the name of the products you want to link in the Search bar.
As you type the names of every product, they’ll start appearing below the search bar. You need to select them by clicking the names and each of the products will be added to the Grouped products section. Once you’ve added all the products, you can click the Update button on the product page to save your changes.
Creating and Offering Product Bundles
If you want to create and sell groups of products as bundles, then you’ll need the WISDM Custom Product Boxes plugin extension.
The specialty of this plugin is – either you or your customers can create custom product bundles to be sold or purchased! The plugin basically tries to bridge the gap between Product bundles and Grouped Products by providing you the best of both worlds.
It allows you to set fixed as well as variable (i.e. dynamic) pricing for your bundles. And, it also allows adding any type of products to a bundle (i.e. simple, variable or subscription products). That’s how you can use it to create bundles of products that are closely related to each other (i.e. all music tracks of a single album).
Plus, it also allows your customers to mix and match similar products easily for creating custom Grouped Products based on various criteria (i.e. music tracks belonging to different albums but same genre). This advantage takes it a step ahead of the core functionality included in the WooCommerce plugin.
Once you install the plugin, you’ll be able to create a bundle.
To do so, you have to create a ‘Custom Product Box’ product. You can decide the price, set the capacity, add items or let customers choose products they want to purchase as add-on products. You could:
- Sell empty (customers can add products and create their own group)
- Create partially filled groups
- Create a filled box (a group of products) that a customer can purchase as a single product
And, to help you experience all the functions and features of the plugin, you can now try out the plugin for Free!
That’s right, you can opt to sign up for the 15 Day Free Trial of the Custom Product Boxes plugin. Once you sign up, you’ll get access to all the premium features, support, and the freedom to cancel your subscription anytime during the trial period.
This is your golden chance to try the plugin before you buy it!
Conclusion
Grouped products are an easy way to increase your revenue and to create strong interlinking between your various product pages that have certain similarities.
They can help in significantly increasing sales while improving the user experience at the same time, and that’s precisely why they work.
We’ve explained to you everything about this functionality, and also the two ways to implement it easily.
Now it’s upon you to select an implementation method of your choice and start using the power of Grouped products. All the best!

