| A custom Walker Class in WordPress lets you change the way menu items are displayed on your site. Instead of relying only on the default output of wp_nav_menu(), you can use Walker_Nav_Menu to customize menu structure, add icons or arrows, assign custom classes, and redesign the navigation to better match your website. In this article, we will see how a custom walker class works and how you can use it to redesign WordPress menus. |
One of the USPs of WordPress is that it is an open-source web publishing platform. Like every open-source piece of software, it’s free for you to tweak and customize the way you see fit. And one of the many possibilities while personalizing your WordPress website is that you can change the way it displays menu items on the site.
Take a look at the mega menu on our site, and notice how the menu has been redesigned to match the look of the website.
Such personalizations can be implemented using the Walker Class. Once you create a menu from your WordPress backend i.e. Appearance > Menus, it is the function wp_nav_menu() within your template files that displays those menus.
The basic output of wp_nav_menu() is simple enough. But if you want more control over the HTML structure, custom classes, submenu indicators, or the overall design of the menu, the default settings can feel limited.
That is where the Walker Class comes into the picture.
<ul id="someid">
<li><a href="someurl.com">Blog</a></li>
<li><a href="someurl.org">AboutMe</a></li>
<li><a href="someurl.in">ContactMe</a></li>
</ul>
While it’s possible to customize a wp_nav_menu() by passing an argument array, customizing it that way is limited at best and is not what we are looking for here.
If you need professional help redesigning your WordPress website, book a free consultation.
Checkout this WordPress Redesign Best Practices if You are Thinking of a WordPress Redesign
Things To Do Before You Start
Before you begin customizing the menu, make sure you:
- know where wp_nav_menu() is being called in your theme
- have access to your theme files
- take a backup of the current code
- test changes on a staging site if possible
- check whether your theme already has a custom walker in place
This can save you from unnecessary confusion later.
Walker Class
WordPress uses a special class, called the Walker class, designed to help traverse and display elements having a hierarchical structure. WordPress goes through menu items and their child items using a walker object and then outputs the required HTML.
The Walker_Nav_Menu class is located in wp-includes/nav-menu-template.php. You can navigate through Walker_Nav_Menu from the mentioned PHP file, and see how the links and the menu structure are built there. Here are some useful functions from this class relevant to our topic of discussion.
- start_lvl() : A function to return the HTML for the start of a new level. In the case of lists, this would be the start of new sub-list and would be responsible for returning the <ul> tag.
- end_lvl() : Called when we finish a level. In the navigation menu example, this function is responsible for ending the sub-list with a closing list tag </ul>
- start_el() : The function responsible for displaying the current element we are on. In the case of menus, this would imply <li> tag and the item’s link.
- end_el() : The function called after an element and all it’s children have been displayed. For our menu example this would mean returning a closing </li> tag.
Let’s get to the part about the know hows of customizing menus any way you want. The steps for the same would be:
- In your functions.php file, create a class which will extend the Walker_Nav_Menu class.
- Copy the required or all functions from Walker_Nav_Menu with their source code and paste it into your class.
- Modify the source code of functions as per your requirement.
- Do not forget to pass an object of customized class to wp_nav_menu() when you call it.
- Lastly, you’ll have to instantiate Wdm_Custom_Walker_Nav_Menu and pass it as an argument to wp_nav_menu() through an array.
Confused? Let’s simplify things with an example. Take a look at the image below, it’s a navigation menu I’ve customized using Walker_Nav_Menu.
How to Redesign a Homepage on WordPress Without Losing SEO?
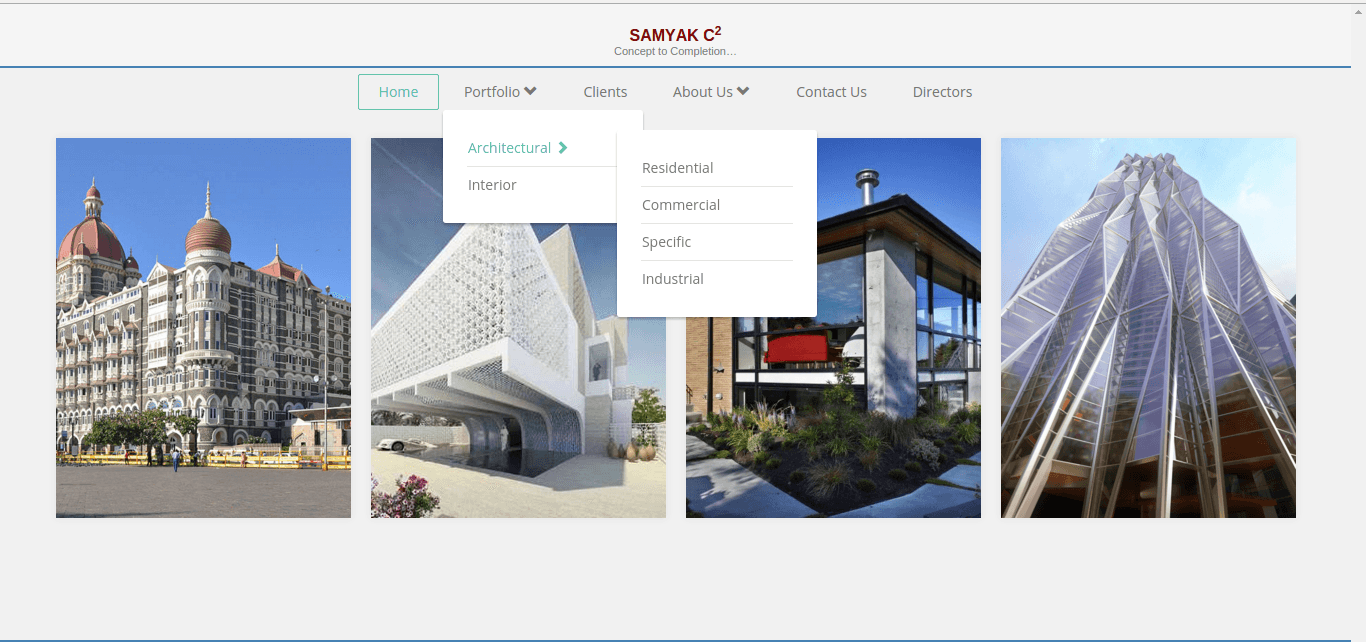
Suppose I’d like to show an arrow against a menu item with a submenu, as shown in the image. As explained above, this can be accomplished by extending the Walker_Nav_Menu class. Here’s the code for the custom Walker_Nav_Menu that I created.
<?php
class Wdm_Custom_Nav_Walker extends Walker_Nav_Menu {
public function start_el( &$output, $item, $depth = 0, $args = array(), $id = 0 ) {
    $indent = ( $depth ) ? str_repeat( "\t", $depth ) : '';
    $classes = empty( $item->classes ) ? array() : (array) $item->classes;
/* -Wdm changes- */
//Getting post id of current page
    $wdm_postid    = url_to_postid( $item->url );
//$have_children var keeps record of the children of the current page
    $have_children    = false;
//wdm_has_children() function is a function I've written in functions.php, that checks the children of a post from its post id.
    if ( wdm_has_children( $wdm_postid ) ) {
       $have_children = true;
    }
//If the current page has a child, I assign my own CSS class- wdm-has-child.
    if ( $have_children ) {
       $classes[] = 'wdm-has-child menu-item-' . $item->ID;
    } else {
       $classes[] = 'menu-item-' . $item->ID;
    }
    /* -End of Wdm changes- */
    $class_names    = join( ' ', apply_filters( 'nav_menu_css_class', array_filter( $classes ), $item, $args, $depth ) );
    $class_names    = $class_names ? ' class="' . esc_attr( $class_names ) . '"' : '';
        $id    = apply_filters( 'nav_menu_item_id', 'menu-item-' . $item->ID, $item, $args, $depth );
    $id    = $id ? ' id="' . esc_attr( $id ) . '"' : '';
    $output .= $indent . '<li' . $id . $class_names . '>';
    $atts            = array();
    $atts[ 'title' ]    = ! empty( $item->attr_title ) ? $item->attr_title : '';
    $atts[ 'target' ]    = ! empty( $item->target ) ? $item->target : '';
    $atts[ 'rel' ]        = ! empty( $item->xfn ) ? $item->xfn : '';
    $page_name = apply_filters( 'the_title', $item->title, $item->ID );
    $atts = apply_filters( 'nav_menu_link_attributes', $atts, $item, $args, $depth );
    $attributes = '';
    foreach ( $atts as $attr => $value ) {
       if ( ! empty( $value ) ) {
        $value = ( 'href' === $attr ) ? esc_url( $value ) : esc_attr( $value );
        $attributes .= ' ' . $attr . '="' . $value . '"';
       }
    }
/* -Wdm changes- */
//Bootstrap icons - right arrow and down arrow.
    $wdm_right_arrow = ' <span class="glyphicon glyphicon-chevron-right"></span>';
    $wdm_down_arrow = ' <span class="glyphicon glyphicon-chevron-down"></span>';
/* -End of Wdm changes- */
    $item_output = $args->before;
    $item_output .= '<a' . $attributes . '>';
    /** This filter is documented in wp-includes/post-template.php */
    /* -Wdm changes- */
    if( $have_children && 'Home' != $page_name ) {
//If the page title is Architectural, I assign to it a right arrow.
       if( 'Architectural' == $page_name ) {
        $item_output .= $args->link_before . apply_filters( 'the_title', $item->title, $item->ID ) . $wdm_right_arrow . $args->link_after;
       }else{
        $item_output .= $args->link_before . apply_filters( 'the_title', $item->title, $item->ID ) . $wdm_down_arrow .$args->link_after;
       }
    }else{
       $item_output .= $args->link_before . apply_filters( 'the_title', $item->title, $item->ID ) . $args->link_after;
    }
    /* -End of Wdm changes- */
    $item_output .= '</a>';
    $item_output .= $args->after;
    $output .= apply_filters( 'walker_nav_menu_start_el', $item_output, $item, $depth, $args );
   }
public function end_el( &$output, $item, $depth = 0, $args = array() ) {
    $output .= "</li>\n";
   }
}
Alternatively, you can also paste the whole of Walker_Nav_Menu class content from wp-includes/nav-menu-template.php and edit it as per your requirement.
And that’s about it. WordPress will use our customized class to output the navigation menu just the way you want it to. Feel free to experiment with the featurettes. With the right knowledge and the right tools, WordPress can very well be your own personal web publishing playground.
When Do You Need Custom Walker Class?
Before getting into the code, it helps to know when a custom walker is actually useful.
You may need a custom walker if you want to:
- Add arrows or icons beside menu items
- Change the HTML structure of the menu output
- Assign custom classes to specific items
- Redesign submenu structure
- Create a menu that better matches the design of your website
If you only want to make visual changes using CSS, then a custom walker may not be necessary.
But if you want to control the actual output of the menu on the frontend, extending Walker_Nav_Menu is a good way to go about it.
When You May Not Need Walker Class?
A custom walker is useful, but it is not always necessary.
You may not need one if:
- you only want to change colors, spacing, or hover effects
- you only want to add a CSS class to a menu item
- your theme already provides enough menu customization options
- your requirement can be handled using filters or CSS alone
So before using a custom walker, it is always worth asking whether you really need to change the output structure of the menu.
FAQ
Is a custom walker necessary for all menu changes?
No. It is only needed when you want to change the actual menu output.
Can I add arrows without a custom walker?
Sometimes yes, using CSS. But if you want more control, a custom walker is better.
Will this affect my whole site?
It will affect the menu output where the custom walker is applied, so proper testing is important.
Conclusion
And that’s about it. WordPress will use our customized class to output the navigation menu just the way you want it to. Feel free to experiment with the featurettes. With the right knowledge and the right tools, WordPress can very well be your own personal web publishing playground.
Just remember that menu customization should not only help the navigation look different, but also make it easier for visitors to use.
If you’re considering a more flexible, easier-to-manage storefront, it might be worth looking at a structured redesign approach on WordPress.
You can explore how that works here: WordPress redesign services
It’ll give you a clearer idea of how design, performance, and conversions can be improved without constantly working around platform limitations.
Queries and suggestions? The comment section below is all yours!
A great follow up read would be about creating a simple and dynamic navigation menu in WordPress. Stay tuned for more WP tips and tricks.
You may also find the following articles helpful:
Before and After Metrics Every Business Should Track for a Redesign