
Getting started with WooCommerce Error 503
Identifying and resolving the server or website errors, such as when you need to Fix Error 503, is like finding a needle in a haystack. The errors can be a result of a combination of one or more issues that your website may have encountered.
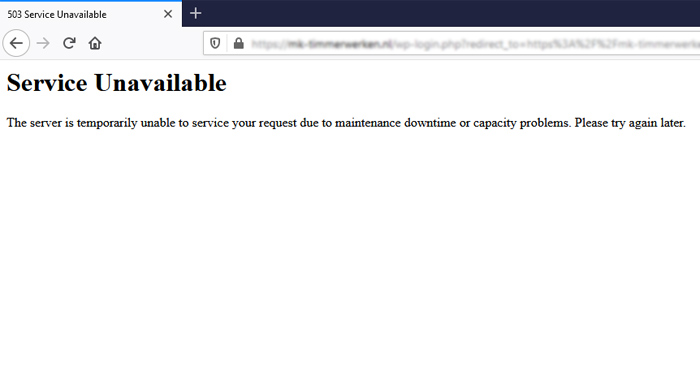
If you encounter the 503 Service Unavailable error on your WordPress site, it means your users are not able to access your WooCommerce website’s content. Ensure your WooCommerce site stays online and error-free with our WooCommerce development services.
This error occurs when your server struggles to manage the access requests from users, either due to the server overload or technical website issues. This error is generally temporary in nature unless there is technical issue that completely makes your website inaccessible.
In this guide, we’ll explore the typical causes of the 503 error and offer step-by-step instructions on how to troubleshoot and resolve it.

Source: Source
Common Causes of 503 Service Unavailable Error
Before finding the solution to the error, it is important to deep dive into what caused the error in the first place. We have listed some of the common causes of 503 error on your WordPress site –
A. Server Overload – When a large number of users try to access the website at the same time and your server lacks sufficient CPU or memory, it slows down the server often resulting in 503 Service Unavailable error.
Further, if you are using a shared webhosting setup, it often causes spacing issues resulting in access errors.
B. Plugin Issues – For every new plugin that you install, there are one or more changes to the functioning of your website. Having too many plugins may put burden on your webserver.
Similarly, old, poorly written plugins not updated at regular intervals can slow down your website and making it hard for people to get in.
C. Theme Problems – It is likely that the themes you are currently using for your WooCommerce store are incompatible due to coding bugs or resource-intensive.
D. Content Delivery Network (CDN) Issues – Error in CDNs setup can often lead to failure of customer access requests to your website.
E. Firewall Settings – If the firewall settings are configured incorrectly, lawful traffic to your webstore may be blocked.
F. Server Maintenance – When your website is under planned or unplanned maintenance, there is a good chance that users won’t be able to access your website.
G. DDoS Attacks – A Distributed Denial-of-Service or DDoS attack will flood your server with a barrage of fake requests from bots, making your website inaccessible to the genuine users. It’s an easy method for potential attackers to take down the website and make it out of reach for the users.
Steps to troubleshoot Error 503
Once you have identified the problem with your website maintenance, follow the below steps to resolve the issue
Step 1 – Check the status of website server
A. Contact your hosting provider – Reach out to your hosting provider to check if there are any issues at their end.
Also, check whether any unplanned maintenance is going on or a maintenance is scheduled for near future.
B. Check service status page – Visit your hosting provider’s service status page and check for any updates on possible server outages.
C. Check e-mail notifications – Look for any emails from your hosting provider regarding potential server issues.
Step 2 – Deactivate all Plugins on your WooCommerce store
A. Use FTP or File Manager –

Source: Source
- Download and install an FTP client like FileZilla.
- Connect the FTP client to your website using your web-hosting credentials.
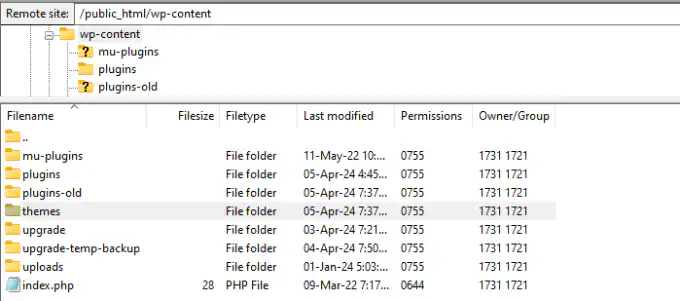
- Navigate to the public_html folder (or equivalent).
- Find the wp-content directory.

Source: Source
- Locate the plugins folder, right click and rename it to plugins_old.

Source: Source
B. Check your website –
- Visit your website to see if the 503 error is resolved or not.
- If the error disappears after plugin deactivation, it simply means that one or more of the plugins are causing the error.

Source: Source
C. Identify the plugin causing the error –
- Rename the plugins_old folder back to plugins.
- Start activating the plugin one by one through your WordPress dashboard.
- Go back and check your website after activating each plugin to identify the plugin causing the error.
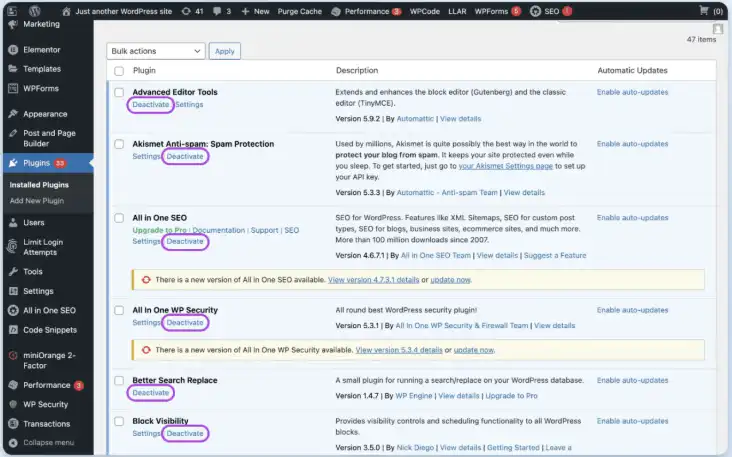
D. Deactivation through WordPress dashboard
If you are able to access your website’s WordPress dashboard, you can directly perform the plugins check using the below steps –
Source: Source
- Go to WordPress dashboard and click on Plugins.
- The list of all the active plugins on your website will appear.
- Click on Deactivate against each plugin.
- After deactivation of each plugin, try accessing your website to check if it is restored.
- If yes, the plugin that you have most recently deactivated is causing the 503 Service Unavailable error.
Master Tip – Not all plugins causing error needs to be deactivated. For instance, security plugins may put additional load on server due to their continuous scanning in the background. However, you cannot remove such plugin as it will make your website vulnerable to cyberattacks and data breach.

503 Error Still Blocking Your Store?
Every minute of downtime = lost sales. Our WooCommerce experts fix errors fast & keep your store online.
Step 3 – Switch to a Default WordPress Theme
A. Use FTP or File Manager –
- Connect to your website via an FTP as detailed above.
- Navigate to the wp-content directory.
Source: Source
- Find the themes folder.
- Rename your current theme folder.
B. Activate a Default Theme –
- If you have a default theme for your website such as Twenty Twenty Four, ensure the theme is activated.
- If there is no default theme, download and install a default theme via FTP.

Source: Source
C. Check your website –
- Visit your site to see if the error is resolved. If yes, themes are causing the error.
- Make use a compatible theme for your website.
Master Tip – If your WordPress dashboard is still functional, you can directly check the error in themes by going on WordPress Dashboard > Appearance > Themes
Step 4 – Disable the WordPress Heartbeat API
WordPress Heartbeat API can sometimes result in high usage of web servers for your website. This may cause 503 Service Unavailable error. To disable the API follow the below steps –
A. Go to Appearance and click on Theme Editor.
B. Open the functions.php file.

Source: Source
C. Add the following code to the file –
add_action(‘init’, ‘stop_heartbeat’, 1);
function stop_heartbeat() {
wp_deregister_script(‘heartbeat’);
}

Source: Source
You can also make use of Heartbeat Control plugin to resolve this issue.
Step 5 – Disable Content Delivery Network (CDN) on your website
A. Access your CDN Dashboard –
- Log in to your CDN provider’s dashboard.
- Look for options to disable or pause the CDN.
B. Check your website –
- Visit your site to see if the error is resolved after disabling the CDN.
Step 6 – Stop running unnecessary processes on your website
A. Use cPanel process manager –
- Log in to your cPanel and navigate to the ‘System Health’ section.
- Click on ‘Process Manager’.
- Identify and kill any unnecessary processes.
B. Check your website –
- Refresh your site to see if stopping the unrequisite processes resolves the error.
Step 7 – Reset Firewall settings for your WooCommerce store
A. Access the Firewall dashboard –
- Log in to your web application firewall (WAF) dashboard.
- Navigate to firewall settings.
B. Reset Firewall configuration –
- Look for an option to reset or default the configuration.
- Apply the changes and test your website. If the error is resolved, then you will have to configure your firewall settings carefully to avoid the re-occurrence of the error.
Step 8 – Enable Debug Mode
A. Edit wp-config.php –
- Use FTP to access your website files.
- Open the wp-config.php file in a text editor.
- Add the following lines before the require_once ABSPATH . ‘wp-settings.php’; line-
define(‘WP_DEBUG’, true);
define(‘WP_DEBUG_LOG’, true);
define(‘WP_DEBUG_DISPLAY’, false);
Save the changes made to the php file.

Source: Source
B. Check error logs – Check the debug.log file in the /wp-content/ folder to diagnose issues.
Master Tip – Once the error is identified and resolved, don’t forget to disable the debug mode. You can do it by setting WP_DEBUG to false.
Step 9 – Reinstall WordPress core files
A. Download a fresh copy of WordPress from the official website. Alternatively, access WordPress Dashboard > Updates > Re-install the latest version.

Source: Source
B. Extract the core files and upload them to your website via FTP, replacing the existing files.
Master Tip – Reinstall the WordPress core files will not delete your data as it is stored in the website’s database. However, don’t forget to take a backup using tools like UpdraftPlus.
How to prevent 503 Service Unavailable Error in Future
A. Make the best use of server resources
- Use scalable hosting service provider – Select a hosting company that can grow with your needs as resource usage and user traffic increase.
- Use load balancing – Distribute the user traffic to save one server from becoming overcrowded by user requests.
- Enable auto-scaling – Auto-scaling maintains your server performance during peak periods by automatically adjusting server resources based on user requests.
B. Consistent updates and maintenance
- Planning the maintenance – To reduce website interruptions, schedule server maintenance during off-peak times.
Also, try to inform the potential users about the scheduled downtime of your website for maintenance. You can make use of tools like Maintenance Mode plugin for such information.
- Software updates– Ensure that you regularly update the WordPress, plugins, and themes to prevent compatibility issues and security vulnerabilities on your website.
C. Implement caching and Content Delivery Networks (CDNs)
- Use caching – Offer static content where possible on your website by making use of caching solutions like LiteSpeed Cache to reduce the server load. The different type of caching you can use for your website are browser caching, object caching, CDN caching, and server caching.
- Deploying CDN – Make use of CDN to distribute your website content across multiple servers worldwide. This will reduce the load on your primary server.
D. Regularly track server performance
- Configure monitoring tools – Use tools like Ninja One or Dotcom-Monitor to track your website server performance, uptime, and resource usage.
Early alerts can help you to address various server issues before they result into 503 Service Unavailable error.
- Frequent website audit – Regularly conduct an audit of your website to identify unnecessary data scripts, data heavy media files, and inefficient database queries.
E. Update DNS and Firewall settings
- Fix DNS issues – Regularly check and update the DNS settings of your WooCommerce webstore to avoid response errors.
- Reset firewall settings – To prevent blocking legitimate users who are attempting to access your website, periodically review and reset firewall sets.
Conclusion
Fixing the 503 Service Unavailable error on your WordPress site requires you to first identify the error’s root cause and then take the required corrective action to fix it.
Remember! Always make a backup of your website before making any major changes and contact your hosting company if the issue continues.
Still facing difficulties with the error? Contact Wordpress Woocommerce expert now and make your website up and running in no time.


