 Let’s consider you were to host a charity basketball match, between the Chicago Bulls and Boston Celtics. Do you presume the tickets for this event a) will be sold out b) will be sold out or c) will be sold out.
Popular events are undoubtedly sold out. And considering the 6 out of 13 times I’ve been on a waitlist, popular events have waiting lists, to ensure that the tickets are always sold out.
A waiting list consists of interested customers, waiting to attended an event. Usually, although not necessarily, waitlists are created for events which have a tendency to be sold-out. So, say you have an event, which is sold out, like the Celtics v/s Bulls game. You could create a waitlist, where interested customers could then register, in case of cancellations. When an event attendee cancels, customers on the waitlist are informed, and can choose to book the ticket.
Such waitlists are an important part of managing an event. And, if you’ve taken a look at the Event Espresso (EE3) plugin, you’ll know it provides you an option to create and manage a waitlist.
If you’ve tried it out, and want to skip the Event Espresso waitlist creation basics, jump right to the ‘Automate Waitlist Creation in Event Espresso’ section. If not, read on.
[space]
How to Add a Waiting List in Event Espresso
In Event Espresso (EE3), you to can create a waiting list as an event. I tried it out, it’s pretty simple. So, say for example, you want to create a waitlist event for the Celtics v/s Bulls game. Here’s what you have to do:
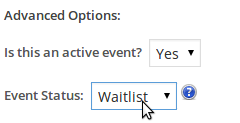
- You have to create a new event in EE3, and set the Event status as ‘Waitlist’.
- Add a new event, Celtics v/s Bulls Waitlist
- In Event Options -> Advanced Options, select ‘Waitlist‘, in the Event Status drop-down list
- Publish the event
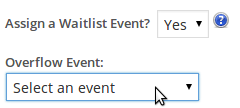
- Then, you assign the waitlist event to the original event. Basically link the Celtics v/s Bulls Waitlist to your Celtics v/s Bulls event. This can be done by editing your original event.
- Edit the Celtics v/s Bulls event
- In Event Options -> Advanced Options, select ‘Celtics v/s Bulls Waitlist’, as the Overflow Event
- Update the event
- Once you’ve done this, interested customers will be automatically prompted to ‘Join Waiting List’, once the original event is sold-out.
Although the steps are quite simple, they can be time consuming when you have several events to manage, and want to create a waitlist for each event on your website. I’ll help you out here. You can automate waitlist event creation, using hooks provided by the Event Espresso plugin.
[space]
Automate Waitlist Creation in Event Espresso (EE3)
To auto-create a waitlist event in EE3, we’ll follow the below logical steps:
- Register to the Event Creation Hook
- Create a Waitlist Event
- Assign Waitlist Event as Overflow event
Sounds good? Let’s elaborate each step.
Step 1: Register to the Event Creation Hook
The ‘action_hook_espresso_insert_event_success’ hook is invoked in Event Espresso each time an event is created. We’ll add a function on this hook.
add_action( 'action_hook_espresso_insert_event_success', 'wdm_create_waitlist_event', 10, 1 );
function wdm_create_waitlist_event($_REQUEST) {
    /* the $_REQUEST variable is maintained by Event Espresso and contains data of the recently created event */
}
Step 2: Create a Waitlist Event
To create a waitlist event we’ll call the add_event_to_db() function, inside the function we’ve created.
function wdm_create_waitlist_event($_REQUEST) {
    // the $_REQUEST will contain details of the recently created event
    $original_event_id = $_REQUEST['event_id'];

    // create a new event for the waiting list
    $waitlist_event_name = $_REQUEST['event'].' Waitlist';
    add_event_to_db();

    // the $_REQUEST will now contain details of the newly created event
    $waitlist_event_id = $_REQUEST['event_id'];

    // Event Espresso will set default values for the newly created event. You will then have to update the event name, and set the Event Status as 'Waitlist'
    $wpdb->query( $wpdb->prepare( "UPDATE ".EVENTS_DETAIL_TABLE." SET event_status=%s, event_name=%s WHERE id=%d", 'S', $waitlist_event_name, $waitlist_event_id ) );
}
Step 3: Assign Waitlist Event as Overflow event
The final step is to assign the waitlist event as the overflow event. For this, we have to update the original event. Add the following to the wdm_create_waitlist_event function.
$wpdb->query( $wpdb->prepare( "UPDATE ".EVENTS_DETAIL_TABLE." SET allow_overflow=%s, overflow_event_id=%d WHERE id=%d",'Y', $waitlist_event_id, $original_event_id ) );
If you want to charge a fee for your waitlist event that’s just as well. The default settings will allow just that. However, if you want to not charge a fee, but simply allow interested customers to register, you can do so by disabling payment gateways for waitlist events.
[space]
And done! You could add this code in functions.php of your theme, or create a new plugin. Once this code is in place, you do not have to worry about manually creating waitlist events. But again, I must mention that this is possible only in Event Espresso (EE3). EE4 does not have an option to creating waitlists. Do let me know your thoughts and questions in the comment section below.
[freepik]






2 Responses
it doesn’t work.
my entry was duplicated 1000 over times instead.
I put the codes into my theme’s function.php file.
Is there any thing i missed out?
Hey,
Have you used the exact same code or modified it?